Category Mapping
Each sales channel has its own taxonomy — a list of categories and subcategories used to place products. Most likely, your store's structure differs from this taxonomy.
Category Mapping lets Mulwi automatically replace your Shopify categories, collections and product types in the feed with the corresponding categories of your sales channel.
You just map your store's structure to the channel's taxonomy once, and then add the new mapping to your feeds.
Set up a category mapping
Mapping your store's structure to other taxonomies requires a lot of planning and attention. Therefore, to avoid being distracted by basic settings, we recommend dividing the setup process into two steps: first create an empty category mapping, and only then configure the mapping.
NOTE
If your store has only one Shopify category, collection, or product type, you don't necessarily have to create a category mapping. You can manually enter the sales channel's corresponding category directly in the template when you use category mapping in the feed.
Create an empty category mapping
To create an empty category mapping, follow these steps:
Steps for creating an empty category mapping in Mulwi
- In your Shopify admin, go to Apps > Mulwi Feeds > Feed tools.
- Click Add category mapping.
- In the pop-up window, choose from the dropdown menu the taxonomy you want to map your structure to. If you want to use a custom taxonomy, select No taxonomy. Note that you won't be able to change the taxonomy after you create the mapping.
- Click Create.
- Fill in the mapping's general information:
- Name. Give your mapping a descriptive name. You will use this name to find this particular mapping among other mappings.
- Internal Code. Enter a unique string of letters, numbers, and symbols without spaces. You will use this code to access this mapping in the feed's template.
- Click Save at the top of the page to finish and create an empty category mapping.
Once you've created an empty category mapping, you should next configure this mapping.
Configure a category mapping
Mapping configuration includes selecting the order of mapping and the category mapping itself. You can either map categories manually or use AI category mapping.
Once you finish configuring the mapping, you can then start using it to map categories in feeds.
Select the order of mapping
On the mapping's configuration page, you can choose the Mapping order in which the mappings are applied to your products.
The order of the mapped fields is represented as a table where each row corresponds to one Shopify field.
You can change the order of the mapped fields by dragging around the table's rows.
To do this, click and hold the vertical dotted lines icon next to a row, and then drag it to the desired position.

Mulwi determines a product's mapped category by checking the fields in your defined order from top to bottom. The mapping process works in such way:
Mulwi first checks the mapping for your top-most field. If any of the product's values from this field has an explicitly mapped category, Mulwi uses the category of the first explicitly mapped value it finds.
If the top-most field has no explicit mappings, Mulwi checks the next field in your defined order, applying the same logic as in step 1. This process continues down the list of Shopify fields until an explicit mapping is found.
If none of the product's fields have an explicit mapping, Mulwi automatically assigns the default category to the product.
NOTE
We recommend mapping by the Shopify category or product type first for the exact classification, as products can belong to many different collections but have only one category and one type.
Map categories manually
You specify mapped categories in the Fields available for mapping section of the mapping's configuration page.
A Default Category, which you enter in the respective input field, is automatically assigned to all uncategorized products and products without defined mapping.
You map Shopify categories, product types, and collections on separate tabs. An indicator next to each tab name shows how many fields you've already mapped within that tab.
Each tab contains a table featuring all your field values and their mapped categories. You can filter this table by clicking on the search icon next to the tab toggles.
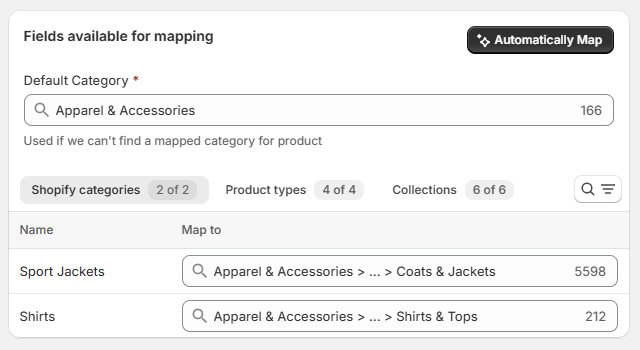
To add a mapped category to the field's value, simply enter the appropriate taxonomy category in the input field next to the value name.
If you've selected a preinstalled channel taxonomy, you can use autocomplete to find the necessary category faster. For that, start typing the category name or ID in the input field and choose the desired category from the dropdown menu.
You can preview how your products will be mapped in the feed by clicking the Validate & Preview button.
Map categories using AI
You can map your categories using Mulwi's AI by simply clicking the Automatically Map button on the mapping's configuration page.
We work tirelessly to make our AI category mapping as accurate as possible, but sometimes it may map your products into not the most suitable categories. Thus, always check our AI's output and, if necessary, fix imperfect AI mapping manually.
You can also preview how your products will be mapped in the feed by clicking the Validate & Preview button.
Use mapping in the feed
Adding category mapping is slightly different for prebuilt templates, customized CSV/TXT/XLSX templates, and customized XML templates.
Use mapping in a prebuilt template
To add category mapping to a prebuilt feed template, follow these steps:
- In your Shopify admin, go to Apps > Mulwi Feeds > Feeds.
- Click Edit next to the feed you need.
- Find the Template section.
- Check if the Template section has a Categorization input block.
- Select the situation you're facing from the options below and follow the instructions inside.
My feed template doesn't have a Categorization input block
Category mapping may be optional or unnecessary for some sales channels. In this case, the prebuilt template for that channel won't have a Categorization input block.
If your sales channel supports the category attribute and you want to provide category information, then here's what you should do next:
- Customize your template.
- Add the category attribute according to your chosen channel's requirements.
- Apply category mapping to your CSV/TXT/XLSX template or XML template.
There is a Categorization input block, I want to add a single mapped category manually
In this case, here's what you should do next:
- Click the Static Category toggle.
- In the input field under the toggle, start typing the category name or ID and choose the appropriate category from the dropdown menu.
- Click Save at the top of the page to apply new settings.
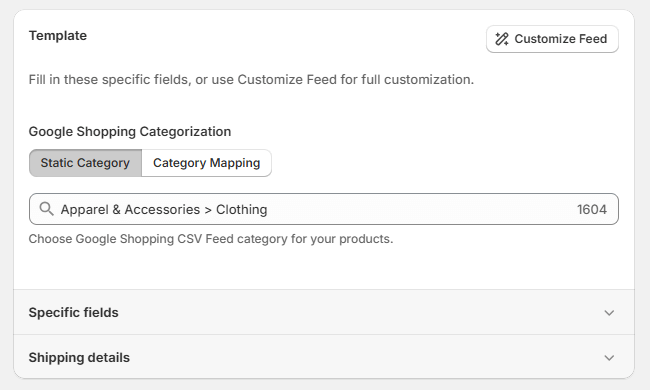
Static mapping to a single category in a prebuilt feed template
There is a Categorization input block, I want to use the category mapping I've created
In this case, here's what you should do next:
- Click the Category Mapping toggle.
- In the input field under the toggle, choose the appropriate category mapping from the dropdown menu.
- Click Save at the top of the page to apply new settings.
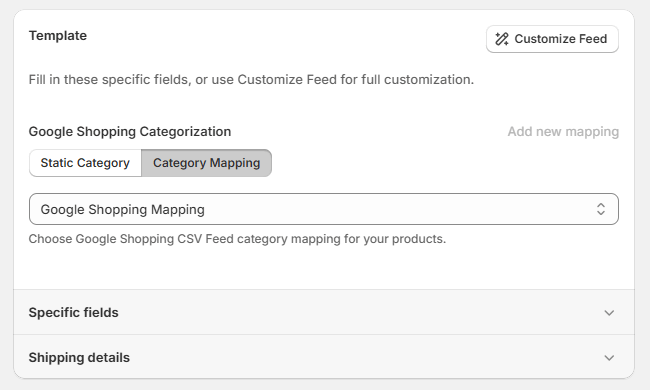
Dynamic category mapping in a prebuilt feed template
Use mapping in a custom CSV/TXT/XLSX template
To add category mapping to a custom CSV/TXT/XLSX feed template, follow these steps:
- In your Shopify admin, go to Apps > Mulwi Feeds > Feeds.
- Click Edit next to the feed you need.
- Find the Template section.
- Click Edit template.
- In the Columns section of the template editor, find the sales channel's category attribute.
- Select the situation you're facing from the options below and follow the instructions inside.
I want to add a single mapped category manually
In this case, here's what you should do next:
- Set Expression as the category attribute's data Type.
- Enter the appropriate category name or ID as a single line in the Value field.
- Click Save at the top of the page to apply new settings.

Static mapping to a single category in a CSV/TXT/XLSX feed template
I want to use a category mapping I've created before
In this case, here's what you should do next:
- Set Attribute as the category attribute's data Type.
- Choose the category mapping from the dropdown menu in the Value field.
- Click Save at the top of the page to apply new settings.

Dynamic category mapping in a CSV/TXT/XLSX feed template
Use mapping in a custom XML template
To add category mapping to a custom XML feed template, follow these steps:
- In your Shopify admin, go to Apps > Mulwi Feeds > Feeds.
- Click Edit next to the feed you need.
- Find the Template section.
- Click Edit template.
- In the Template editor, find the sales channel's category attribute.
- Select the situation you're facing from the options below and follow the instructions inside.
I want to add a single mapped category manually
In this case, simply add the appropriate category name or ID to the attribute's value.
Example
Here's how you would add a static category name to a Google Shopping feed template:
<g:google_product_category><![CDATA[{{ "Apparel & Accessories > Clothing > Shirts & Tops > T-Shirts" }}]]></g:google_product_category>
Once you've finished adding the mapping, click Save at the top of the page to apply new settings to your feed.
I want to use a category mapping I've created before
In this case, add the category mapping to the attribute's value using Liquid Objects. You can view how to use the Liquid Objects of a specific mapping by clicking Variables & Filters at the top of the feed template's editor.
Each category mapping has two Liquid Objects:
XXX.attr_YYY. Returns the mapped category's name.XXX.attr_YYY_id. Returns the mapped category's ID.
Here XXX is the feed's context (product or variant) and YYY is the mapping's internal code.
Example
Assume that you have:
- A category mapping with the
gs_mappinginternal code; - A custom Google Shopping XML feed in product variant context.
In this case, you would add the mapped category names to the feed in such way:
<g:google_product_category><![CDATA[{{ variant.attr_gs_mapping }}]]></g:google_product_category>
If you wanted to add mapped category IDs instead, here's how you would do that:
<g:google_product_category><![CDATA[{{ variant.attr_gs_mapping_id }}]]></g:google_product_category>
Once you've finished adding the mapping, click Save at the top of the page to apply new settings to your feed.