Dynamic Expressions
With Dynamic Expressions, you can write custom logic in the Shopify Liquid language to create dynamic string values for your feed.
Set up a dynamic expression
Building a working expression requires a lot of planning and attention. Therefore, to avoid being distracted by basic settings, we recommend dividing the setup process into two steps: first create an empty dynamic expression, and only then write the expression's logic.
NOTE
When using item attributes in a dynamic expression, it's important to know the context (content type) of a feed for which you set up an expression. If the feed's context doesn't match the attributes used in the expression, the output may be incorrect.
For guidance on how to find out a feed's context, please see the Common Questions page.
Create an empty dynamic expression
To create an empty dynamic expression, follow these steps:
Steps for creating an empty dynamic expression in Mulwi
- In your Shopify admin, go to Apps > Mulwi Feeds > Feed tools.
- Click Add dynamic expression.
- Fill in the expression's general information:
- Name. Give your expression a descriptive name. You will use this name to find this particular expression among other expressions.
- Internal Code. Enter a unique string of letters, numbers, and symbols without spaces. You will use this code to access this expression in the feed's template.
- Click Save at the top of the page to finish and create a dynamic expression.
Once you've created an empty dynamic expression, you should next write this expression's logic.
Write an expression's logic
You write an expression's logic inside the Liquid expression text editor on the dynamic expression's configuration page.
Apart from the Shopify Liquid language capabilities, you can freely use any of Mulwi's Liquid objects and Liquid filters in your dynamic expressions.
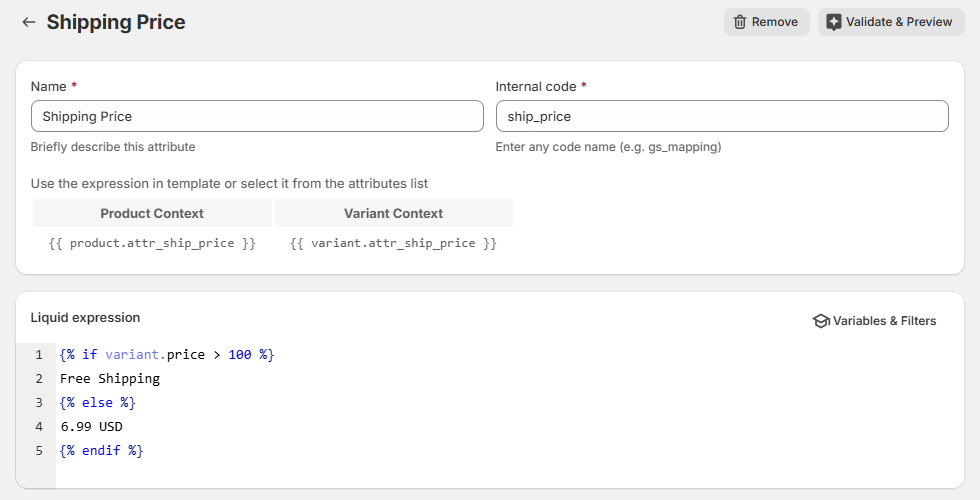
For your convenience, the expression's editor has a quick reference of all the Liquid objects and Liquid filters that you can use in this expression. You can view this reference at any time by clicking Variables & Filters at the top of the expression's editor.
You can preview how your expression will be evaluated in the feed by clicking the Validate & Preview button.
Once you finish writing the expression's logic, you can then start using the dynamic expression in feeds.
NOTE
We know that dynamic expressions might seem very complex, so don't hesitate to contact our support team if you ever need help.
Use dynamic expression in the feed
Using dynamic expressions is slightly different for prebuilt templates, customized CSV/TXT/XLSX templates, and customized XML templates.
Use dynamic expression in a prebuilt template
To add a dynamic expression to an attribute in a prebuilt feed template, follow these steps:
Steps for adding a dynamic expression to an attribute in a prebuilt feed template
- In your Shopify admin, go to Apps > Mulwi Feeds > Feeds.
- Click Edit next to the feed you need.
- Find the Template section.
- Set Attribute as the data type of the attribute you need.
- In the input field next to the data type selector, choose the appropriate dynamic expression from the dropdown menu.
- Click Save at the top of the page to apply new settings.

Using dynamic expression in a prebuilt feed template
NOTE
If you can't find the attribute you need in the prebuilt feed's Template section, you must first customize your feed and only then add the dynamic expression to your custom CSV/TXT/XLSX or XML feed.
Use dynamic expression in a custom CSV/TXT/XLSX template
To add a dynamic expression to an attribute in a custom CSV/TXT/XLSX template, follow these steps:
Steps for adding a dynamic expression to an attribute in a custom CSV/TXT/XLSX template
- In your Shopify admin, go to Apps > Mulwi Feeds > Feeds.
- Click Edit next to the feed you need.
- Find the Template section.
- Click Edit template.
- In the Columns section of the template editor, find the attribute you need.
- Set Attribute as the attribute's data Type.
- In the Value input field next to the data type selector, choose the appropriate dynamic expression from the dropdown menu.
- Click Save at the top of the page to apply new settings.

Using dynamic expression in a custom CSV/TXT/XLSX feed template
Use dynamic expression in a custom XML template
To add a dynamic expression to an attribute in a custom XML template, follow these steps:
Steps for adding a dynamic expression to an attribute in a custom XML template
- In your Shopify admin, go to Apps > Mulwi Feeds > Feeds.
- Click Edit next to the feed you need.
- Find the Template section.
- Click Edit template.
- In the Template editor, find the attribute you need.
- Add the dynamic expression to the attribute's value using its respective Liquid Object:
XXX.attr_YYY(hereXXXis the feed's context (product or variant) andYYYis the expression's internal code). You can view how to use the Liquid Object of a specific expression by clicking Variables & Filters at the top of the feed template's editor. - Click Save at the top of the page to apply new settings.
Example
Assume that you have:
- An attribute containing an item's title;
- A dynamic expression with the
gs_title_optimizeinternal code; - A custom Google Shopping XML feed in product variant context.
In this case, you would add the dynamic expression to the title attribute in such way:
<g:gender><![CDATA[{{ variant.gs_title_optimize }}]]></g:gender>
Dynamic expressions examples
Here we've provided examples of some commonly used dynamic expressions.
Optimize titles for apparel items
The dynamic expressions below build a search-optimized title for apparel items, expanding the original title with additional information.
{{ product.vendor }} {{ product.title }}
{{ variant.vendor }} {{ variant.title }} - Size {{ variant.size }}
Add shipping details to Google Shopping XML feed
The dynamic expression below returns an XML object in Google Shopping format for an item's shipping option. An in-line conditional block dynamically determines an item's shipping rate based on price.
<g:shipping>
<g:country>US</g:country>
<g:region>NY</g:region>
<g:service>Express</g:service>
<g:price>{% if variant.price > 100 %}0.0{% else %}15.00{% endif %} USD</g:price>
<g:min_handling_time>1</g:min_handling_time>
<g:max_handling_time>3</g:max_handling_time>
<g:min_transit_time>2</g:min_transit_time>
<g:max_transit_time>4</g:max_transit_time>
</g:shipping>
NOTE
This expression is intended for feeds with product variant context.
To use this expression in feeds with product context, simply replace variant.price with product.price.
Create custom message with an item's special deals
The dynamic expression below builds a custom message with an item's deals like free shipping and save amount during discount. Items without deals will have an empty message.
{% assign deals = '' %}
{% if variant.qty < 5 %}
  {% assign deals = deals | append: 'Low stock ' %}
{% endif %}
{% if variant.price > 100 %}
  {% assign deals = deals | append: 'Free Shipping ' %}
{% endif %}
{% if variant.price < variant.compare_at_price %}
  {% assign save_amt = variant.compare_at_price | minus: variant.price | currency %}
  {% assign deals = deals | append: 'Save ' | append: save_amt %}
{% endif %}
{{ deals | strip }}
NOTE
This expression is intended for feeds with product variant context.
To use this expression in feeds with product context, simply replace variant.XXX with product.XXX, where XXX is the item's attributes.