OTTO Integration
Mulwi Shopping Feeds OTTO integration allows to do the following:
- Create and import new products from Shopify to OTTO
- Automatically update product price and quantity changes from Shopify to OTTO
- Automatically translate exported listings via translation services
- Automatically export new Orders from OTTO to Shopify
Main Settings
How to create and connect the OTTO Integration
Log in to your Shopify store admin and follow these steps to create an OTTO integration:
Navigate to Apps > Mulwi Feeds > Integrations. Click the Add Integration button.
Click the Select button in front of the OTTO line.
Name your connection and click Save connection.
Follow these steps and fill in the required fields to finish the setup:
1. Authorization

In this step, click the Sign in with OTTO button. You will be redirected to your OTTO merchant account where you will need to confirm Mulwi's access to your account.
After confirmation, you will be redirected to back Mulwi. Click the Save and Continue button in the OTTO integration setup.
As a result, in the Service Provider tab on OTTO, you will see the Mulwi app with the status Active.
This means that everything has been set up correctly.
2. Configuration
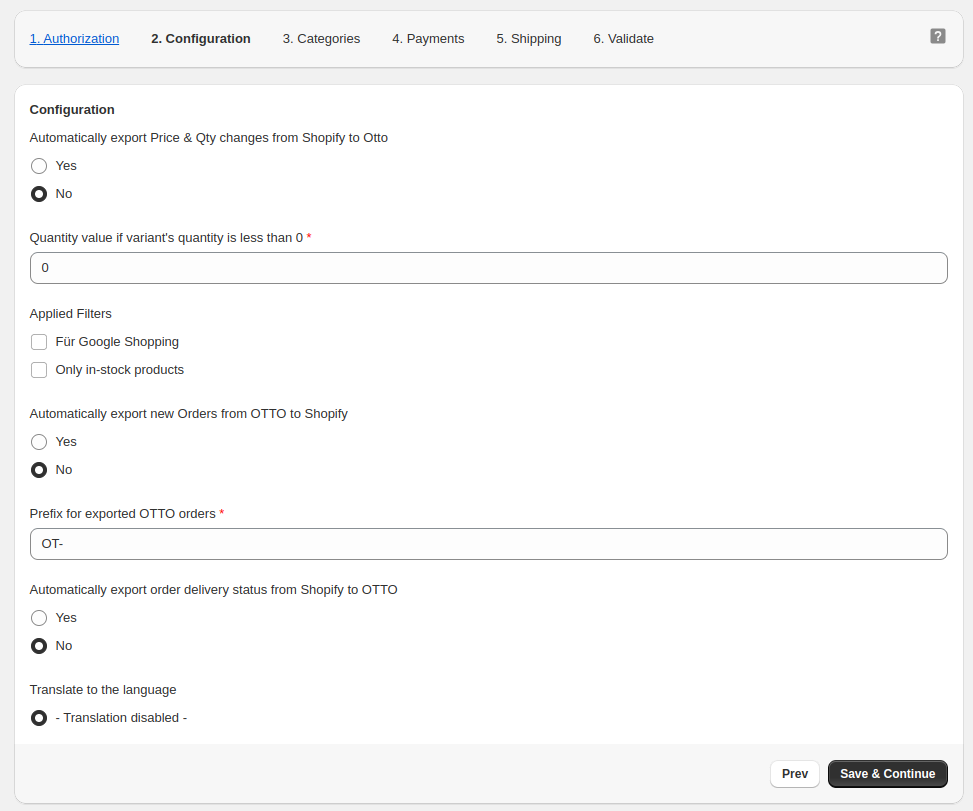
In this step, you configure the basic integration settings:
Automatically export Price & Qty changes from Shopify to OTTO.
If you enable this option, Mulwi will automatically update product price and quantity on OTTO when they change in Shopify.Quantity value if variant's quantity is less than 0.
If a product variant has a quantity less than 0, Mulwi will set the quantity to the value you specify.Applied Filters.
Use filters to choose what products to exclude from listings on OTTO.
Check the information on creating filters on the Feeds > Filter exported products page.Automatically export new Orders from OTTO to Shopify.
If you enable this option, Mulwi will automatically add OTTO orders to Shopify.
You can process these orders in the same way as the default Shopify orders.Prefix for exported OTTO orders.
All orders Mulwi imports from OTTO will have this prefix in their name, for example "OT-0001".Automatically export order delivery status from Shopify to OTTO.
To enable this option, please contact our support team.Translate to the language.
Translate your listings if necessary.
To enable translations, go to the Translate the feed page for steps and details.
After you finish the integration setup, you will be able to change these settings in the Configuration menu.
3. Categories
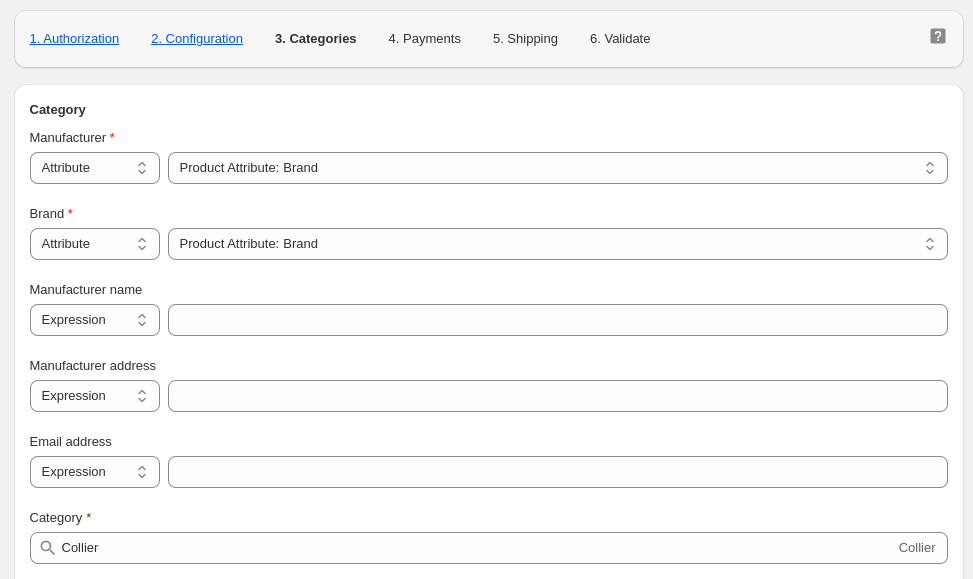
In this step, you create a default category for your products.
If you have multiple categories in your store, you will be able to create a template for each category after you finish the integration setup.
Enter the Manufacturer and Brand of your products, Manufacturer name, Manufacturer address, and Email address.
You can use Liquid Objects to customize the output for each field.
OTTO uses its own category names.
In the Category field, start typing the name of your main category.
Autocomplete will propose available category names from the OTTO taxonomy list.
Select the appropriate category from the dropdown.
Depending on the selected category, you might need to fill in additional product attributes.
The required fields are marked with a red asterisk.
4. Payments
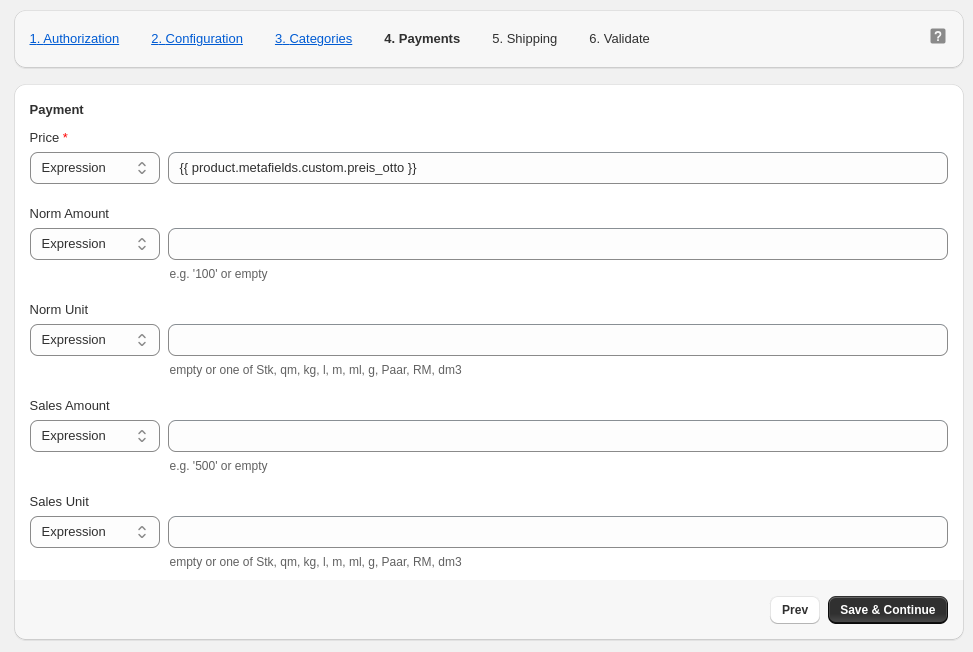
In this step, you set the default payment settings for your products.
Enter the Price of your products. Optionally enter the Norm and Sales quantity parameters.
You can use Liquid Objects to customize the output for each field.
5. Shipping
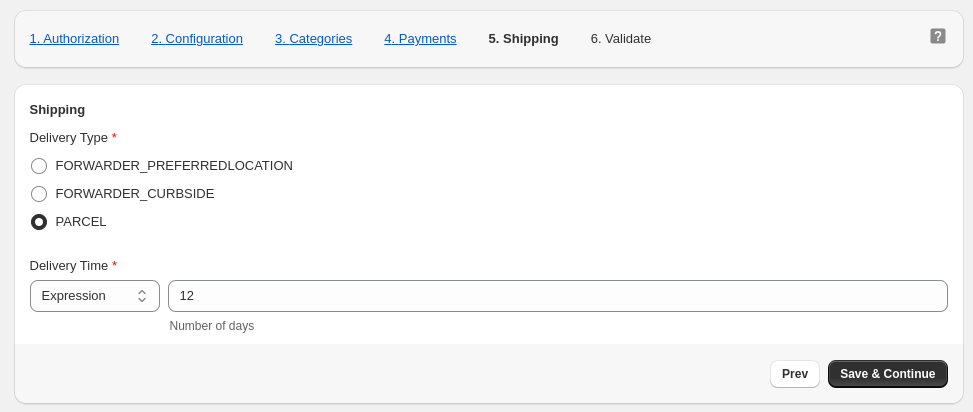
In this step, you set the default shipping settings for your products.
Select the Delivery Type and enter the Delivery Time.
You can use Liquid Objects to customize the output for the Delivery Time.
6. Validate
Mulwi will establish the connection with OTTO and validate the values you've entered.
If everything's successful, you will see the success message:

Click Create listings to start adding your products to OTTO.
How to list products after connection
When Mulwi finishes connecting to your OTTO account, go to the Templates tab on the main integration page and follow these steps to add your products to OTTO:
- Configure Templates (Templates tab)
- Add products to Listings (Products tab)
- Check Templates applied to Listings
- Publish product Listings to OTTO (Listings tab)
Templates
Templates let you customize product attributes.
The Default templates store the main configurations you've set up during the initial OTTO integration connection.
You can edit the Default templates or create new ones.
Note that templates must be applied to the listings to become active.
To create a new template, do the following:
- Click the Add Template button.
- In the Type field, select the template type from the dropdown.
- Fill in the input fields. The required ones are marked with a red asterisk.
You can use Dynamic Conditions, Dynamic Expressions, and Liquid Objects to customize the output. - Click the Save button to finish and save your template.
⚠️ Once you save a new template, you won't be able to change its type.
Each template type is displayed in a separate tab. There are four template types:
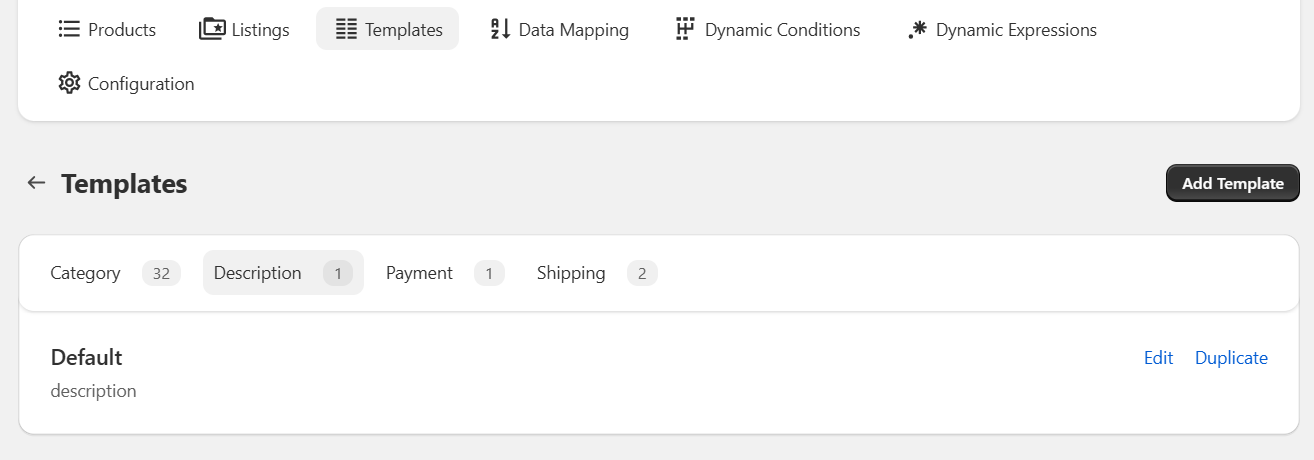
1. Category Templates
The Category template lets you set up these product attributes:
- Category (required)
- Manufacturer (required)
- Brand (required)
- Manufacturer name
- Manufacturer address
- Email address
Depending on the selected category, you might need to fill in additional product attributes.
2. Description Templates
The Description template lets you set up these product attributes:
- Description (required)
- EAN (required)
- GTIN (required)
- Product line
- Bullet points
3. Payment Templates
The Payment template lets you set up these product attributes:
- Price (required)
- Norm Amount
- Norm Unit
- Sales Amount
- Sales Unit
4. Shipping Templates
The Shipping template lets you set up delivery type and delivery time.
Products
On this page, you decide what products to list on the OTTO marketplace.
Mulwi shows here all available products in your store.
You can filter your products by Product Type, Collection, and Tag.
To apply filters, click the + icon on the top panel and choose the filter you need.
Tick the checkboxes near the products you want to list.
If you want to select all available products, tick the checkbox near any product you need and click the Select all items button in the table header.
After selecting the products you need, click the Create Listing button in the table header.
In the modal window, choose the appropriate templates and click Save to create listings.
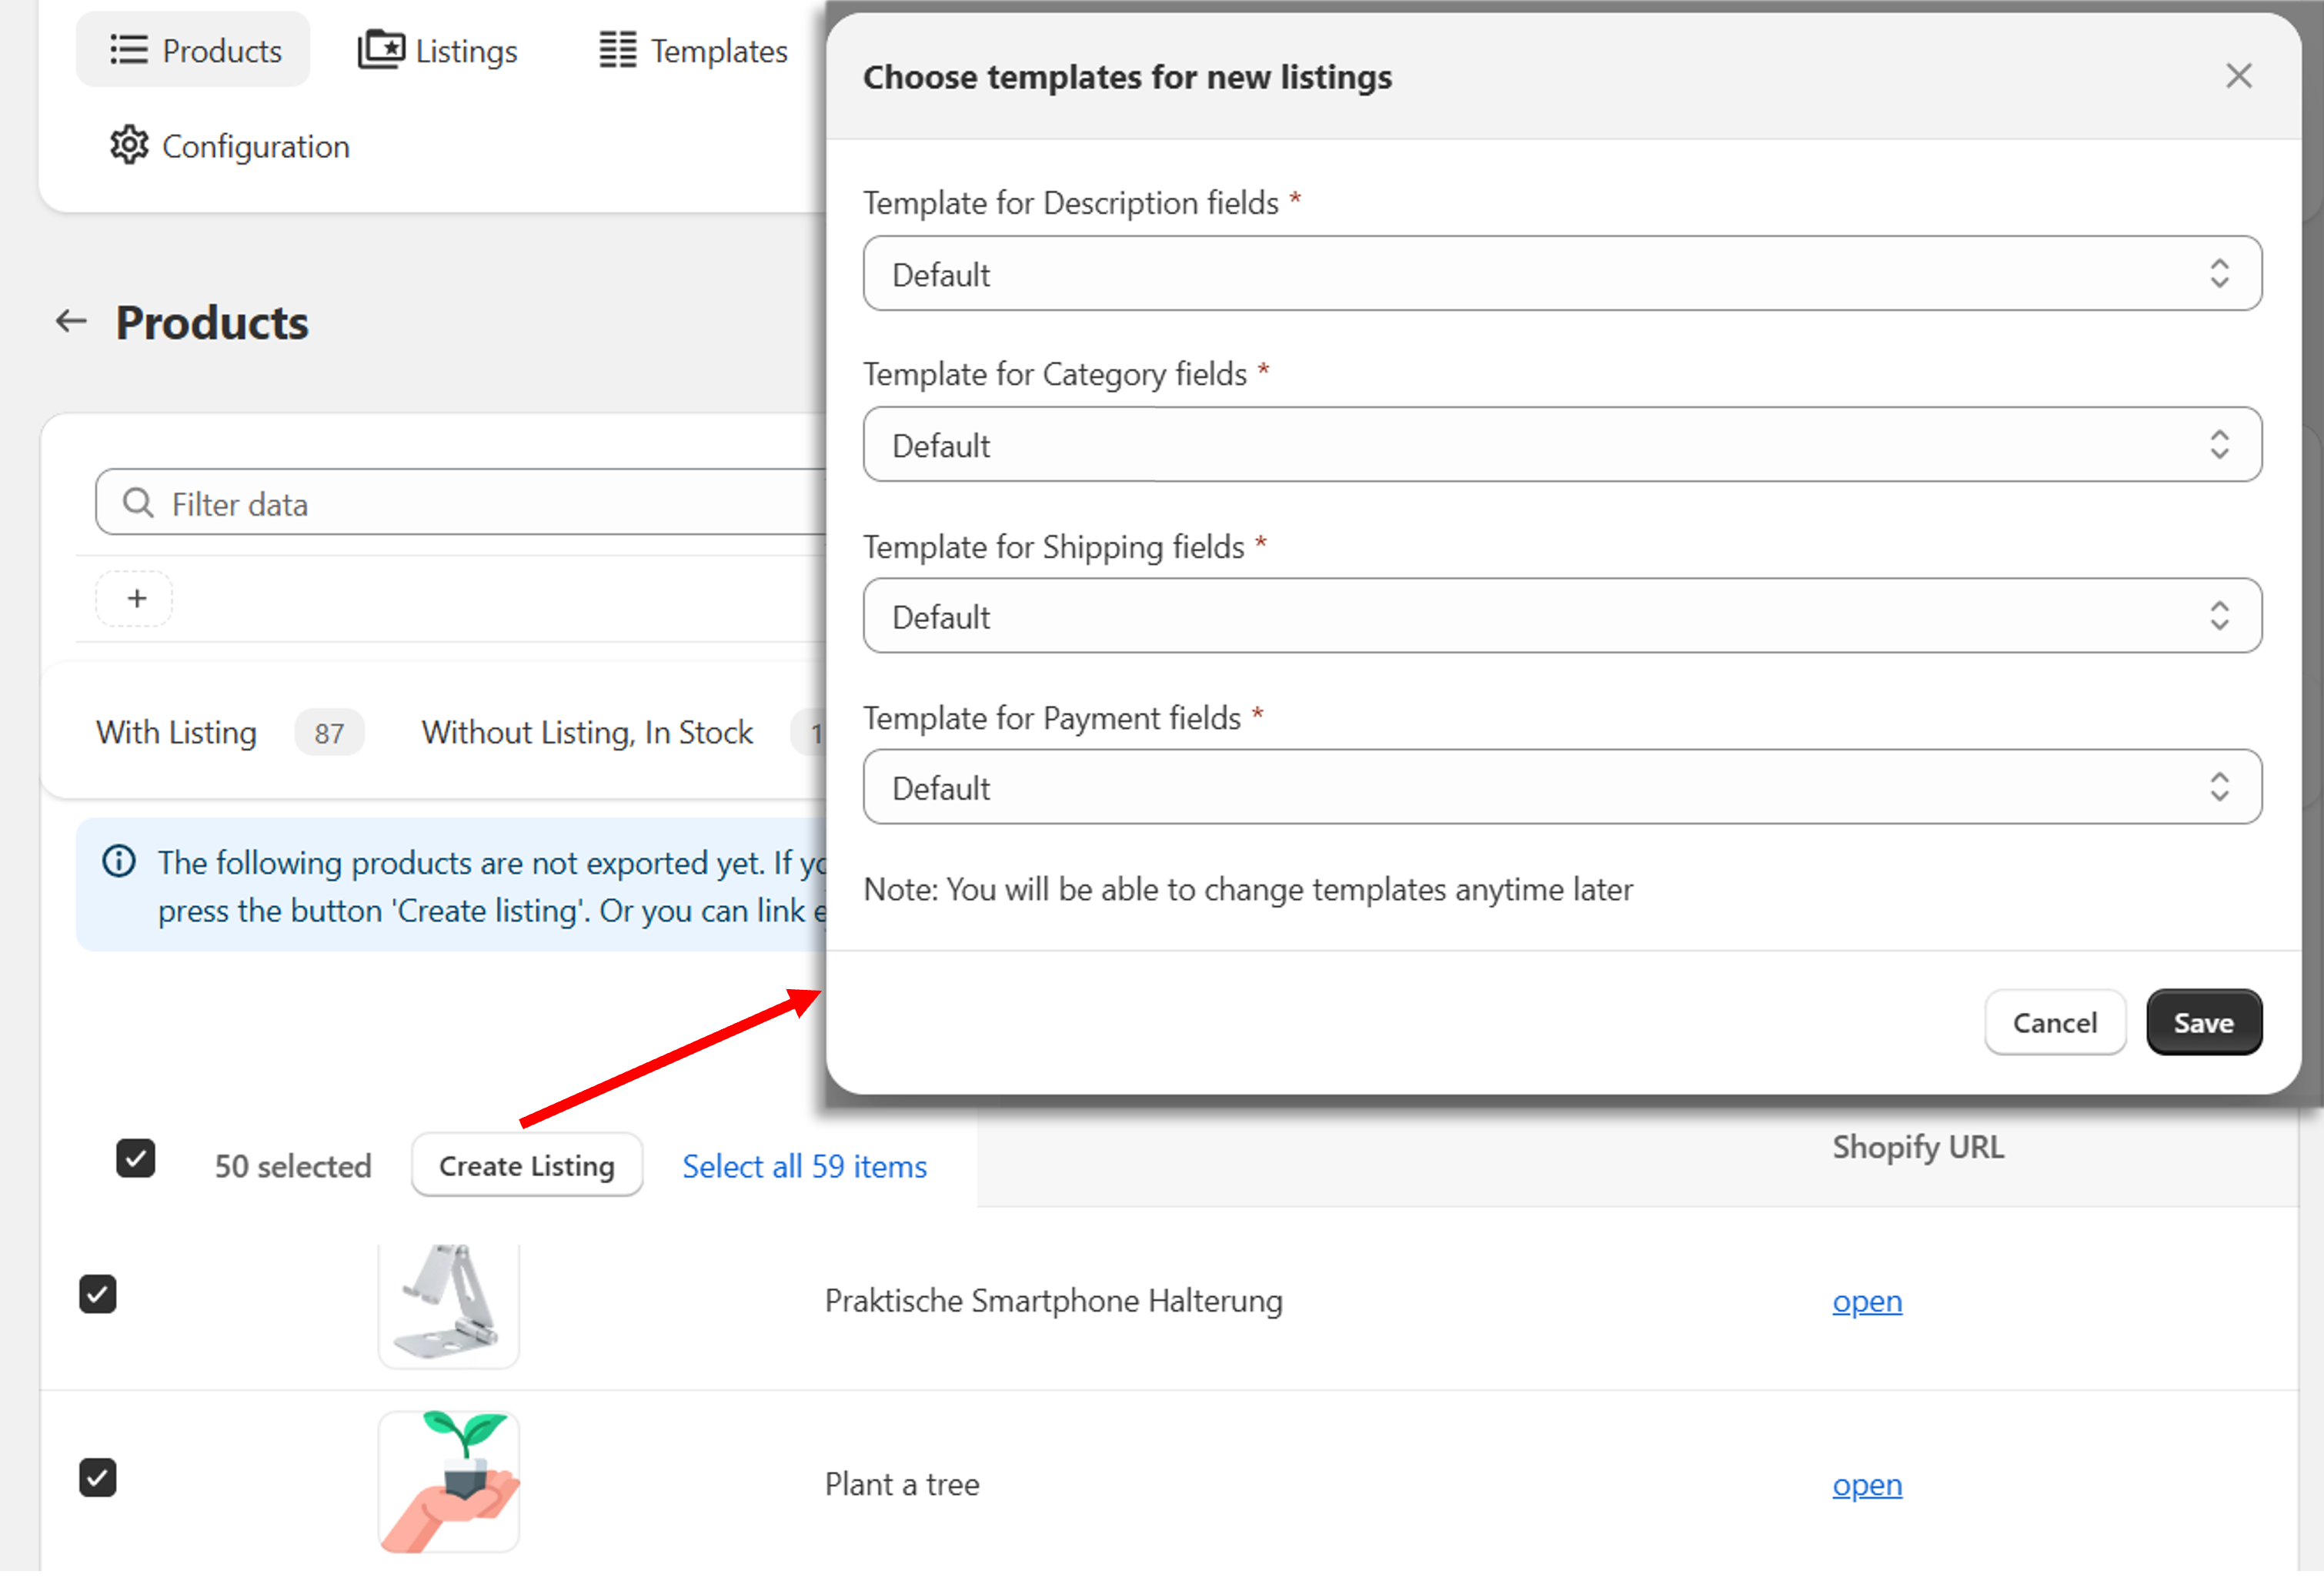
To see your listings, go to the Listings tab.
How to apply new Templates to Listings
To check and change templates for your listing, follow these steps:
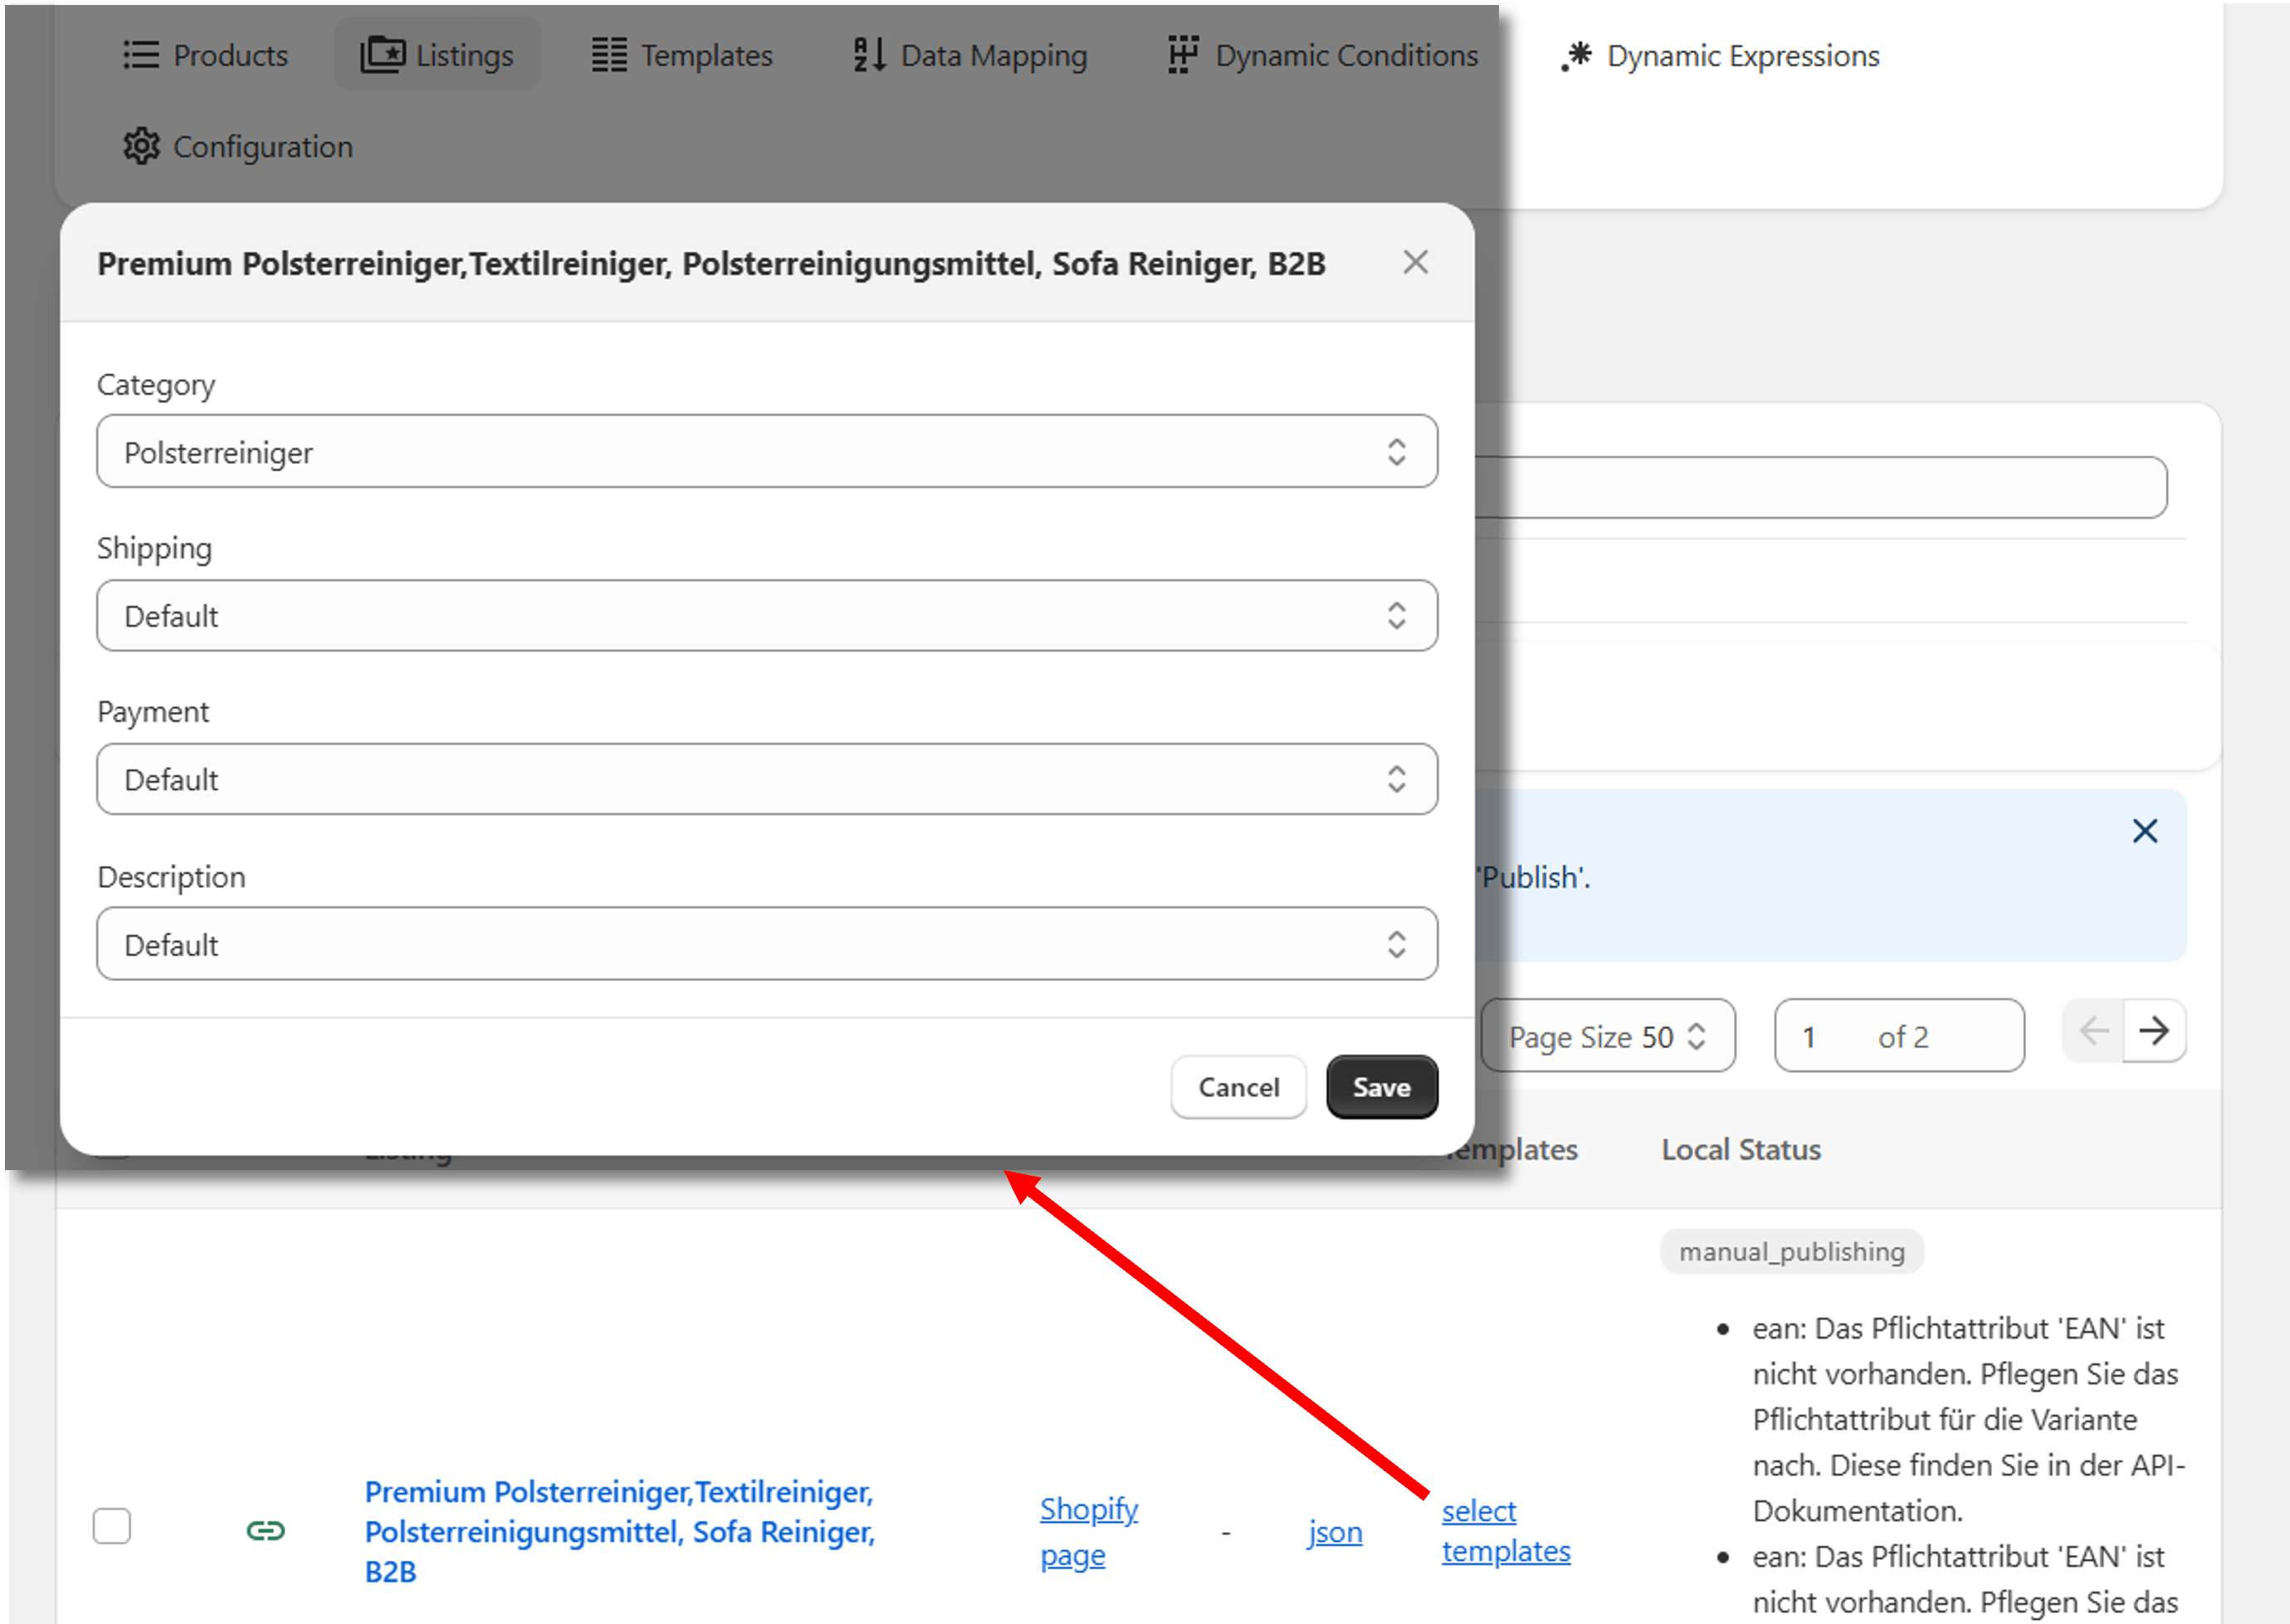
- Go to the Listings tab and find the Templates column.
- Click Select templates near the listing you want to configure.
- Choose the appropriate templates and click Save to confirm changes.
You can also change templates for multiple listings at once.
To do that, tick the checkboxes near the listings you want to edit and click the Update Template button in the table header.
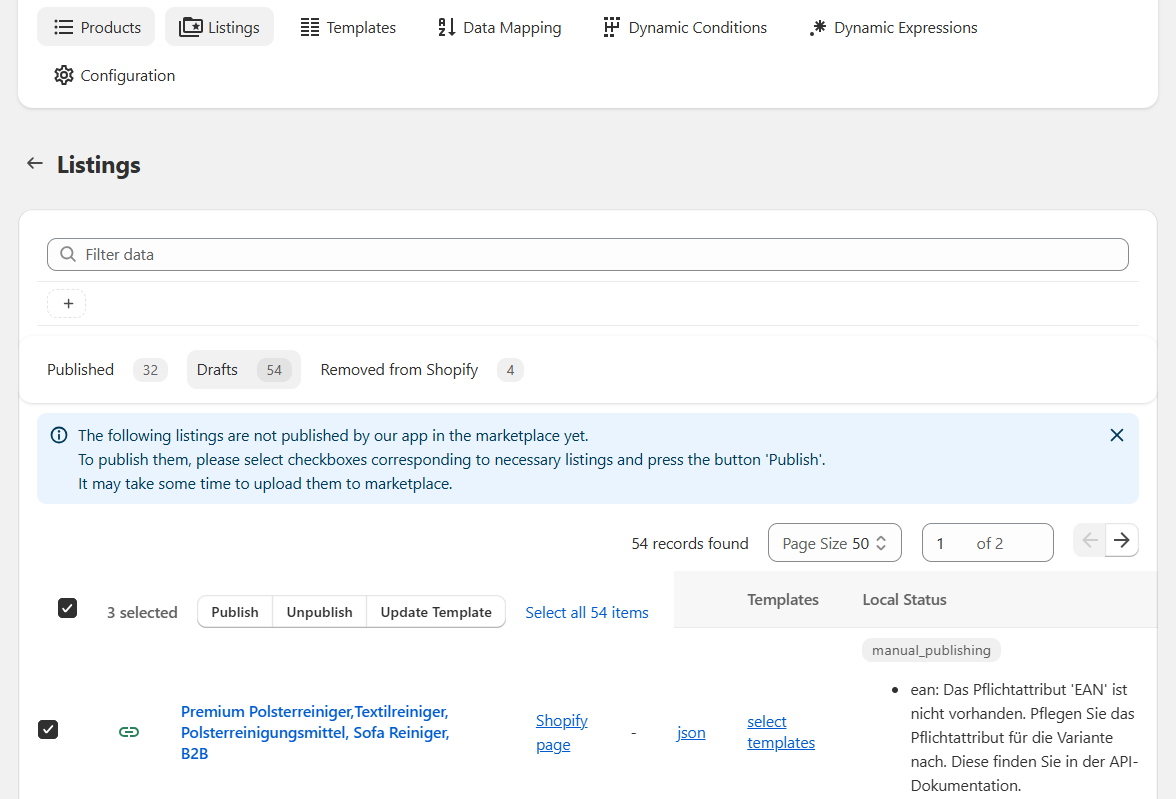
Listings
On this page, you publish listings on the OTTO marketplace.
Be sure to check the applied Templates before publishing.
Tick the checkboxes near the listings you want to publish. If you want to select all available listings, tick the checkbox near any listing you need and click the Select all items button in the table header.
After selecting the listings you need, click the Publish button in the table header to add these listings to OTTO.
Uploading the products may take a few minutes. If OTTO successfully imports your products, the listings will receive the status Published and will be added to the Published block.
Listings that had problems during publishing will be moved to the Errors block.
All of these listings will come with an error message to help you understand what needs to be fixed.
After fixing the errors, you will need to publish these listings manually.
