You're losing out big if you're not selling on Google. With billions of searches every day, Google is the #1 channel for getting traffic and sales.
But when it comes to displaying your products on Google, it can be hard to choose where to start. Should you stick solely with Free Listings, invest in Shopping Ads, or combine both?
In this article, we'll compare Google Free Listings and Google Shopping Ads, examine the best use cases for each, and show you how to quickly get started with both using a single product feed.
What are Google Shopping Free Listings?
Free Listings, as the name suggests, let you show products in Google's search results at no cost. They are the easiest and cheapest way to get your items in front of all Google users.
Any e-commerce retailer that sells physical goods, regardless of size or marketing budget, can use Free Listings. However, keep in mind that not all tangible products are eligible. For example, you cannot list real estate and motorized vehicles like cars and boats.
If you primarily provide services (think of flight tickets or online courses), then in most cases these listings are not suitable for you. Still, there are a few exceptions, such as some prepaid software subscriptions and mobile contracts.
How do Google Free Listings work?
When someone searches for a product on Google, your relevant Free Listings can appear in their search results. Google's algorithm determines where to place your offers based on how helpful they are to the user.
Google usually places Free Listings among other entries on its search engine results page (SERP), featuring them at the top, bottom, or even between organic text results. For example, Free Listings may look like this on a SERP:
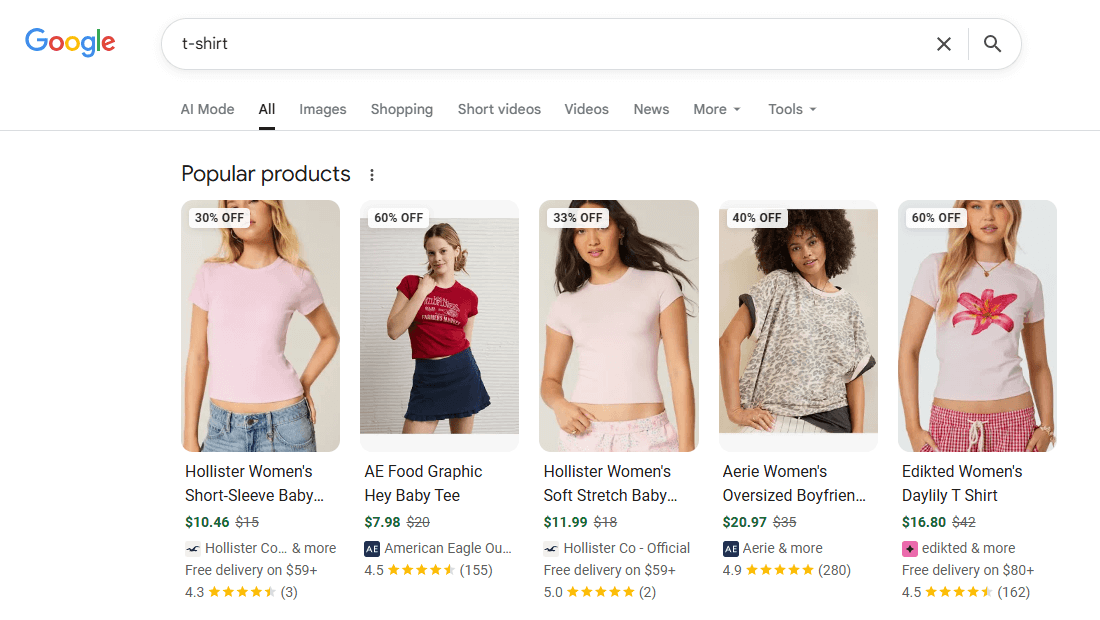
From this SERP, you can then switch to the dedicated Shopping tab with more related products. Your Free Listings can also pop up across Google's other platforms, including Google Images, Google Lens, YouTube, and Gemini.
A standard Free Listing contains this minimal information:
- What the product is (title)
- How it looks (image)
- How much it costs (price)
- Who sells it (vendor)
You can supplement this list with some additional details, such as current promotions or customer reviews.
Advantages of Google Free Listings
You might be wondering: what benefits Google Free Listings have besides an unbeatable price? Let's go over their most prominent advantages:
- Completely free exposure. That's right, we can't simply ignore this key benefit. Free Listings open the door to selling on Google for everyone, giving brands with no advertising budget a chance to use the world's largest marketing channel.
- Increased organic visibility. Your products naturally surface in Google's search results and across its network, reaching millions every day. Thanks to this, you effortlessly turn searchers who are interested in what you offer into potential customers.
- Boost over competitors. Free Listings push your opponents out of the SERP, leaving them fewer opportunities to steal away your buyers. At the same time, since Google lists and references your items organically, it also helps raise their SEO rankings.
- Full catalog coverage. Unlike Shopping Ads, Free Listings don't require you to prioritize which goods to promote. You can present on Google your entire assortment or only a part of it without having to reorganize anything, while still paying nothing.
- Easy risk-free setup. All you need to launch Free Listings is to connect a product feed to your Merchant Center just once. You don't have to maintain any sophisticated campaigns like you would with paid ads, because Google does everything for you.
Limitations of Google Free Listings
Free advertising tools often come with hidden trade-offs, and Google's Free Listings are no exception. They have several significant limitations:
- High competition. Free Listings' accessible low entry cost attracts a ton of sellers. Your products will be fighting for Google's free ad space against offers from countless other retailers, making it extremely hard for you to stand out from the crowd.
- No guaranteed visibility. Whether searchers ever see your products is entirely at Google's mercy. And even if your goods do get onto the SERP, they might end up buried so deep beneath the rest of the content that users will never reach them.
- Low placement control. Free Listings have little to no targeting settings, so you can't change how frequently, in which locations, or for whom to display them. The only way to influence their placement is through Google product feed optimization.
What are Google Shopping Ads?
With Shopping Ads, you can pay to feature your products on Google in more prominent spots. Google will actively help your items reach those people who are most likely to buy them.
Anyone with an advertising budget can run Google Shopping Ads for the physical goods they sell. The list of allowed products for these ads is almost the same as for Free Listings, so if your items qualify for the latter, then you can also promote them with Shopping Ads.
However, if your products are too niche and require hyperspecific search terms, you should think twice about using Shopping Ads. In such cases, this ad format may not be the most cost-effective option for you.
How Google Shopping Ads work?
Shopping Ads work similarly to Free Listings: Google's algorithms display your relevant products in the user's search results. The main difference is that ads are always labeled as "Sponsored" or "Ad" to indicate their sponsored nature.
You'll usually find Shopping Ads at the very top of a SERP, above all other content, or in a separate section on its side. For instance, here's what a SERP with Shopping Ads may look like:
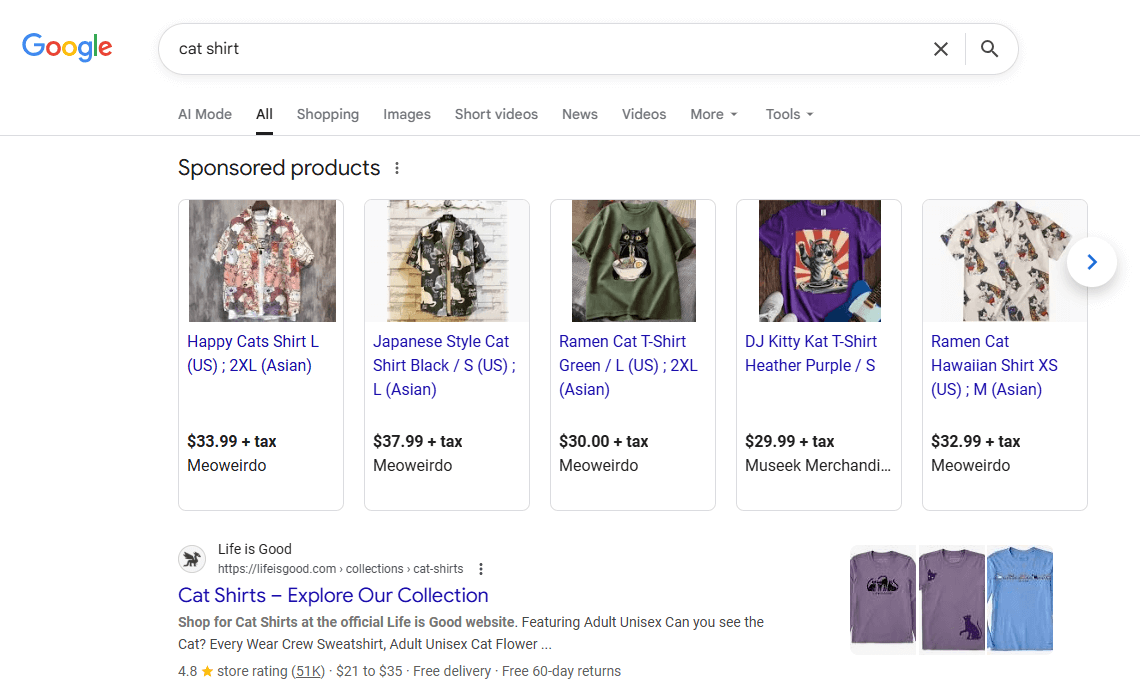
Your Shopping Ads can also appear on the same platforms where Free Listings can be (the Shopping tab, Google Images, and other portals in the Google family), plus on dozens of third-party Google Search Partner websites.
Shopping Ads and Free Listings typically contain identical product data (title, vendor, promotions, reviews, etc.). Still, the ads use a different layout to better highlight the offer's special details, such as price and image.
Google Shopping Ads operate on a pay-per-click (PPC) basis, with advertisers setting their bids (maximum price per click) themselves. Google then uses this bid, along with factors like product relevance, campaign settings and overall ad quality, to determine your ad's position.
Advantages of Google Shopping Ads
With an average ROAS of 200%, Google Shopping Ads are a leader in e-commerce advertising for many reasons. Here are some of their strong sides:
- Fast visibility boost. Shopping Ads begin landing in the most clickable places on Google the exact moment your campaign goes live. Thanks to this instant launch, you're catching the attention of users and luring them to your store right from day one.
- SERP dominance. With Shopping Ads, you consistently appear above your competitors, even those with better SEO rankings. And if multiple of your similar items end up in the same results, you'll be the king of the SERP and easily get seen first.
- High-intent traffic. People who see your Shopping Ads are already planning to buy products like yours. By the time they click on your ad, these qualified shoppers are often ready to complete a purchase, translating into higher conversions for you.
- Flexible scaling. You can easily scale your Shopping Ads campaign up or down anytime. Plus, Google gives you full control over everything you spend, so you're free to adjust your budget, bids, and daily or monthly spending limits as you need.
- Custom targeting. You can tell Google to display your Shopping Ads only to specific audiences based on their location, device type, interests, and other factors. These targeting options will help your ads get the maximum out of each impression.
Limitations of Google Shopping Ads
Every tool has its drawbacks, even paid ones like Google Shopping Ads. Before investing in them, you must consider their limitations:
- Paid marketing model. Shopping Ads entirely depend on your budget and immediately stop once it runs out. On top of that, you always risk paying for wasted ad clicks, since you're still charged for them even if visitors leave without buying anything.
- Product prioritization. Unless you have enough money to promote them all, you'll have to focus your limited budget on your most profitable products. This means keeping a close eye on what items convert and regularly rotating underachievers.
- Complex management. Google Shopping Ads optimization takes more time and expertise than Free Listings, especially for bidding and targeting. You'll need to constantly look after your campaign so that it's performing how you expected it to.
Free Listings vs Shopping Ads: Which Should You Choose? [Comparison Table]
Free Listings and Shopping Ads have completely different marketing purposes. Thus, to help you compare them and choose the right one for your business, we've laid out their main differences side by side:
| Factor | Google Free Listings | Google Shopping Ads |
|---|---|---|
| Cost | Free | Paid (PPC model) |
| Visibility | Within standard organic search results | Sponsored section at the top/side of search results |
| Traffic quality | Organic clicks with lower conversion rates | Paid clicks with higher conversion rates |
| Scalability | Limited (depends on your products) | Highly scalable (with larger budgets) |
| Targeting | No options (general visibility) | Advanced options (location, audience, etc.) |
| Reporting | Basic (total impressions and clicks for all products) | Detailed (impressions, CTR, conversions, etc. per product) |
| Setup complexity | Easier, simply upload a product feed | Harder, requires ad campaign management |
| Long-term benefit | Steady organic SEO growth | Instant traffic boost while ads run |
| Best for | Newer brands, tight budgets, small inventories | Big businesses, flexible budgets, large product catalogs |
So, in a nutshell, which strategy works best for a Shopify store?
If you just want extra organic exposure on Google without spending anything, Free Listings fit the bill perfectly. But in case you need faster results with more control over your presentation, then you should consider adding in Shopping Ads.
But here's the great news: you don't have to pick only one! You can simultaneously feature your goods on Google for free and prepare space for paid advertising.
How to use both Free Listings and Shopping Ads for Shopify?
Combining Free Listings and Shopping Ads is a gold standard for many Shopify stores. If you're one of them, then you want to know the secret of how to do it best, don't you?
The answer lies in how Google obtains your product information for your Free Listings and Shopping Ads.
Free Listings are made through the Google Merchant Center (GMC) tool, while Shopping Ads are configured in the Google Ads platform. Although you work with them from different places, their underlying logic is actually quite similar: you connect a product feed to the management portal, and then Google builds your listings using the feed's content.
Well, what if we told you that you can link GMC and Google Ads to use the same product feed? In fact, that's what Google itself recommends for retailers!
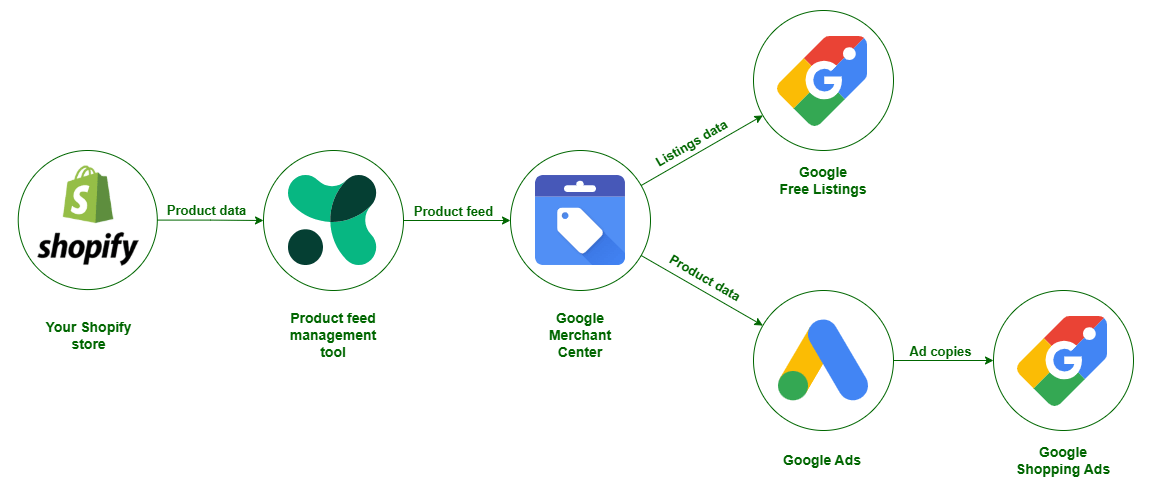
Thanks to a universal feed format, you can create a system that pulls product data for both Google listing types from one central source: a product feed in your GMC. With this configuration, you can start strong with Free Listings and easily add in Shopping Ads later when you're ready to scale.
Sounds exciting? Follow along; we'll show you the basic setup steps.
Create a Google Shopping feed for Shopify
First things first, you need to build the foundation of your entire structure: an accurate Google Shopping product feed.
You may be tempted to make a feed manually, but we strongly advise against that. Google requires you to update your product data at least every 30 days. Imagine what a dreadful time-consuming hassle it would be to recreate a feed from scratch so often.
This is where product data feed management shines. Apps like Mulwi let you quickly create, update, and manage product feeds for many sales channels at once, helping you easily get all your feeds in order.
For example, Mulwi has a ready-made template of a Shopify product feed for Google that's optimized for both Free Listings and Shopping Ads. Generating a feed with it is just as simple as filling out a brief web form. This feed will not only comply with Google's requirements but also be perfectly tailored to your unique Shopify catalog.
What's more, Mulwi's feed can help you better organize your items for Shopping Ads. Our app supports custom labels, which are super convenient if you need to make product groups for your Google Ads campaigns.
How about seeing in action how easy it is to create a Google Shopping feed with Mulwi?
We've shown the entire setup in a short video:
Ready to give it a try yourself? Check out Mulwi on the Shopify App Store and get started with a 7-day free trial today!
Shopify Google Shopping feed optimization
Creating a product feed with your assortment is only half the battle. If you want to achieve great results fast, you must also optimize your Google Shopping feed so that it performs well.
Here are a few basic feed enhancement techniques you should definitely use:
- Include at least 4 top-quality images for each of your items;
- Incorporate relevant keywords into your titles and descriptions;
- Tell the most important product details at the very beginning of your title;
- Always add product category and product type attributes, even if they're optional;
- Regularly check that your product price and availability exactly match the ones in your store.
Looking for more Shopify feed optimization tips? We've gathered more essential best practices for optimizing a Shopify product feed in one of our previous articles.
Enable Google Free Listings in Merchant Center
With your product feed ready, it's time to upload it to GMC and start showing your offers in Google Free Listings.
If you don't have a GMC account for your Shopify store yet, we've got you covered. Our detailed Google Shopping guide will help you set it up. It's a simple two-step process: you just need to sign up for the GMC service and then connect your Shopify store to it by claiming your website domain.
You can upload your product feed to GMC through one of three methods: URL, FTP, or manual submission. If you're unsure which option to choose, we recommend going with FTP, because it can auto-update your product feed for you as frequently as possible.
To make this step much easier, we've prepared a hands-on video walkthrough on how to upload your feed to GMC using the Mulwi app and any of the available upload methods:
We've also put together a step-by-step tutorial on Google feed upload for those who prefer written instructions.
Google Shopping has a lot of nuances, and it's surprisingly easy to mess up when uploading products. For your products to get on Google the first try, be sure to also read our article on common Google Shopping mistakes to avoid.
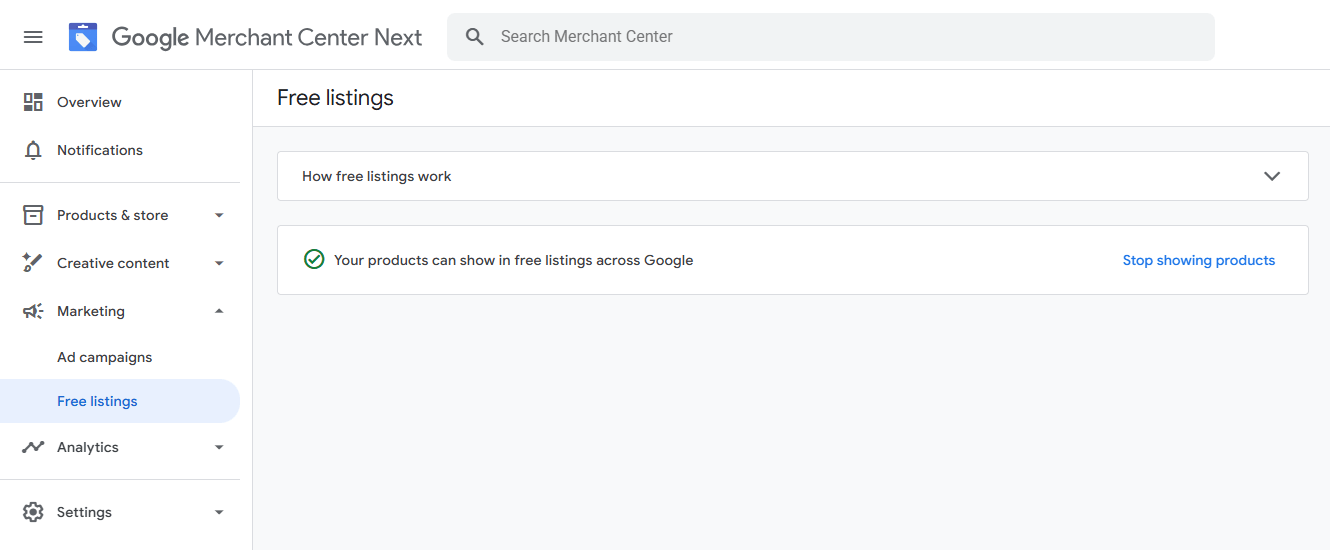
Once your feed is successfully processed, you can rejoice: that's all for Free Listings! In most cases, Google automatically turns them on for new sellers, so there's nothing else you need to do.
To double-check that your Free Listings are active, you can view their status in your GMC's "Free Listings" section:
Set up Shopping Ads for Google Merchant Center feed
Now that your Google Free Listings are live, you can use your GMC product feed to also launch your Shopping Ads.
To do this, you need to link your GMC with a Google Ads account to share the feed data, then set up conversion tracking to measure your sales, and, finally, create your first Shopping Ads campaign.
Let's break down each step with more detail.
Link a Google Ads account to Google Merchant Center
As we mentioned, Google Ads campaigns can populate your Shopping Ads with the data from your GMC feed. This way, you only need to manage your product information in one place, cutting your work with both listing types in half.
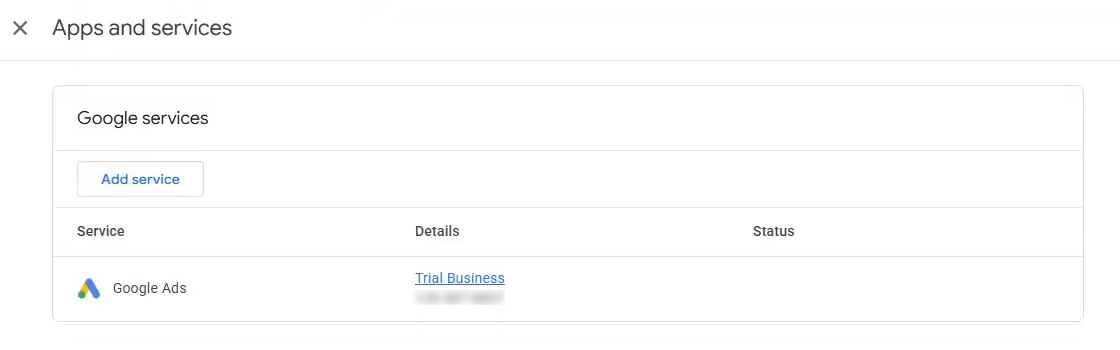
To make this possible, you need to give Google Ads access to your GMC. You do that in the "Access and services" settings of your GMC, inside the "Apps and services" section. From there, just click "Add service", select Google Ads, and follow Google's setup wizard to finish configuring it.
You can quickly create a new Google Ads profile directly from the GMC, or easily link an existing account if you already have one. For the latest full instructions on both scenarios, please check the Google support documentation.
If you've done everything right, Google Ads will appear as a connected service in your GMC settings:
Great job! At this point, you can start using your GMC product feed data in your Google Shopping Ads campaigns. However, for them to work correctly, you must complete one more preparatory step in your Google Ads account.
Set up conversion tracking to measure sales
When running your Shopping Ads campaigns, Google needs to know what counts as a win for you. This helps it collect the right statistics about your viewers and optimize your ads for maximum profit.
That's where conversion tracking comes into play.
With conversion tracking, you tell Google the metrics that matter to you the most (sales, leads, website traffic, etc.) so that it understands how to assess your ad's performance. Google then tracks how those who click on your Shopping Ads behave on your website and whether they eventually do what you need (like completing a purchase).
To set up conversion tracking in your Google Ads account, you need to configure a website conversion measurement action. This involves installing a small tracking code into your Shopify store that lets Google monitor user activity across all the necessary pages of your site.
Wait, don't get too apprehensive: this coding part isn't rocket science. It's a lot easier than it sounds.
If you'd rather avoid coding altogether, you can take the easy route and use an intermediary tool like Google Tag Manager or Google Analytics. Or, if you want to keep things simple and stick with Shopify only, you can add the tracking code directly to your store using Shopify's customer events (AKA pixels).
You can find the most recent complete instructions for any of these methods in the Google support documentation.
Once you've finished connecting and testing it, your conversion tracking action should show up in your Google Ads account with the "Active" status (this may take up to one day):
Well done! You're now all set for the moment you've been waiting for: launching your Google Shopping Ads!
Launch a Google Shopping Ads campaign
You launch your Shopping Ads campaign from your Google Ads dashboard. In there, just click the notably big plus button and choose "New campaign" to get started.
First of all, you need to pick your Google Shopping Ads campaign type. You have two options:
- Standard Shopping. It gives you much more control over campaign settings, including bidding and targeting, but requires extra effort on your side.
- Performance Max. Google uses machine learning to handle campaign optimization for you, but you have little to no influence on the background tasks.
We recommend starting with Standard Shopping. With it, you'll understand the campaign mechanics in practice and clearly know where every bit of your spending goes. Once you get enough conversion data and first-hand experience, you can then consider delegating more tasks to Google's AI with Performance Max.
Next, you sequentially set up these main Google Shopping Ads campaign settings:
| Campaign setting | Description | Recommended Starting Approach |
|---|---|---|
| Goal | Your desired outcome from the campaign. | Specify here the website conversion actions you've created earlier. |
| Bidding | Your bidding strategy and the maximum cost per click (CPC) you're willing to pay. | Stick to manual bidding strategies, such as Manual CPC, while your campaign is learning. Later on, you can switch to an automated strategy to let Google adjust bidding according to your goal. |
| Budget | The ideal amount Google will try to spend every day on your active campaign. | Google may spend less or even twice your daily budget on any given day, but in total for the month, it will never exceed your monthly budget, calculated using this formula: Monthly budget = Daily budget X 30.4 (the average number of days in a month). Thus, to get your optimal daily budget, just divide your comfortable monthly budget by 30.4. |
| Targeting | To whom, where, and for how long Google should show your ads. | Select the regions where your customers are present, all devices, and any Google partner sites you need. If your campaign is short-term, set the start and end dates as well. |
| Ad Groups | Virtual folders that give the same properties (bids, targets, etc.) to multiple individual ad pieces. | Subdivide your products based on attributes with the biggest number of unique options, such as product type, category, brand, or custom label. |
Take your time with each of these settings and remember to click "Publish campaign" at the end. For a full step-by-step campaign setup guide, please consult the Google documentation on Shopping Ads.
And that's it, you've nailed it! Now, you have both the big organic reach of Free Listings and the top visibility of Shopping Ads. Don't forget to regularly check on them to make sure everything is running smoothly.
If you're up to keep the momentum going, you can also level up your offline sales with a Google Local Inventory Feed.
Summary
Google is a must-have sales channel for all Shopify stores, but choosing between Free Listings and Shopping Ads can seem nearly impossible at first.
Free Listings are a solid starting point for everyone, especially small shops and businesses with no ad budget. Those who want maximum visibility plus control over everything should also incorporate Shopping Ads into their plans.
You can prepare the ground for both Shopify Google listing types with a single product feed, created and optimized using professional feed management software.