There are top-10 features that make a great product page, and one of them is to feature detailed product information. In your Shopify store you can go beyond the standard list of fields for products, like the item's title, its description, images, price, SKU, and so forth.
The attribute list above is great for most products. However, some items require non-standard attributes for their full presentation on the product page. For example, it could be a sensitivity value for headphones, the material of the dress, charging current for a wall charger, calories for the candy, burn time for a candle, product expiration date, product ingredients, etc.
So, how do you list non-standard product attributes on a product page of a Shopify store? The answer is metafields (also known as custom fields).
Stores often use online marketplaces for additional sales by pushing their products via product feed. It is important to push all information on the product for better item presentation on such an online shopping engine, so it is good to include data from metafields into your product feed.
What are metafields in Shopify
Metafield is a way for a Shopify store to include almost any related information on a product or product collection. This data can be retrieved by apps and merchants within the Shopify admin.
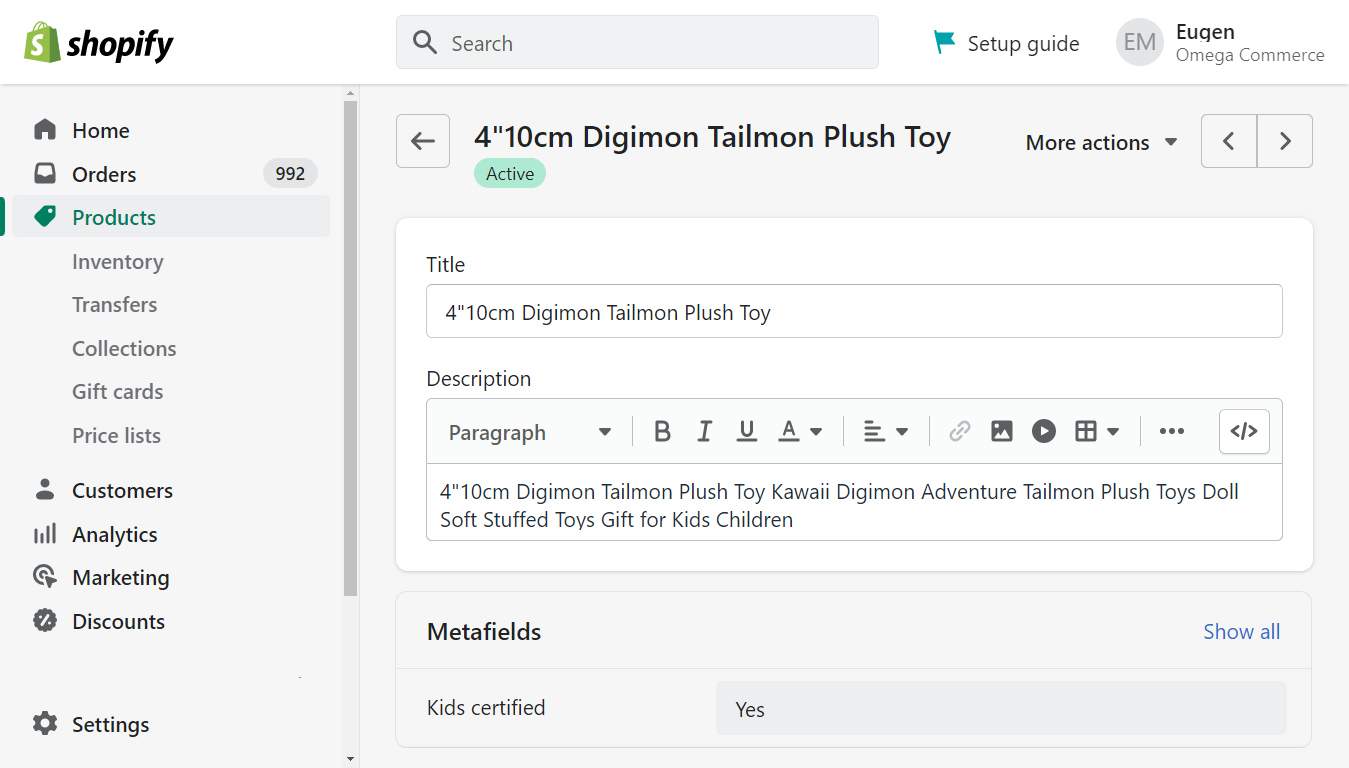
To use a custom field in Shopify, you first need to create it in the store admin. Next, in each product that has this metafield fill its value. Lastly, you need to activate displaying metafields in the store frontend.
How to add Shopify metafields in admin
You can place each non-standard into its metafield. In order to use such a custom field you need to define it:
In your Shopify admin:
- Go to
Settings > Custom data. - Select the part of the store where you want to add a new custom field. For example, Products, Product Variants, or Collections.
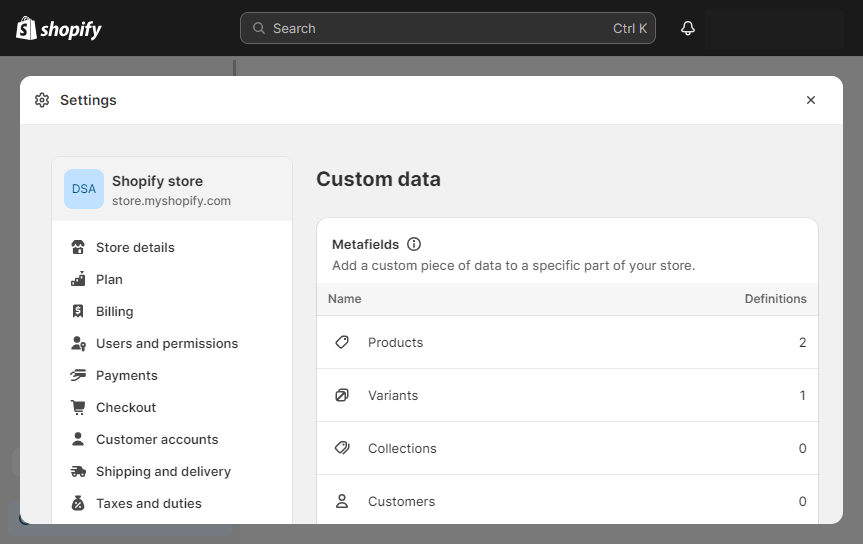
- Click
Add definition.- Give a name to this metafield and its description.
- Leave
Namespace and keyas it is. - Enable the
Expose this metafield to Storefront API requestsoption.
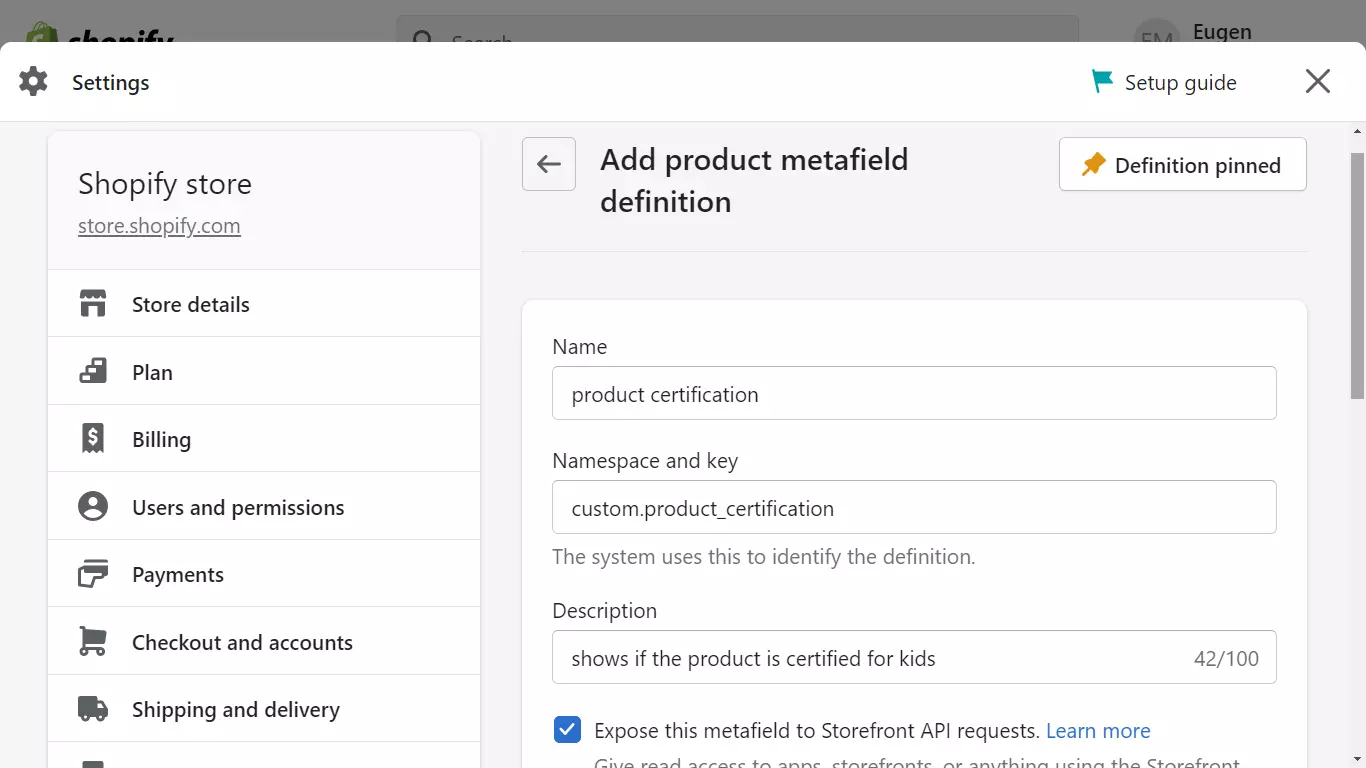
Click
Select type.Choose the type of metafield value.
Select from types DATE AND TIME, MEASUREMENT, NUMBER (Integer, Decimal), REFERENCE (File, Page, Product, Product variant, Collection), TEXT (Single or Multi-line text), OTHER (Color, JSON, Money, Rating, True or false, URL).
- Choose
One valueorList of values.
Metafield can contain one value or a list of values. For example, if you want to add a custom field for product expiry date. For product dimensions (length, width, height), a metafield with a list of values is better suited.
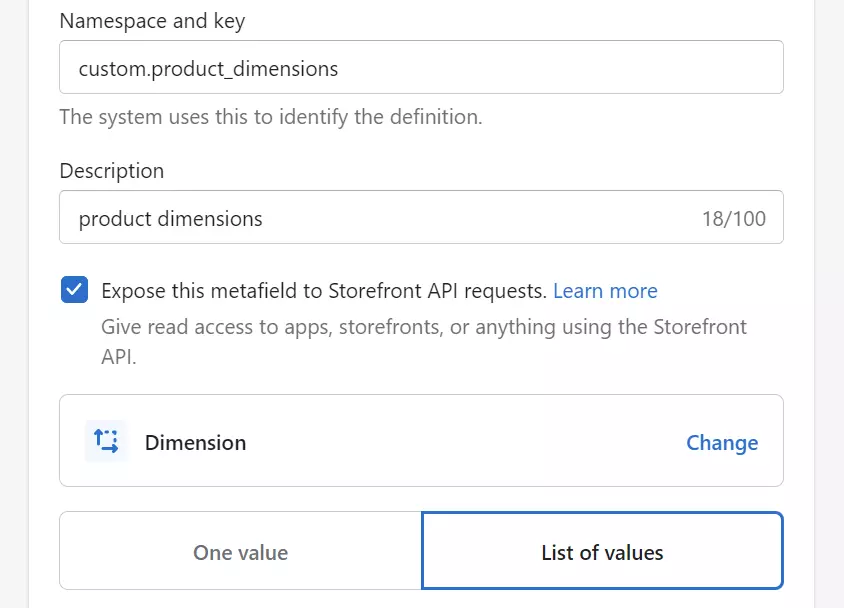
A metafield list of values can store up to 128 values.
Select Validation rules for the metafield.
Validation options depend on the content type from the previous step.
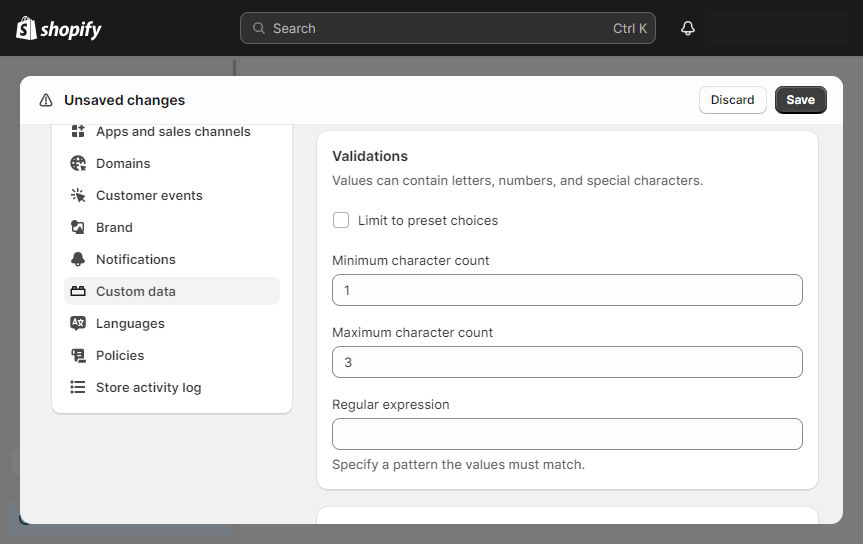
- Click the
Savebutton. - Write down the metafield access name key for future reference. This name key may look like:
{{ product.metafields.custom.product_certification }}
How to fill metafield data for a product in Shopify admin
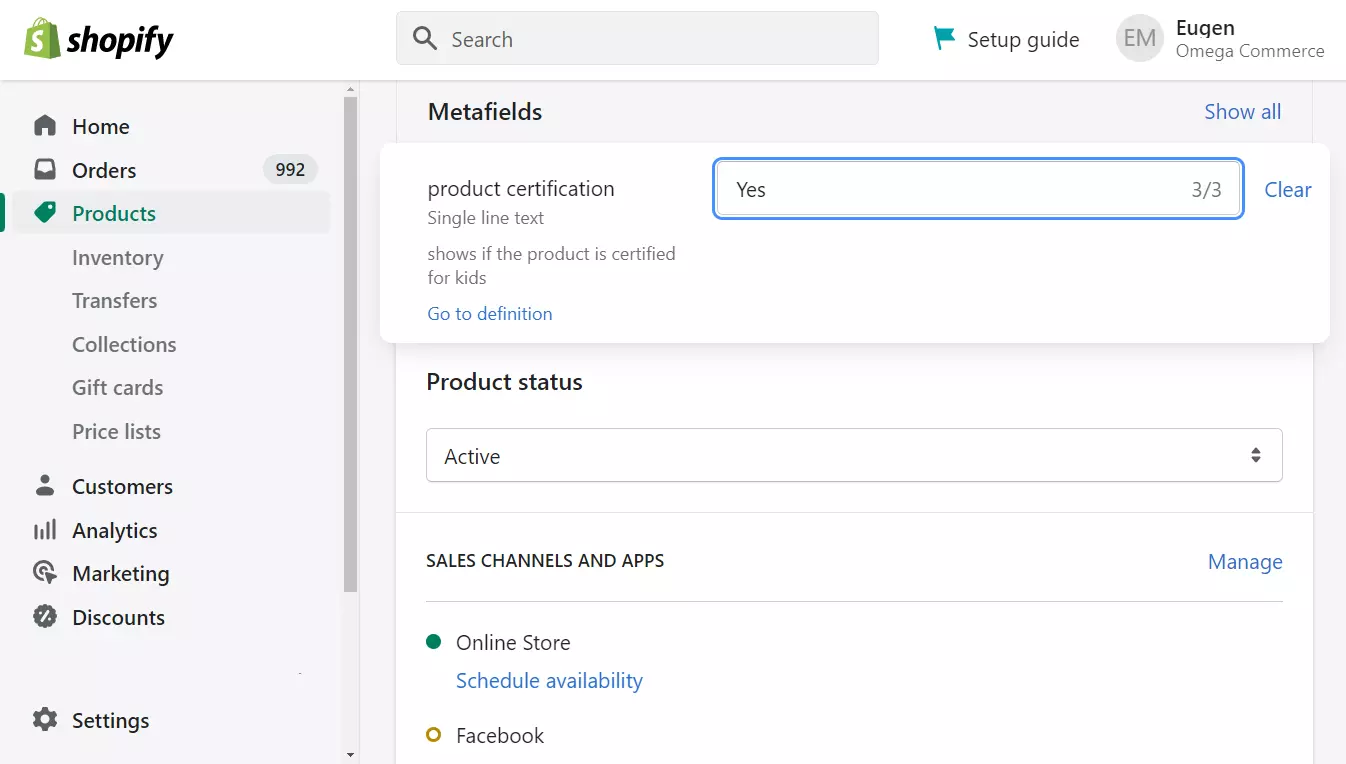
Created metafields are now accessible on the product edit page in Shopify admin. For faster access to the specific metafield on the product edit page you can pin it in the Shopify settings.
To fill the metafield data for a specific product, do the following:
- Open the product edit page in Shopify admin.
- Click on the grey field right to the metafield name.
- Type in the metafield value.
- Click
Save.
How to bulk edit metafields in Shopify
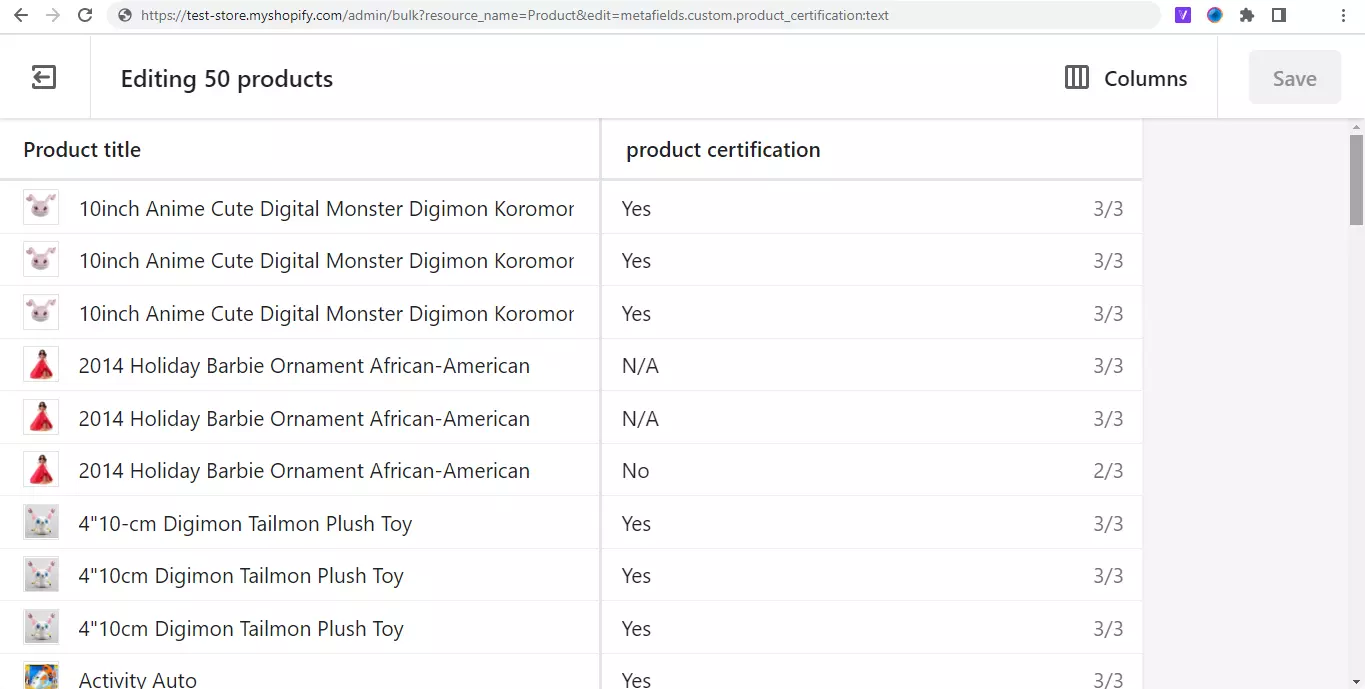
To edit a Shopify metafield in bulk, you need to alter an URL in your browser address bar. The bulk editor URL looks like this
https://YOUR-STORE-NAME.myshopify.com/admin/bulk?resource_name=Product&edit=metafields.custom.METAFIELD_NAMESPACE:METAFIELD-CONTENT-TYPE
In the example link above, replace:
- YOUR-STORE-NAME with the name of your store.
- METAFIELD_NAMESPACE with the namespace of the metafield you have written down previously.
- METAFIELD-CONTENT-TYPE with the metafield content type.
Here is an example of the URL:
https://test-store.myshopify.com/admin/bulk?resource_name=Product&edit=metafields.custom.product_certification:text
How to use metafields in Shopify
In order to display Shopify product metafields in store frontend, it is required to connect them to the store frontend theme. With an Online Store 2.0 theme, metafields can be activated via theme editor. Previous generation themes require changing theme code directly.
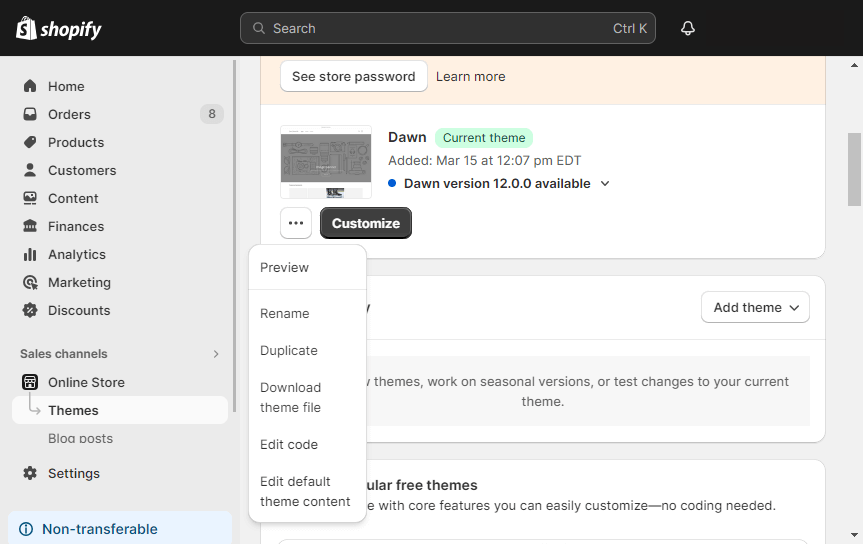
If you want to know what generation of frontend theme is used in your Shopify store, in the admin, navigate to Online Store > Themes > Actions > Edit code.
Locate the product.json in the Templates folder.
If you find the product.json file - your store utilizes a second generation of Shopify themes.
Enable metafields for store with Online Store 2.0 theme
Online Store 2.0 frontend themes provide a user-friendly in-browser editor for enabling metafields:
- Open Shopify admin and navigate to
Online Store > Theme. - Click the
Customizebutton. - Locate the page template where you want to place the custom field. For example, a Product page template. Press
Home Page - Productsin the upper part of the screen. Select the product you want to change. - Click
Add blockin the left menu ofTemplateas a metafield placeholder. Each such block allows placing up to 20 custom fields. SelectTextfrom the list. - Click connect dynamic source icon on the right side of the screen:

- Select the metafield you want to display on this page type.
- Add text to describe the custom field value in the frontend.
- Click
Save.
Enable metafields for store with vintage theme
To enable metafields in the older generation of Shopify frontend themes, it is required to edit their page template directly.
In the Shopify admin panel:
- Navigate to
Online Store > Themes. - Click
Actions > Edit code.
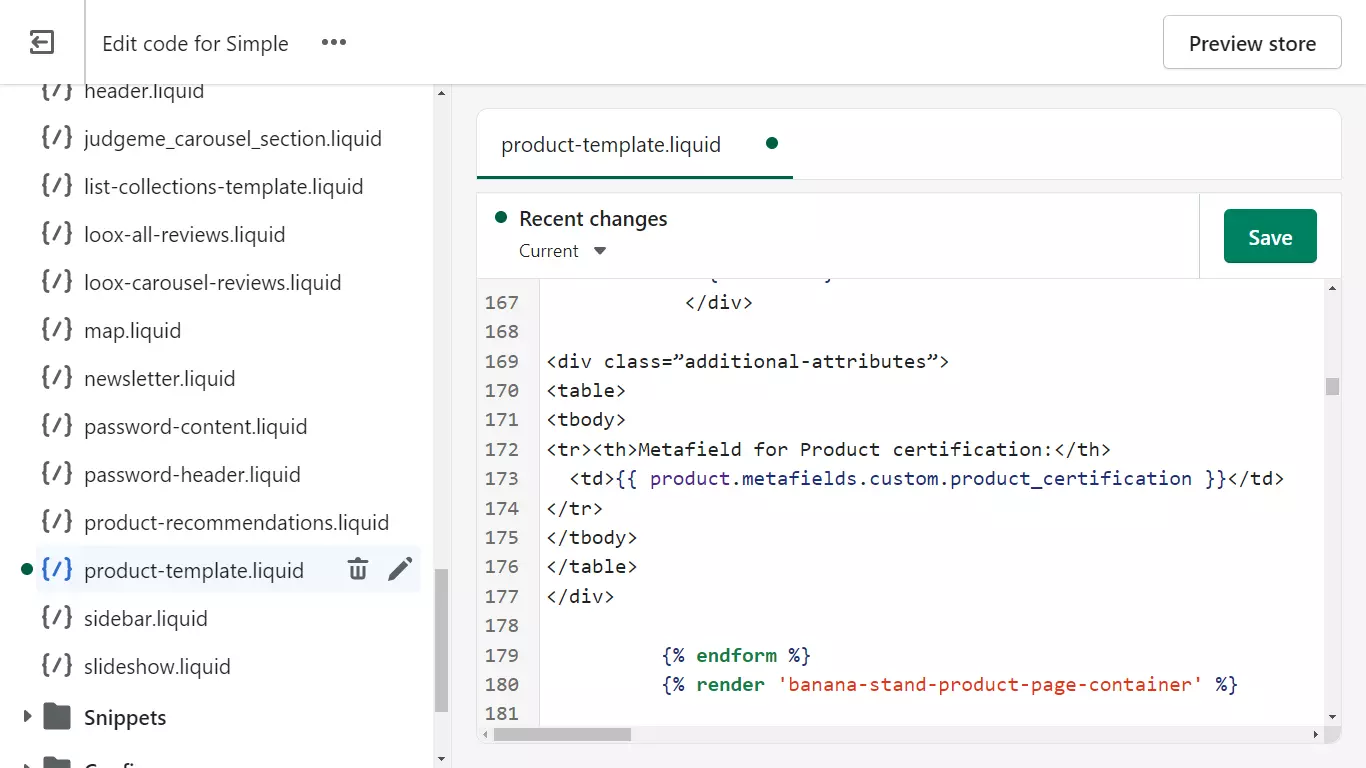
- Locate the page template file. For example, a
product-template.liquidtemplate file for the Product page. - Go to the position on the page where the custom field should be displayed.
- Insert the metafield code. For example:
Replace METAFIELD_NAME and METAFIELD_NAMESPACE with a frontend name displayed for the metafield and a metafield name key you have written down when creating the custom field:
    <div class=”additional-attributes”>
		<table>
			<tbody>
			<tr><th>METAFIELD_NAME</th>
				<td>{{ product.metafields.METAFIELD_NAMESPACE }}</td>
			</tr>
			</tbody>
		</table>
		</div>
- Click
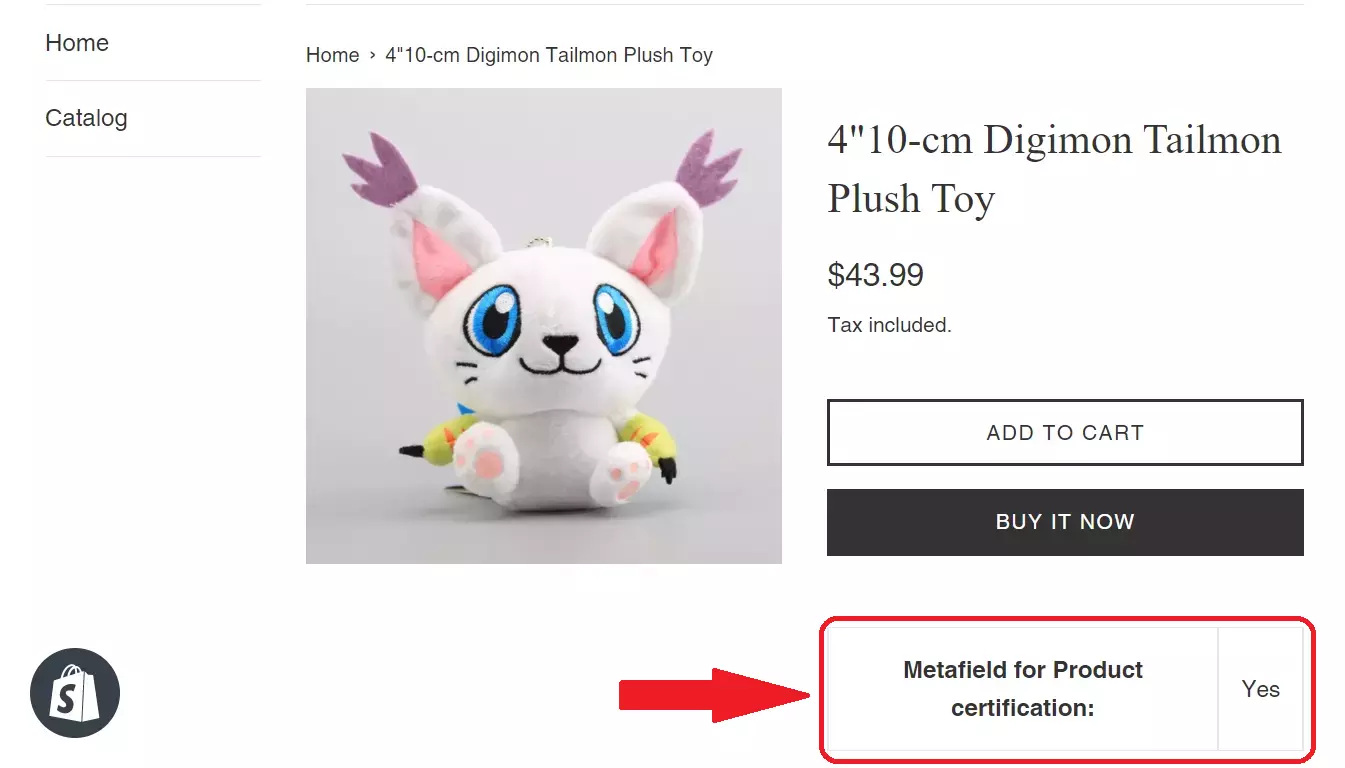
Save. - Check how the metafield is displayed in the store frontend.
How to include metafields in Shopify product feed
The Mulwi Shopping Feeds app generates a product feed without metafields. In order to include custom fields in your product feed, you need to customize the feed template.
Step 1. Activate metafields indexing
You can include metafields in your product feed after indexing them.
In the Mulwi Shopping feeds app:
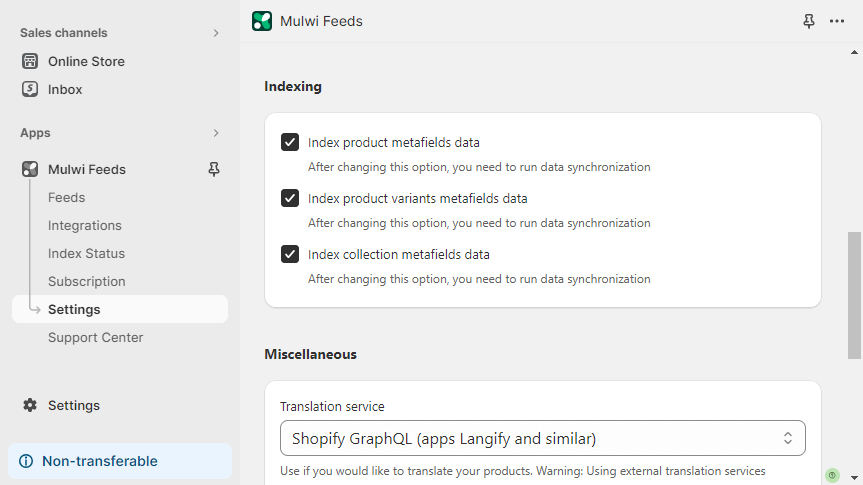
- Navigate to
Settings > Indexing - The next step depends on which part of your data you would like to index: all data or just collection metafields, for instance. You can select only one, two, or all three of the following options:
- a) Index product metafields data
- b) Index product variants metafields data
- c) Index collection metafields data
- Click the
Savebutton
- Navigate to
Index Status - Click
Schedule Synchronization
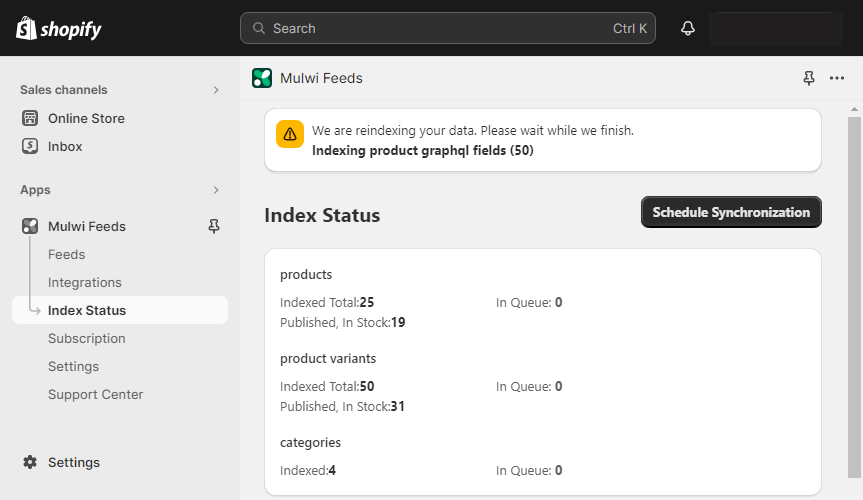
Step 2. Use Shopify metafields in a Mulwi product feed
After indexing is finished, you can call metafields from within the feed template. There are two ways to do it:
- Select the needed metafield in the feed:
a) Go to the
Templatesection of an XML feed. Click onVariables & Filters.
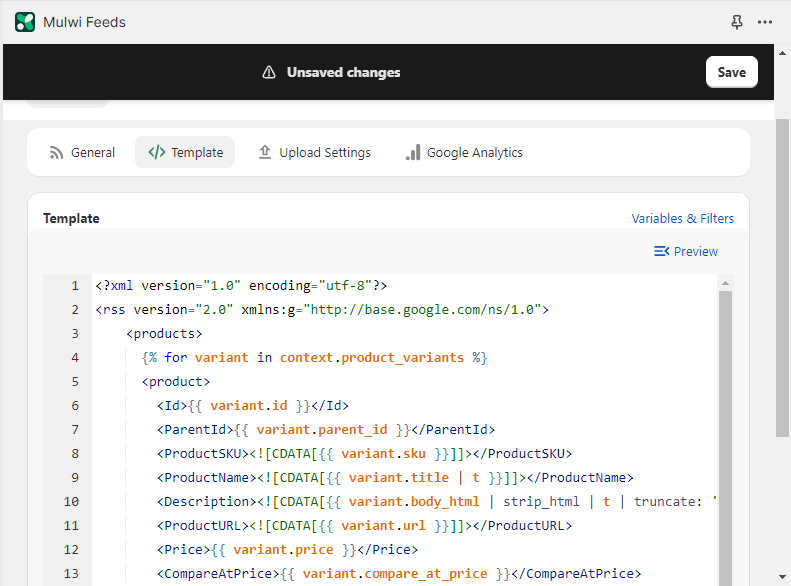
Choose the needed metafield in the Metafields tab.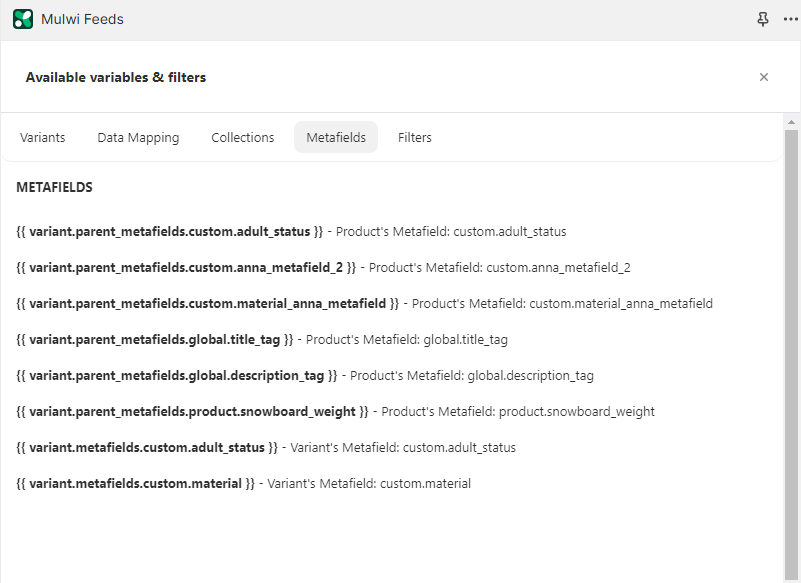
b) Go to the Attribute section of a preinstalled CSV, TXT, or XLSX feed.
Open the Template section of a custom or customized feed.
Click on the needed attribute and choose the metafield from the list.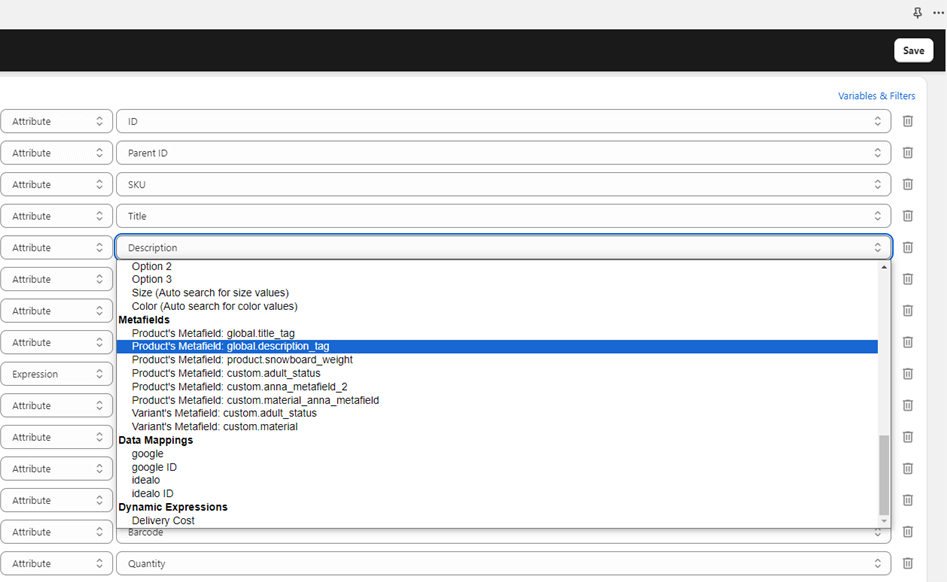
- To get the metafield data, place it in the feed as follows:
{{ product.metafields.METAFIELD_NAMESPACE }}Replace METAFIELD_NAMESPACE with the namespace of your metafield.
Here is an example of a custom XML product feed template with a metafield:
Input
    {% for product in context.products %}
		<item>
		  <id><![CDATA[{{ product.sku }}]]></id>
		  <title><![CDATA[{{ product.title }}]]></title>
		  <metafield><![CDATA[{{ product.metafields.custom.product_certification }}]]></metafield>
		</item>
		{% endfor %}
Output
    {% for product in context.products %}
		<item>
		  <id><![CDATA[TOY139]]></id>
		  <title><![CDATA[4"10-cm Digimon Tailmon Plush Toy]]></title>
		  <metafield><![CDATA[Yes]]></metafield>
		</item>
		{% endfor %}
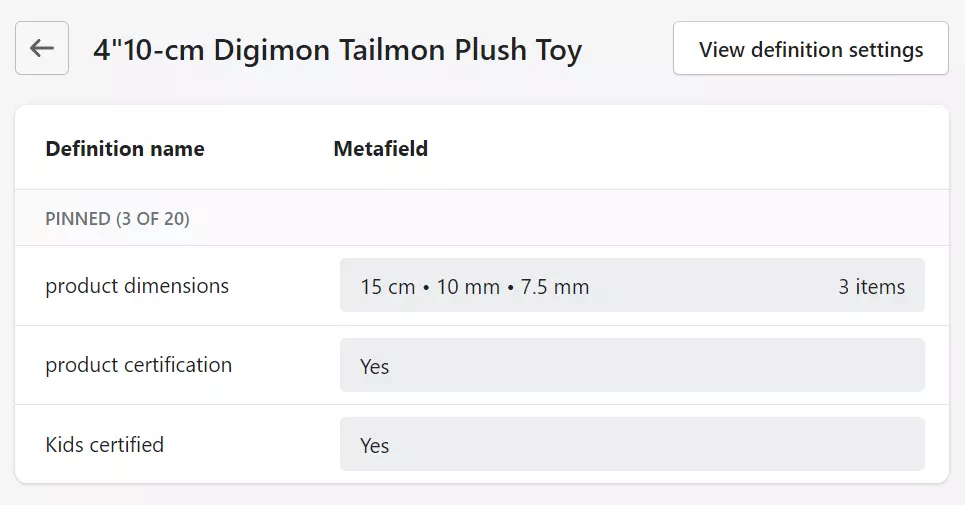
Here is how that metafield looks on the product edit page in the Shopify store admin:
Summary
Metafields are a great way of presenting in a Shopify store non-standard product attributes, like expiry date or calories. Enable such custom fields in a store frontend and enhance products' presentation for your shoppers.
When a store generates extra sales on online marketplaces (like Google Shopping, Fruugo, ShareASale, or Idealo) it presets products to customers via the product feed.
With the Mulwi Shopping Feeds app, you can include metafields in your product feed. Make your products on online marketplaces more attractive to customers and generate more sales.


