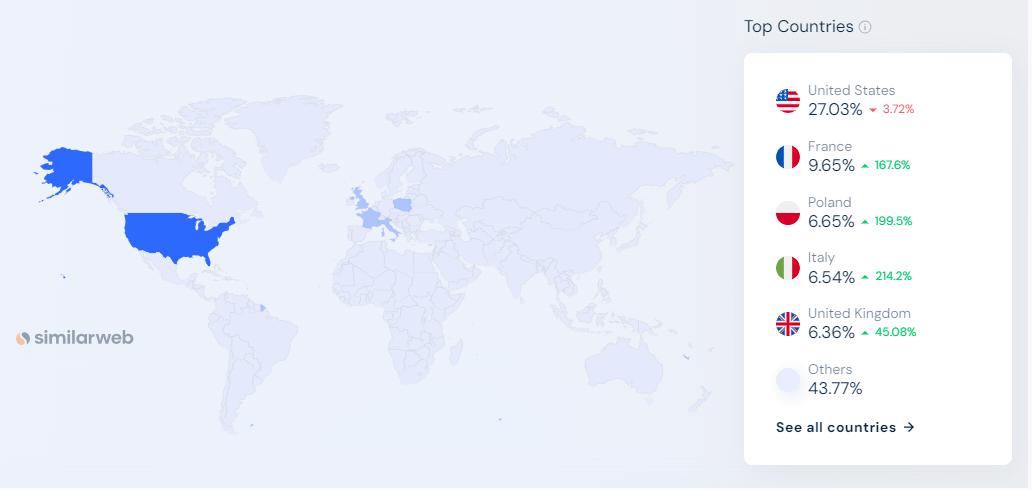
In 2002, Craig Graham Nevill-Manning created Froogle, a product search engine. Mr. Nevill-Manning is a computer scientist. He was the Engineering Director at Google at that time. Today, we know this engine as Google Shopping. It allows people to search, buy, sell, and advertise goods. The shopping engine has become so popular that in 2023, shopping.google.com has 3.6M visits per month. The most searched segments globally are computers, electronics, fashion, and apparel.
The top country sending traffic to the website is the USA. France, Poland, Italy, and the UK bring many customers as well.
Introduction
US Google Shopping insights
In the United States buyers spend around $2,409 per year on online shopping. It is more than the average spending in Europe, which is $2,186. Google Shopping can help you sell internationally. It may boost your sales and make your brand more well-known. In 2023, the shopping engine integrated AI into the website search. This integration aimed to ease shoppers search for goods and gifts. Find out more information here. The aim is to make the merchants sales higher. If customers find goods faster, they will buy faster.
The US holds the second position in the global e-commerce market, with China being the only one ahead. Americans often buy products from big markets like China, the UK, and Germany. The main reasons they shop outside the U.S. are because of the price and how unique or available the product is. Lots of shops, including those on Shopify, sell their goods on Google Shopping.
Shopify stores statistics in the USA
There are 1,023,047 live Shopify stores in the United States. In Q3 2023, Shopify stores in the United States rose by 7.5% from the previous quarter. Compared to the same quarter last year, there was a notable 38% increase. These numbers show how well Shopify is doing and how much it's growing in the region.
Shopify stores in the USA are selling:
About 31.2% are offering Clothing and Fashion items.
For Home & Garden products, it's around 11.8%.
Beauty & Fitness products are also quite popular, with 10.7%.
But not only those three industries are successfully selling in the US. Food & drink, people & society, sports, and other segments bring high sales in the country. The global store ranking shows five leaders. The most successful stores are Gymshark, Sanrio, Steve Madden, Bodybuilding.com, and Glossier. So, how to become as successful as them? Connect your Shopify store to Google Shopping.
Google Shopping Guide
The general plan is as follows:
Link your Shopify store to the Google Merchant Center;
Create a Google Shopping feed in the Mulwi app;
Upload the Google Shopping feed to the Google Merchant Center;
Link Google Ads to the Google Merchant Center.
Let's go through each step.
Link your Shopify store to the Google Merchant center
Connecting Shopify to Google Merchant Center is crucial for your business. It allows you to showcase your products on Google Shopping. The aim is to increase visibility, more traffic, and higher sales. The Google Merchant Center is a platform for organizing information about your products. Before adding product data and linking Google Ads, you must prove that the website belongs to you.
The steps below correspond to the users with a Classic version of the Merchant Center. If you do not have an account, the registration will be in the Google Merchant Center Next. It is a new version of the Classic Google Merchant Center. The interface, methods, and steps will be different. You can read about it in this post.
Step 1. Add your website address to the Google Merchant Center
Adding your website address is crucial as it is not only a technical requirement. It helps to establish trust, boost visibility, streamline product management, and advertising. You won’t be able to fulfill the next steps without it.
Sign in to your Google Merchant Center Account.
Click the Merchant Center settings icon and select Business information.
Select the Website tab.
Enter your Store URL. Start with https://
Click Continue to proceed with verification.
Step 2. Verify your website
When you verify your website address, you prove you have authorized ownership of it. Verification doesn’t give Google any special access to your website. It adds a layer of authenticity. The verification ensures users interact with the genuine representation of your business. Search engines, including Google, trust verified websites more. This trust can make your website more likely to appear in search results. Keep in mind that only the user who verifies a website can claim it later.
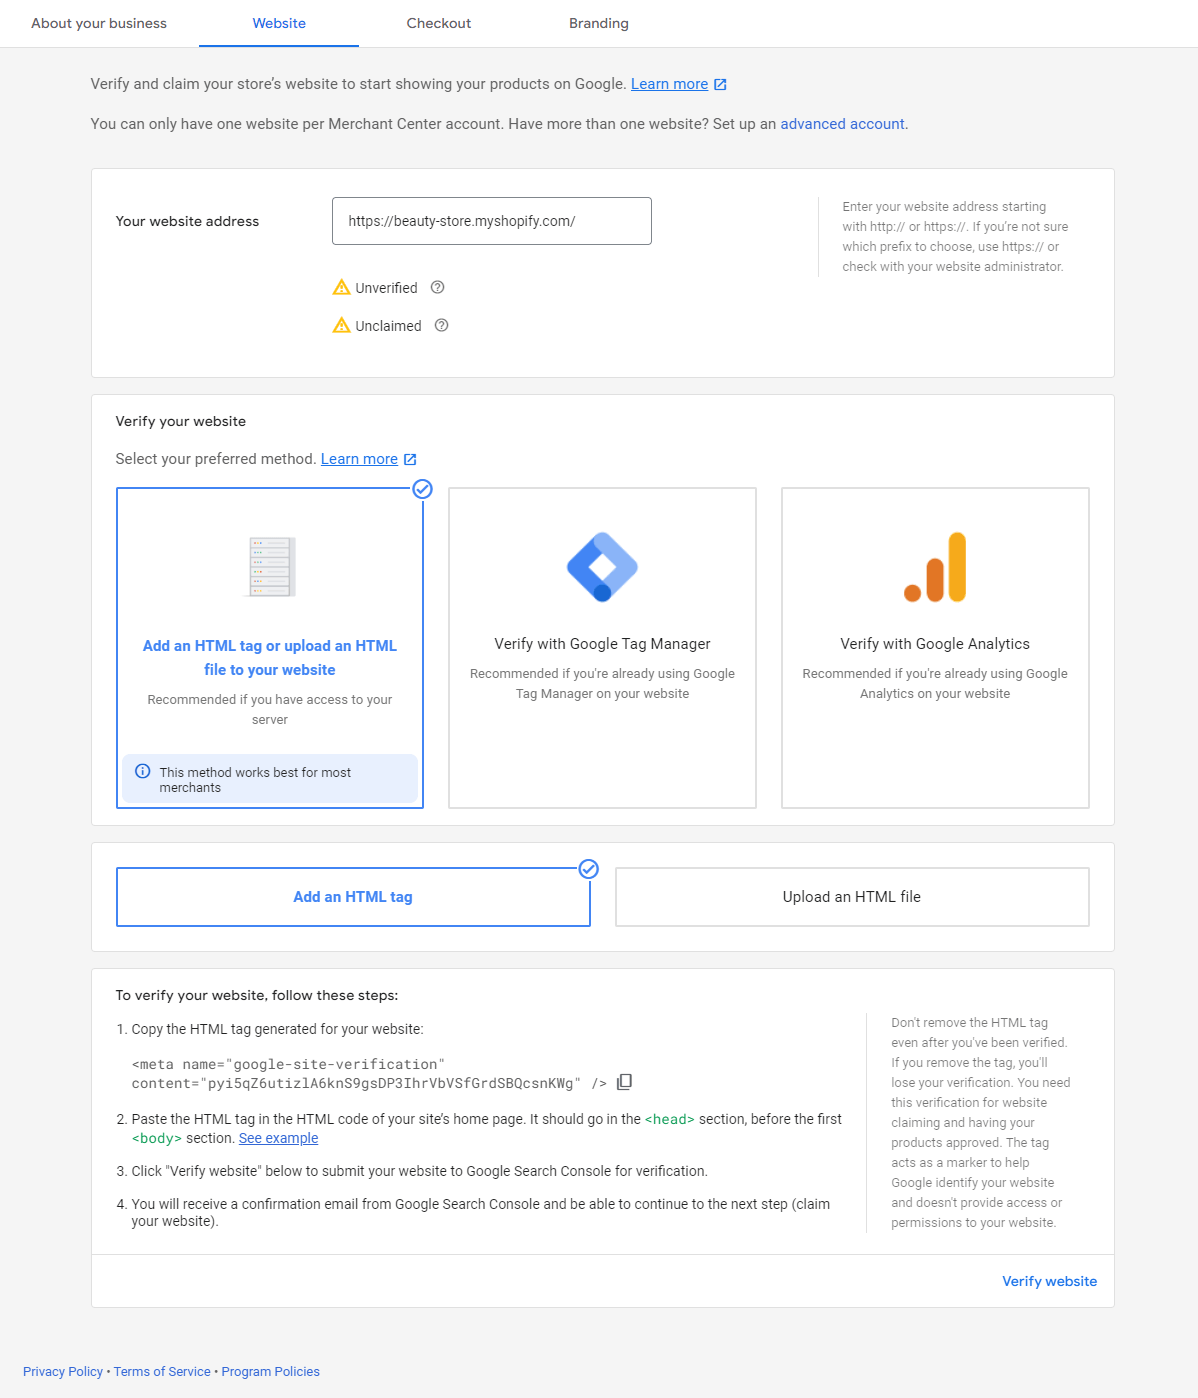
Select Add an HTML tag or upload an HTML file to your website. Google recommends this method for a Shopify store.
Choose the Add an HTML tag option.
Copy the HTML tag generated for your website. For instance:
Go to the Google Merchant Account-Settings-Business Information-Website tab. Click Verify website to submit your website to Google Search Console for verification.
You will receive a confirmation email from Google Search Console. After the confirmation, continue to the next step (claim your website).
Step 3. Claim your website
Claiming is the next step. It helps to recognize and link your ownership to your account on the platform. This link ensures that the website address is reserved only for your account to use.
Click the Claim website button to connect your store to the account.
If you have more questions or there is an error, refer to the Google Merchant Center Help.
Create a Google Shopping Feed in the Mulwi app
Creating a feed in the app acts as a bridge between your Shopify store and Google Shopping. It facilitates the smooth and accurate transfer of product data. This process is essential for meeting Google's requirements and optimizing product listings. The best Shopify app to do it is the Mulwi Shopping Feeds. The app provides many features to speed up product management and upload.
Step 1. Install the Mulwi app
Click here to go to the Mulwi app page in the Shopify app store.
Click the Install button. Press the Install app button in your Shopify store to finish the installation. Your Shopify product data will be synchronized and updated automatically.
Step 2. Add a Google Shopping Feed
The Mulwi Shopping Feeds app offers a Google Shopping Feed in three formats: CSV, XML, or TXT. Plus - Google Shopping Local Inventory Feed for local inventory ads. Local Inventory Ads (LIA) are shown for local product searches. They can be an effective way for retailers to drive in-store traffic.
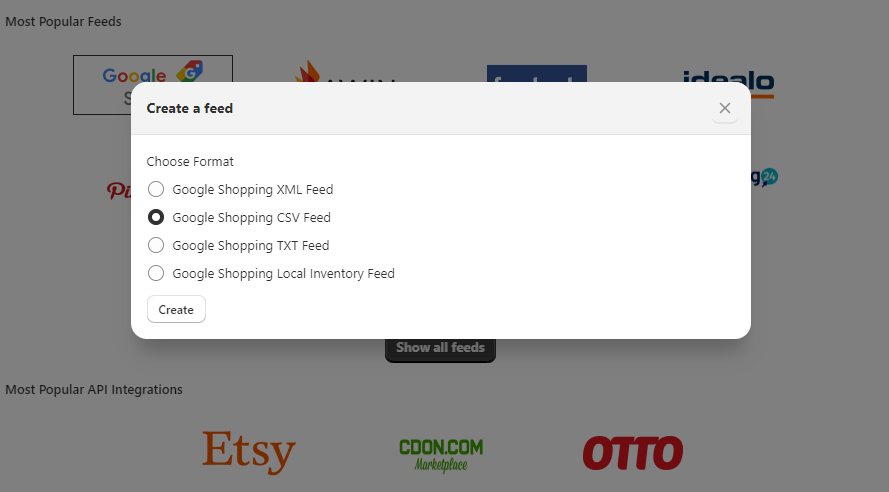
Click the Add Feed button.
Choose Google Shopping from the list of the most popular feeds. Select one of the three formats: XML, CSV, or TXT. Press the Create button. We recommend choosing the CSV format if you do not need complex settings of the feed.
The Local inventory Feed is a separate feed for local inventory advertising and free information about local goods for a separate store. It's useful once your products are already uploaded on Google Merchant Center (GMC). To link it with GMC, pick the Google Shopping feed in XML, TXT, or CSV format first. You can add the Local inventory feed later if needed. Read more here.
Step 3. Set up a Google Shopping Feed
Google Shopping is designed for product-centric searches. When people find your products easily, it gives them more chances to buy. This, in turn, can contribute to a boost in your sales. That’s why you must set up your product feed.
a) Fill in the attributes in the General tab of the Google Shopping Feed in the Mulwi app:
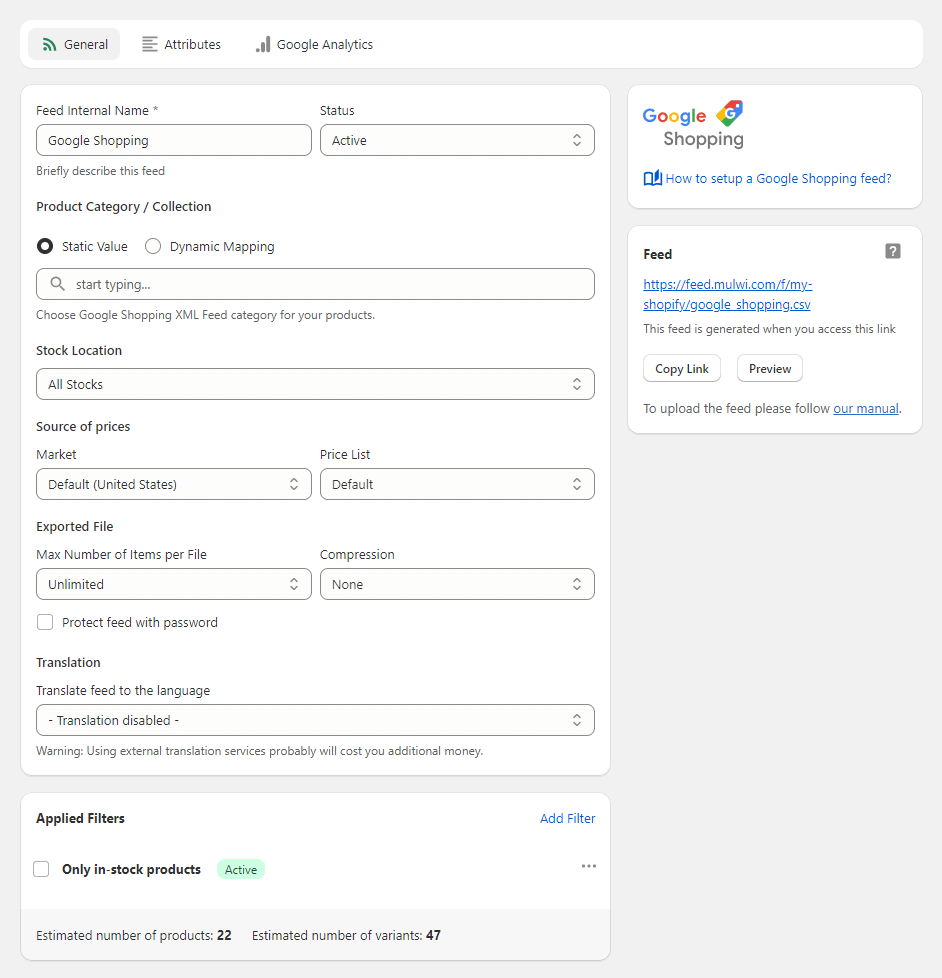
You can change the feed's internal name if you want.
Make sure that the Status is Active to make it work.
The Product Category/Collection section helps categorize your products accurately according to the Google Shopping taxonomy. It will help to enhance your products' visibility. There are two options depending on your inventory categorization.
If your store collection(s) match only one Google Shopping category, select the Static value and start typing the category name. It will be autocomplete for all products.
In case your store collections correspond to different Google Shopping categories, specify different categories for various product collections using the Data Mapping option. Click here for more detailed instructions.
You can choose the Stock Location, for instance the nearest one. Or leave All stocks value as it is.
Choose the Source of prices. The Shopify markets functionality is available in the Mulwi app. You can just select the market from the list to add the needed prices to the feed. You can also choose a Price List from the list created by you on the Shopify store.
In the Exported file section, you can choose the limit to the number of feeds or leave the Unlimited option. You can also select a Compression of your feed to a ZIP file to decrease the feed file if you need it.
You can protect your feed with a password to make it more secure. Just fill in the Username and Password.
You can localize your feed by connecting Google Translate, Weglot, or Shopify Translation apps to the Mulwi app. Read here how to do it.
Use filters to include or exclude the items in the product feed. Click Add filter. Name it, and check the Active status. Add rules or a group of rules. Filter items by Variant Price, Variant Quantity, Product image, Product Vendor, etc. Apply the filter to the feed in the Apply to Feeds section. Click the Save button. Read more about filters here.
On the right there is a Feed block where you can Preview and Copy the URL of your feed. You can also Download the feed in this block by simply clicking the link.
Fill out the Attributes tab of the Google Shopping Feed in the Mulwi app. It includes all the required Google Shopping attributes:
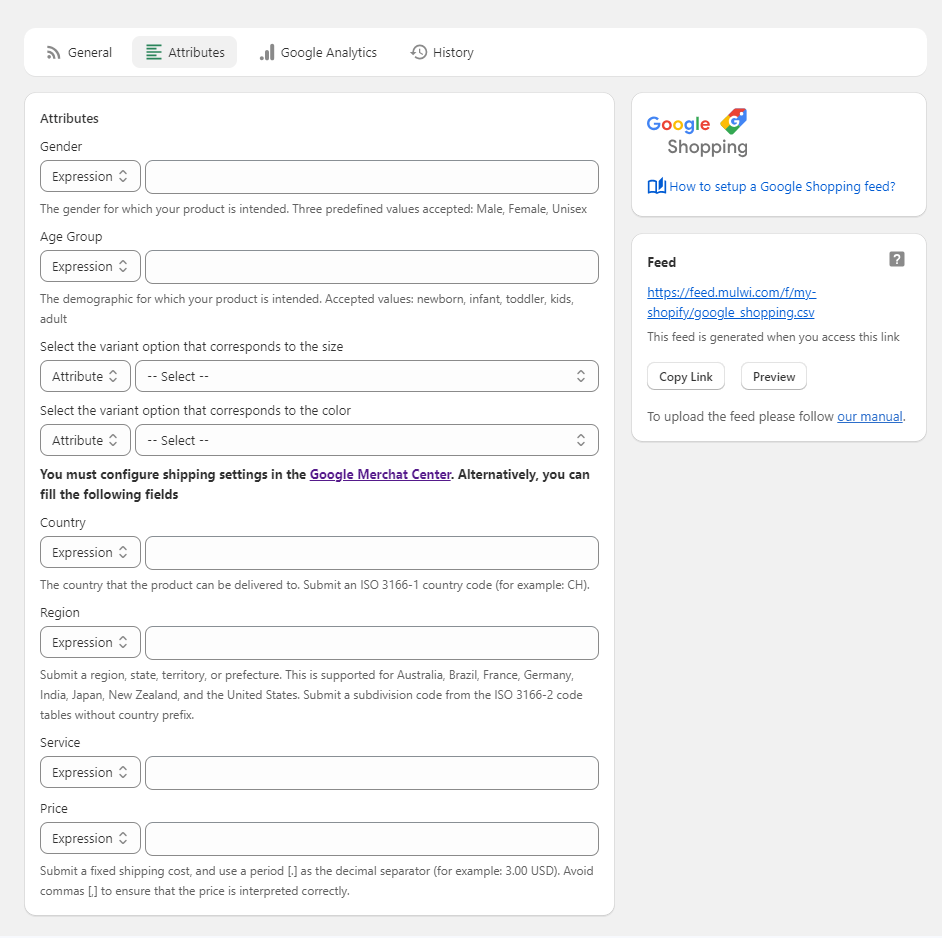
Fill in the Gender field for which your goods are intended. Male, Female, Unisex values are accepted.
Precise the age group to target a certain demographic. Newborn, infant, toddler, kids, adult values are available.
Select the variant option corresponding to the Size and Color from Variant options list from your Shopify store.
The Color and Size auto search option does not always filter the necessary items properly, as it can take every occurrence it finds. It is recommended to select other available options.
Configure the shipping settings:
Type the country your products can be delivered to. Submit an ISO 3166-1 country code (for example, CH).
(Optional) Submit a region, state, territory, or prefecture. It is supported for Australia, Brazil, France, Germany, India, Japan, New Zealand, and the United States. Submit a subdivision code from the ISO 3166-2 code tables without a country prefix.
(Optional) Fill in the Service field with the name of the delivery company you are working with.
Submit a fixed shipping cost, and use a period [.] as the decimal separator (for example: 3.00 USD). Avoid commas [,] to ensure that the price is interpreted correctly.
Alternatively, the Shipping settings can be fulfilled in your Google Merchant account in the Settings- Shipping and returns - Shipping tab. More detailed instructions you can find here.
Press the Save button before going to the next tab.
You can add UTM codes for Google Analytics to the URLs of your products in the Google Analytics tab.
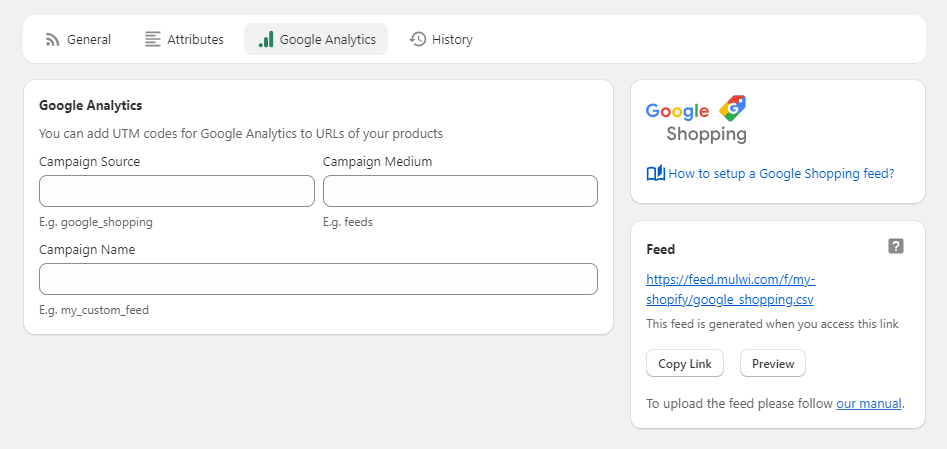
Fill in Campaign Source (e.g., google_shopping), Campaign Medium (e.g., feeds), and Campaign Name (e.g., my_custom_feed) to set up this tab. Click the Save button.
If you need to add additional fields or details to the feed, click the Customize feed button to activate a new Template tab. Read more here. If you need help with customization, you can always contact our support team.
Upload Google Shopping Feed to the Google Merchant Center
To add your product data to the Google Merchant Center, you must upload the feed to your account there. There are three ways to do it:
Submit the Google Shopping feed by URL
This way is the easiest one and is recommended. The URL submission method is a time-saving approach. It simplifies the process by avoiding the manual uploading of files. Any changes on your Shopify store automatically appear on Google Shopping.
In your Google Merchant Account, navigate to Products - Feeds and click the Plus button.
Press Add and choose the country where you’d like to show goods from your feed.
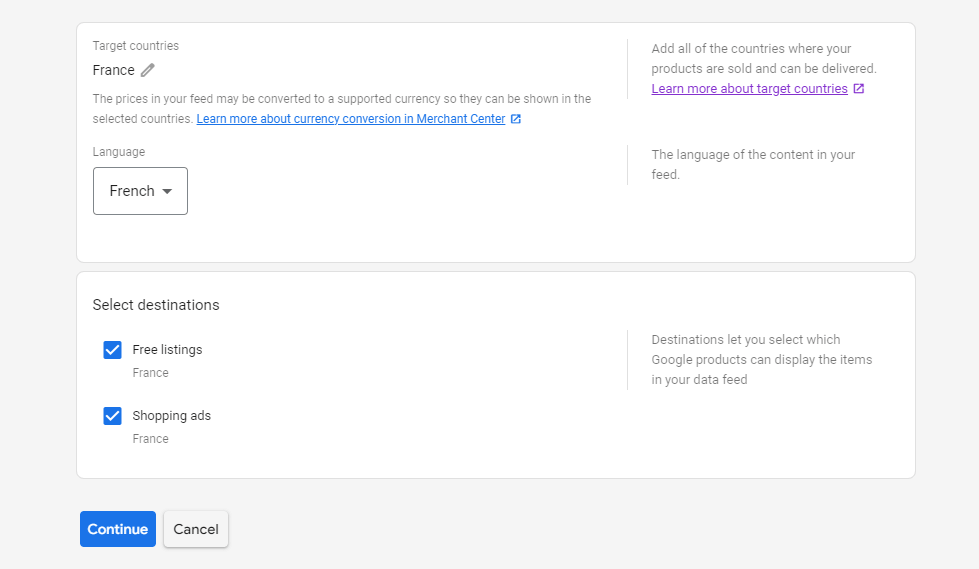
The target country is where your products will be sold. The uploaded goods must meet all the requirements of the country you select. Learn more here.
Select the Language of your feed. This choice must correspond to the country you choose. For instance, if you choose France, then your feed must be in French, and you must select the French language.
Choose destinations where the goods from your feed will appear. Destinations show which Google programs can use the items from your product data. Besides the example below, the list may include Display ads, Local inventory ads, Free local listings, etc. The number of destinations may vary depending on the number of programs set up and enabled for your feed. Also, it depends on the target countries you select, as in some countries, some programs may be unavailable. Learn more about multiple destinations here. For example:
a) Free listings - allow you to display your products across Google without charging. Items will be seen on Google Lens, Google Images, Google Search, YouTube, and the Shopping tab. Learn more about free listings here.
b) Shopping ads - use your product data (not keywords) to decide how and where to show your ads. Read more about the service here.
It is recommended to choose all available destinations for the maximum visibility of your items. Click the Continue button.
Fill in the name of your feed.
Select the Scheduled fetch option and click the Continue button.
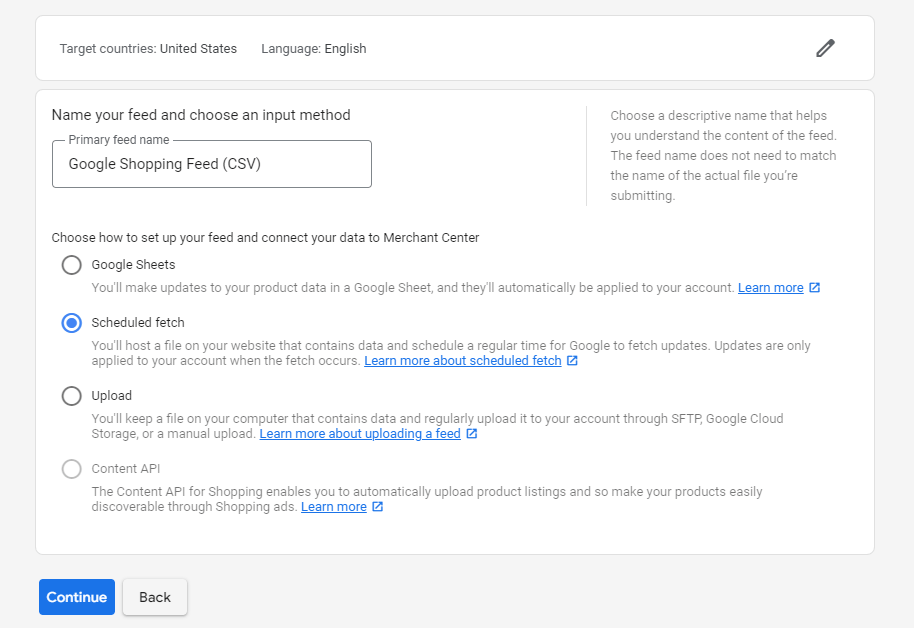
Fill out the name of your feed.
Set Fetch frequency, Fetch time, and Time zone.
Navigate to the Mulwi app - Google Shopping Feed - Feed block - Click the Copy link button. Paste the link you've copied in the Mulwi app in the file URL field.
If your URL is password protected, provide your login info.
If you set the username and the password in the Mulwi app in the General tab, you must use the same data in the Merchant Center. If these data do not match, the feed will not be uploaded.
Click the Create feed button to finish.
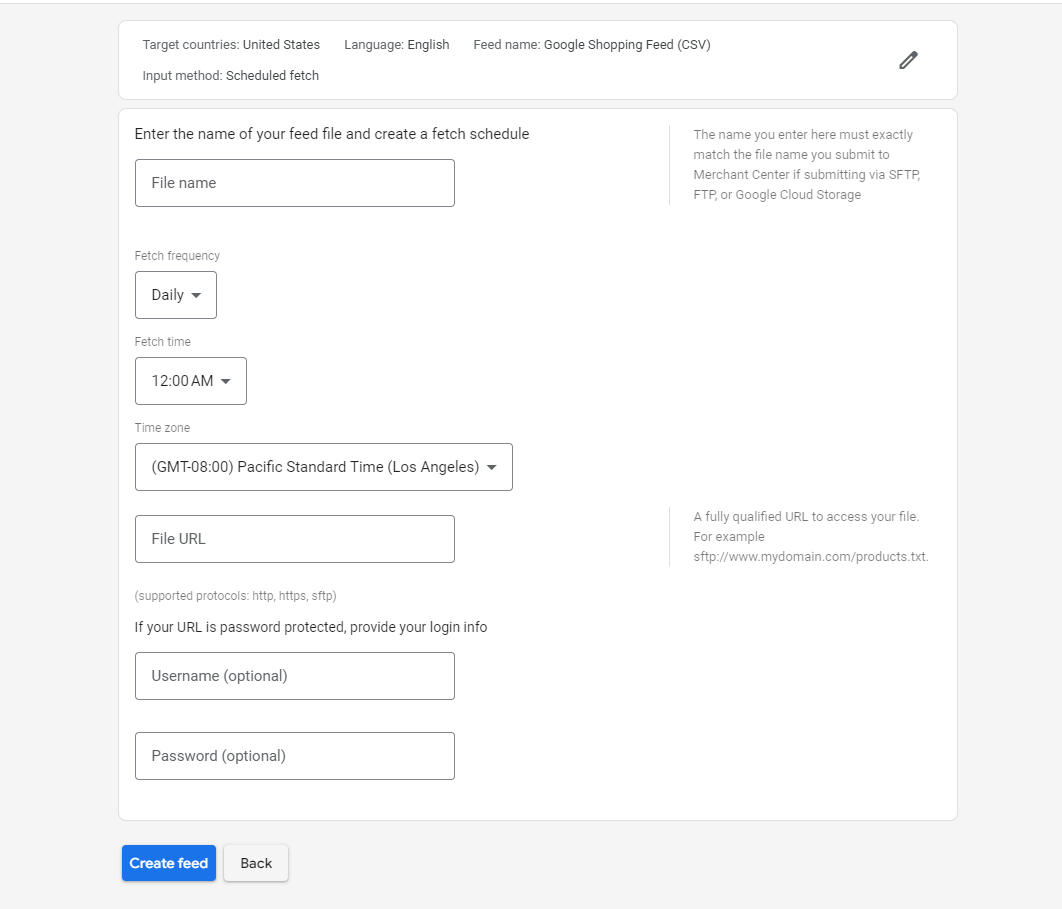
Enter the name of your feed file and create a fetch schedule:
Upload the Google Shopping Feed over SFTP
SFTP, or SSH File Transfer Protocol, is like a secure way to send and receive files on the Internet. It makes sure your data is safe by using encryption. It's like sending your files in a locked and safe box. This method is more complicated than the first one. It is aimed at more professional usage. Still, it is recommended due to encryption.
Create the primary feed.
In your Google Merchant Account, navigate to Products - Feeds and click the Plus button.
Press Add and choose the country where you’d like to show goods from your feed.
Select the Language of your feed.
Choose destinations where the goods from your feed will appear.
Fill in the name of your feed.
Select the Upload option and click the Continue button.
Write the exact name of your feed. The feed name must match with the Mulwi app.
Click the Create feed button.
Create an SFTP account in Google Merchant Center:
Log in to your Google Merchant Center account.
Select SFTP/GCS from the settings dropdown.
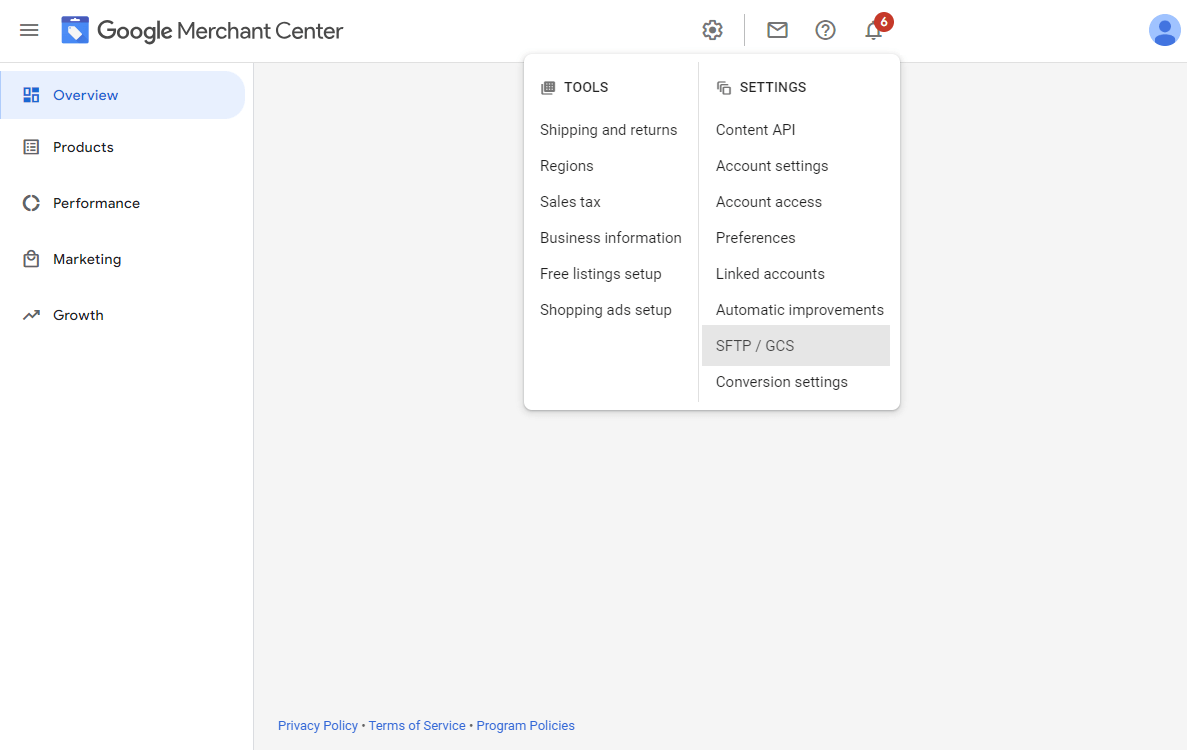
Select the SFTP tab.
An SFTP account username will be automatically generated. To generate a password and enable your account, click Generate.
A popup box that contains your automatically generated password will appear.
Your password will not be shown again for security reasons. Make sure you securely store your password before dismissing the popup box.
To return to the SFTP Settings page, click Dismiss.
First password generation may take effect for only several hours. If you can't log in to the SFTP server immediately, try again later.
Go to the Mulwi Shopping Feeds app:
Navigate to the Google Shopping feed.
Click Edit.
Click Upload Settings.
This tab is available in the XML format from the start. In CSV/TXT formats, you need to click the Customize feed button, and this tab will appear as well.
Paste the SFTP credentials from your Google Merchant account:
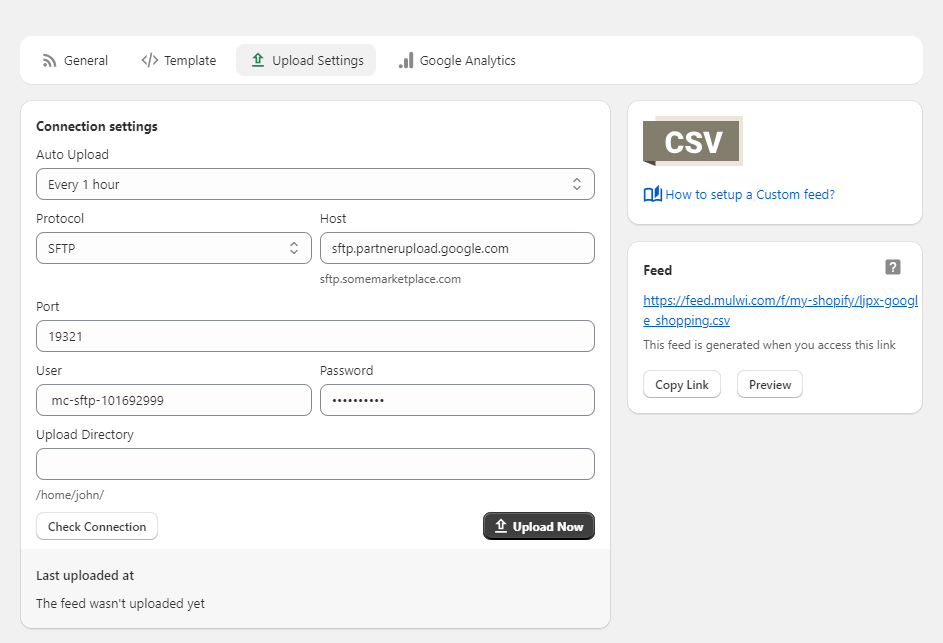
a) Auto Upload: choose the time interval of the automatic feed uploading
b) Protocol - select SFTP
c) Host (Server) example: sftp.partnerupload.google.com
d) Port example: 19321
e) Use the same Username and Password you created earlier for the Merchant Center
f) Leave the Upload Directory empty
Click Check the connection to make sure all the data is right.
Click the Save and Upload now buttons to finish uploading.
The maximum supported file size for upload is 4 GB.
Direct Google Shopping Feed file upload
We do not recommend using this method as in this case the Google Merchant Center will not be able to update your products automatically. If you change the product data in your Shopify store, you'll need to upload it again to the Merchant Center.
The maximum supported file size for upload is 4 GB.
Go to the Mulwi app. Upload the feed file by clicking on the feed URL in the Feed block of your Google Shopping Feed.
Log in to your Google Merchant Center account.
In the navigation menu, click Products, and then select Feeds.
Click the Plus button.
Press Add and choose the country where you would like to show goods from your feed.
Select the Language of your feed.
Choose destinations where the goods from your feed will appear.
Fill in the name of your feed.
Select the Upload option and click the Continue button.
Write the exact name of your feed. The feed name must match with the Mulwi app.
Click Upload a file now.
Press Browse and select the feed file from your computer.
Click the Create feed button.
Link Google Ads to the Google Merchant Center
Google Ads is an online advertising platform developed by Google. Sellers can display advertisements, service offerings, product listings, and video content through it. Expanding your reach to international markets via Google Ads can result in a higher ROAS. It can decrease Cost Per Click (CPC) compared to advertising solely in your home country. You can learn more about Google Ads here. The platform exists separately from the Google Merchant Account. But you can link them by following the steps below.
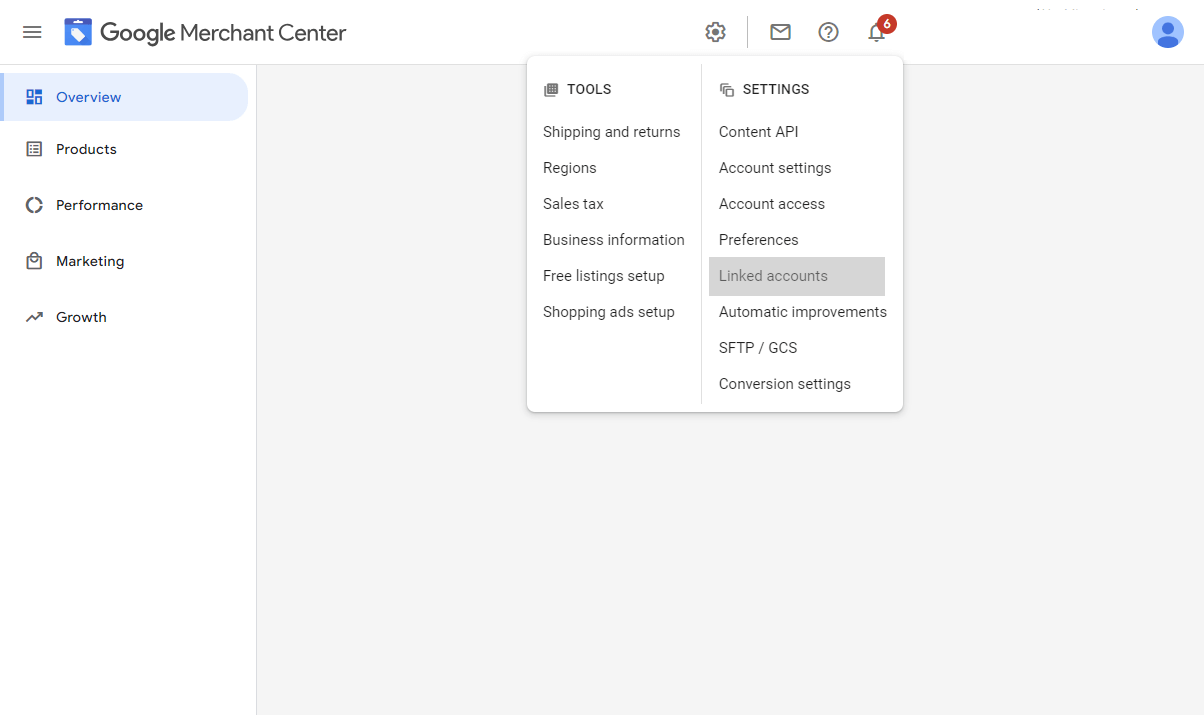
Click the settings icon in your Google Merchant Center account.
Select Linked accounts.
There are three ways depending on the Google ads accounts you have or do not have at your disposal:
Create a new Google Ads account if you do not have one.
Click the Link to Google Ads.
Press Create account. Follow the instructions to complete your account and link it to the Merchant Center.
You must provide your time zone and currency during the setup process. The options are pre-populated based on your location. But you can change the time zone and currency while setting up your account. After you create your account, you will not be able to change these settings later.
Link to your Google Ads account if you already have one. Choose this option and click the Link account button.
Enter your Google Ads customer ID in the Google Ads tab, then click Link.
If your Google Account is already associated with one or more Google Ads accounts, select the Google Ads account from the list instead.
If your Google Ads account requires 2-Step verification, you will need to Turn on it in your Google account. Or Disable the 2-Step Verification requirement in Google Ads before linking your account.
Link to a Google Ads account you don't manage if the account administrator is not you.
Press the Link account. Fill out the Google Ads Customer ID of the account admin, and click the Send link request button. You will be notified about the success of the operation.
Read more detailed instructions here.
Conclusion
In this article, we've explored a popular platform with 3.6 million monthly visits. It highlights the significance of the US market, which is a leader in website traffic. The US Shopify market is a profitable space with a diverse audience of buyers. Google Shopping is a great opportunity for sellers worldwide. We hope our guide has made it easy for you to connect your Shopify store to Google Shopping. This process opens doors to your store's success in the competitive US market.
In the context of Google Shopping Feed creation, the Mulwi app stands out as the premier choice for Shopify store owners. The app ensures the accurate transfer and update of product data. This transfer is not just a technical necessity, but a crucial step in meeting Google's requirements and optimizing your product listings for maximum visibility and performance. The Mulwi Shopping Feeds team will help you with any technical issues to speed up your way to success.