Promoting your store with Microsoft Ads can be the breakthrough you need to expand your customer base and boost sales. With Microsoft Ads, you will get access to a unique audience less targeted by other major advertisers like Google. Although this market segment may be less competitive, it is no less valuable. In this article, you will learn how to advertise on Bing and how to optimize every aspect of your Microsoft Ads campaign, from target audience and keywords to budgeting and Bing shopping feed.
Getting Started with Microsoft Bing Shopping Campaigns
The first step on your way to advertising on Bing is to sign up on Bing Ads. This process is easy and requires only a few minutes and a Microsoft account. But don’t worry if you don’t have a Microsoft account: you can make one during the sign-up process.
Go to the official Microsoft Ads website and follow these steps to register:
- Click the Sign up now button. Sign in with a Microsoft account if you have it. If not, click Create one to quickly set up a new account.
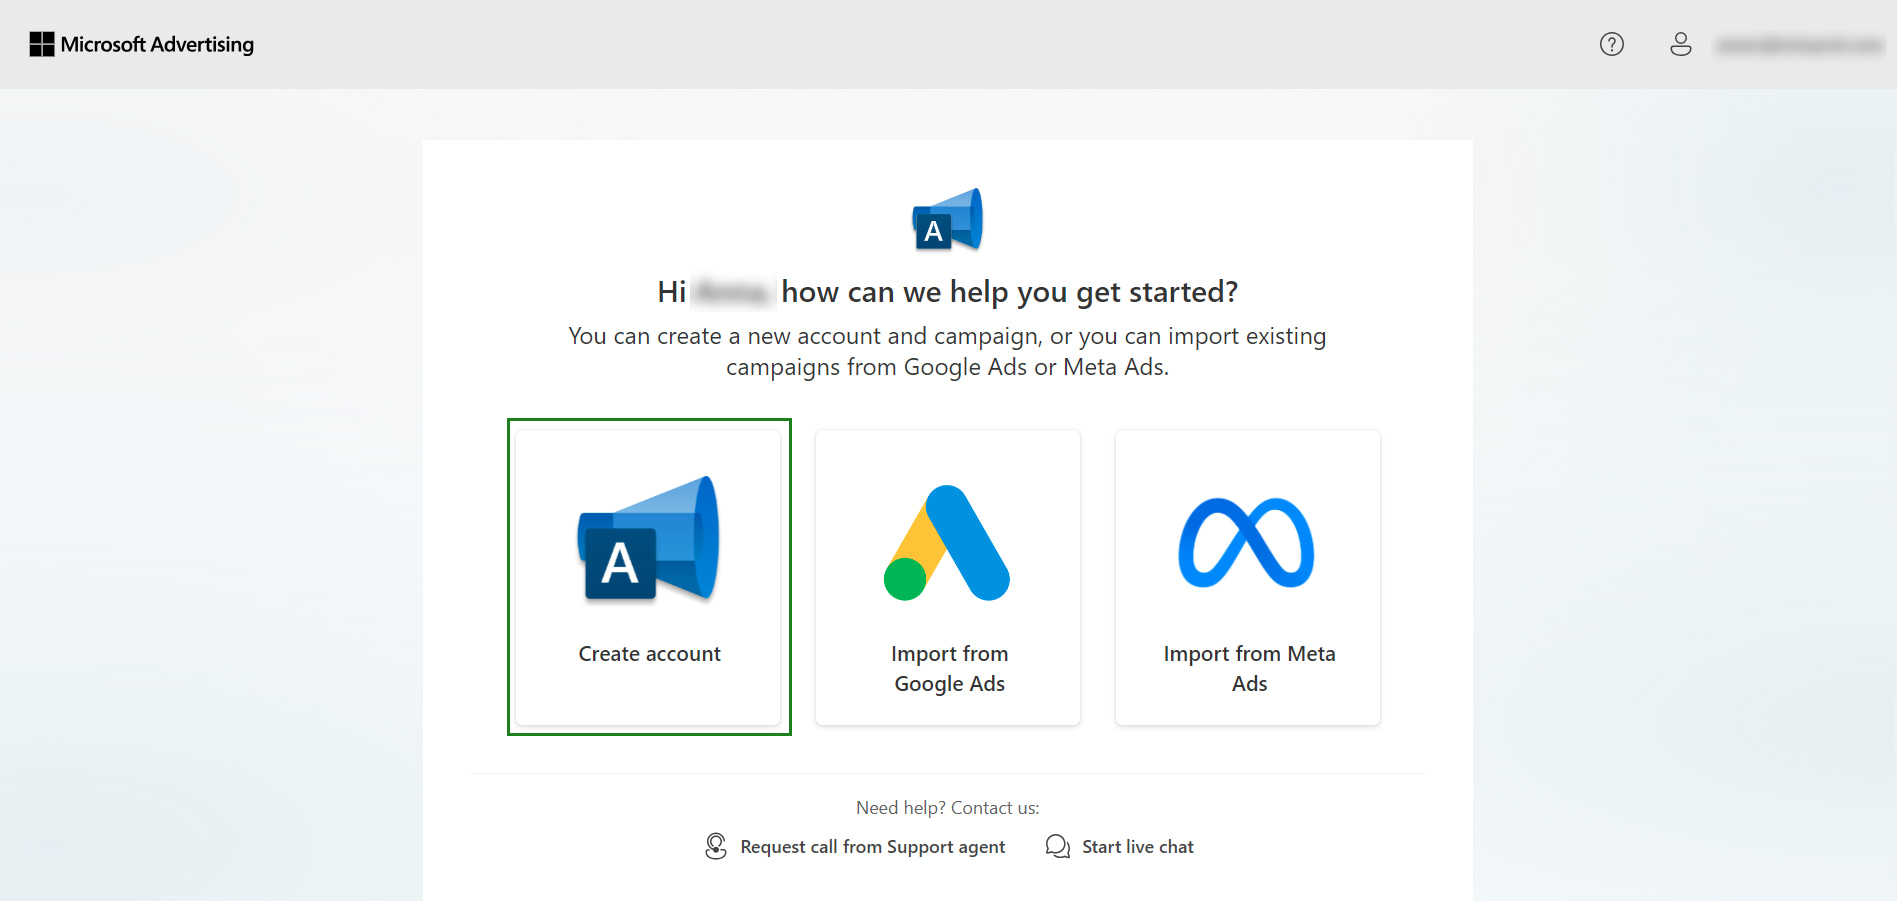
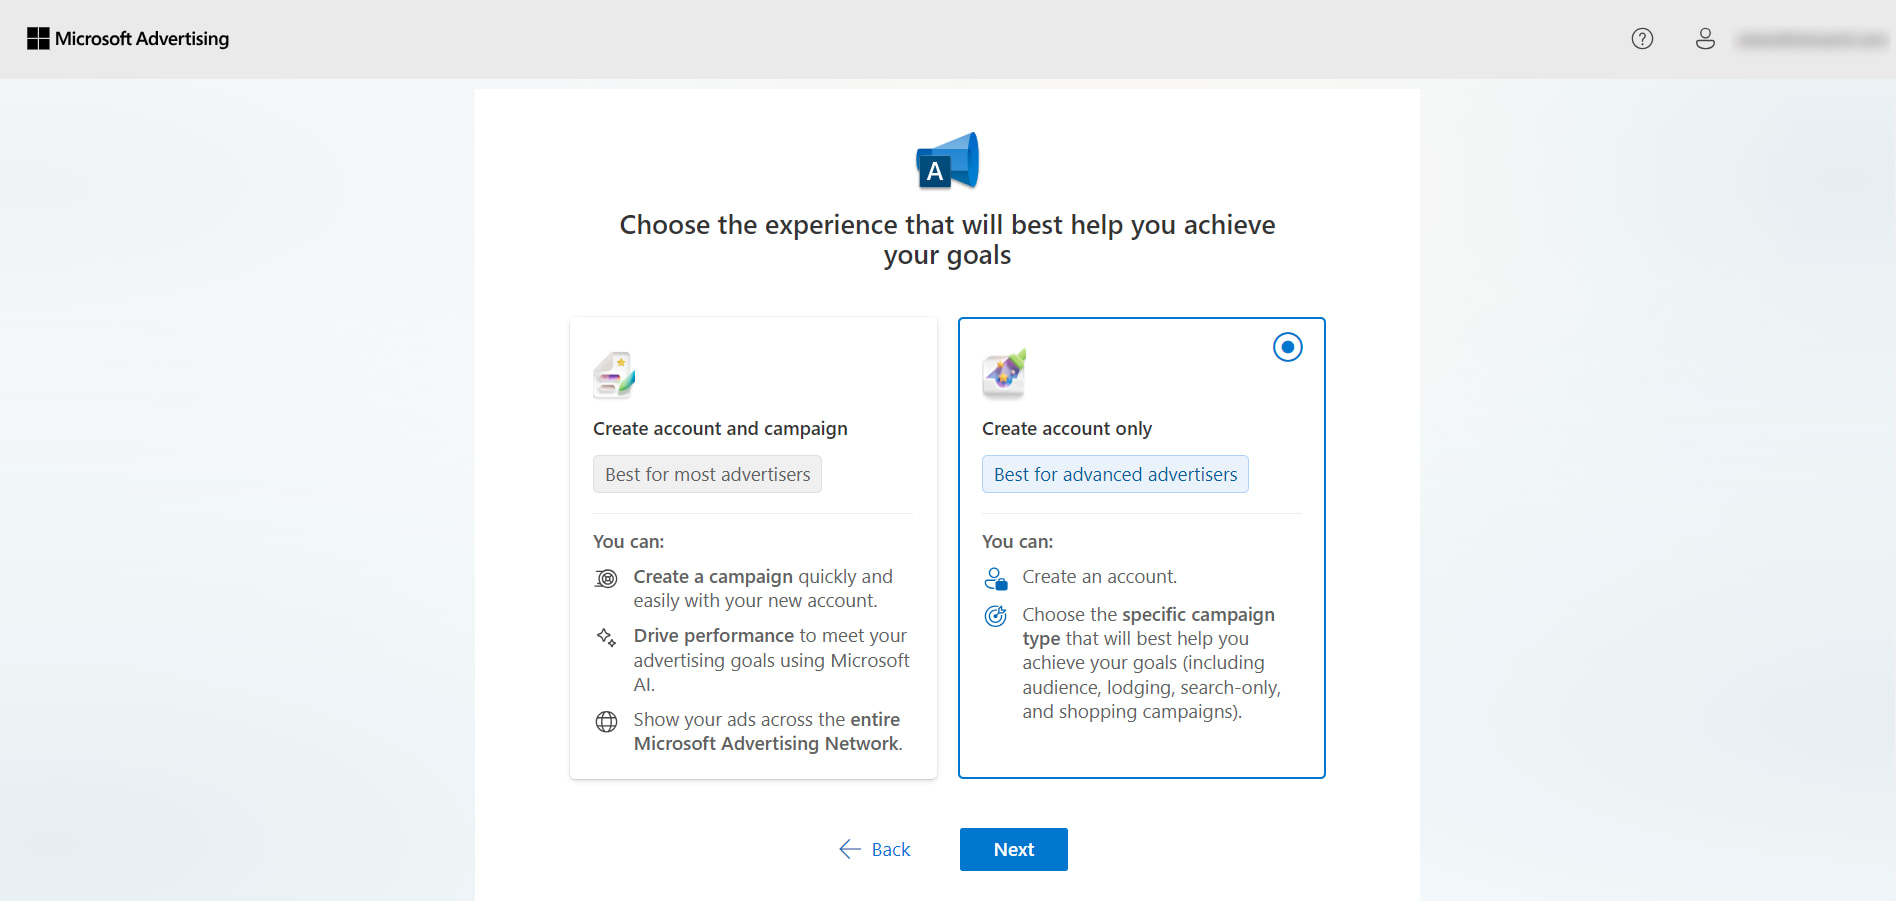
- There will be three options: Create account, Import from Google Ads, and Import from Meta Ads. We recommend selecting Create account for now. While you can import campaigns from Google Ads or Meta Ads right as you create an account, the import options at this stage are basic and limited. Importing later will give you more control.
- Enter basic information about your business, namely country, language, and store website URL.
- At this point, Microsoft also lets you create your first campaign while you finish setting up your account. However, we recommend choosing the Create an account only option. Just like with the import options before, the campaign settings are simple and limited at this stage. When you finish your account setup and create a campaign later, you will have more options for customization.
- Give more details about your business, such as its name, contact phone number, time zone, and currency.
- Configure your payment method. Pay attention to the payment setting. Prepay means you add funds to your account before you launch your ads. Microsoft will then use that money as your ads run. Postpay, on the other hand, means you pay after your ads run, based on how much you spent during a billing period.
Good job! You’ve created a Microsoft Advertising account! We know you’re excited to create a Bing Ads campaign, but let’s first look into some major factors that influence your campaign’s performance. Understanding them is important so that you can create an effective campaign right from the start.
Know Your Audience
Every ad campaign begins with audience research. If you know your audience, you’re aware of their problems. And if you know their problems, you can promote your products as solutions.
Microsoft’s audience is wide and diverse. Finding your fish in this sea can be challenging. But we will help you. Use these tips to choose and better understand your potential customers:
- Analyze your Shopify data. Look at your store’s current customers. Discover who they are, how old they are, and where they come from. Use this data to make a profile of your ideal customer.
- Understand your product’s value. Remember: your product is a solution. Think about what problems it solves. And focus on the people who have these challenges.
- Learn from your competitors. Check out ads from other businesses in your segment. This will let you see who your competitors target. Study their approach and learn from their mistakes.
- Use analytics tools. You can see how people use your website thanks to tools like Google Analytics and Microsoft Clarity. The data you gather hides your ideal customer’s profile. Search for trends, such as location, gender, and age, to find it.
- Speak with your audience. The easiest way to find out their problems is to simply ask them. Create surveys to learn what they need and like. You can also turn participants into potential customers by offering them a discount as a small reward.
Wonderful, you've found your target audience! But how can you create Bing ads that will resonate with them? These tips will help you with that:
- Divide and conquer. Group your potential customers by age, gender, location, and interests. Then make personalized messages for each group. For example, if you sell clothes, create separate ads for teens, young adults, and parents.
- Stay on trend. Update your ads to match what’s popular in your industry and the world. For example, you can use slang to connect with younger audiences or focus on promoting warm clothes more during cold months.
- Use engaging content. Grab people’s attention with images, videos, and catchy text. People are more likely to respond to relatable and appealing ads.
- Test and experiment. Try out several versions of your ads to see which people like the best. Change ad styles, images, and messages to find what gets the most attention.
- Choose keywords wisely. Use words your customers would use. Think about what they would type in when searching for your products.
But knowing your audience isn’t enough if you can’t speak their language. And your common language is keywords.
Choose the Right Keywords
Keywords are the phrases shoppers use to find your goods on Bing. And these are also the phrases your ads use to find the right people. Keywords are your first impression on your customers, so it’s important to invest time in choosing the right ones.
Just like in the natural language, different keywords can mean the same thing. This is why Bing and other search engines use three keyword matching types:
- Broad Match. Bing will show your ads for queries that use words with similar meaning. Those searches can include a part of your keyword, synonyms, or even misspelled versions of it. With this approach, you reach wide but have a low relevance.
- Phrase Match. Your ads will appear for queries that have the exact keyword. Those searches can have extra words before or after your keyword, but the keyword itself is unchanged. This approach gives you a balance between relevance and reach.
- Exact Match. Only the exact keyword or very close versions will trigger your ads. In this case, your ads will have high relevance, but fewer people will see them.
Let’s look at an example. If your ads target the keyword “flower bouquet”, then they may also show up for these searches:
- Broad match: “flower bouquet”, “flower delivery near me”, “floral arrangements”, “wedding flowers”, or even “garden flowers”.
- Phrase match: “best flower bouquet”, “flower bouquet for wedding”, “bouquet of flowers”, “buy flower bouquet online”.
- Exact match: “flower bouquets”, “red flower bouquet”, “flower bouquet delivery”, “mixed flower bouquet”.
Try each type of keyword to find those working the best. Here are a few more tips to help you come up with great keyword ideas:
- Pick words relevant to your business and products. Think about words that shoppers would use to find your products and create several versions of each keyword.
- Think about long-tail keywords. Short keywords like “t-shirt” have a lot of competition. Instead, focus on longer, more specific keywords, like “white women t-shirt size m”. Although they have fewer searches, they often convert to sales better.
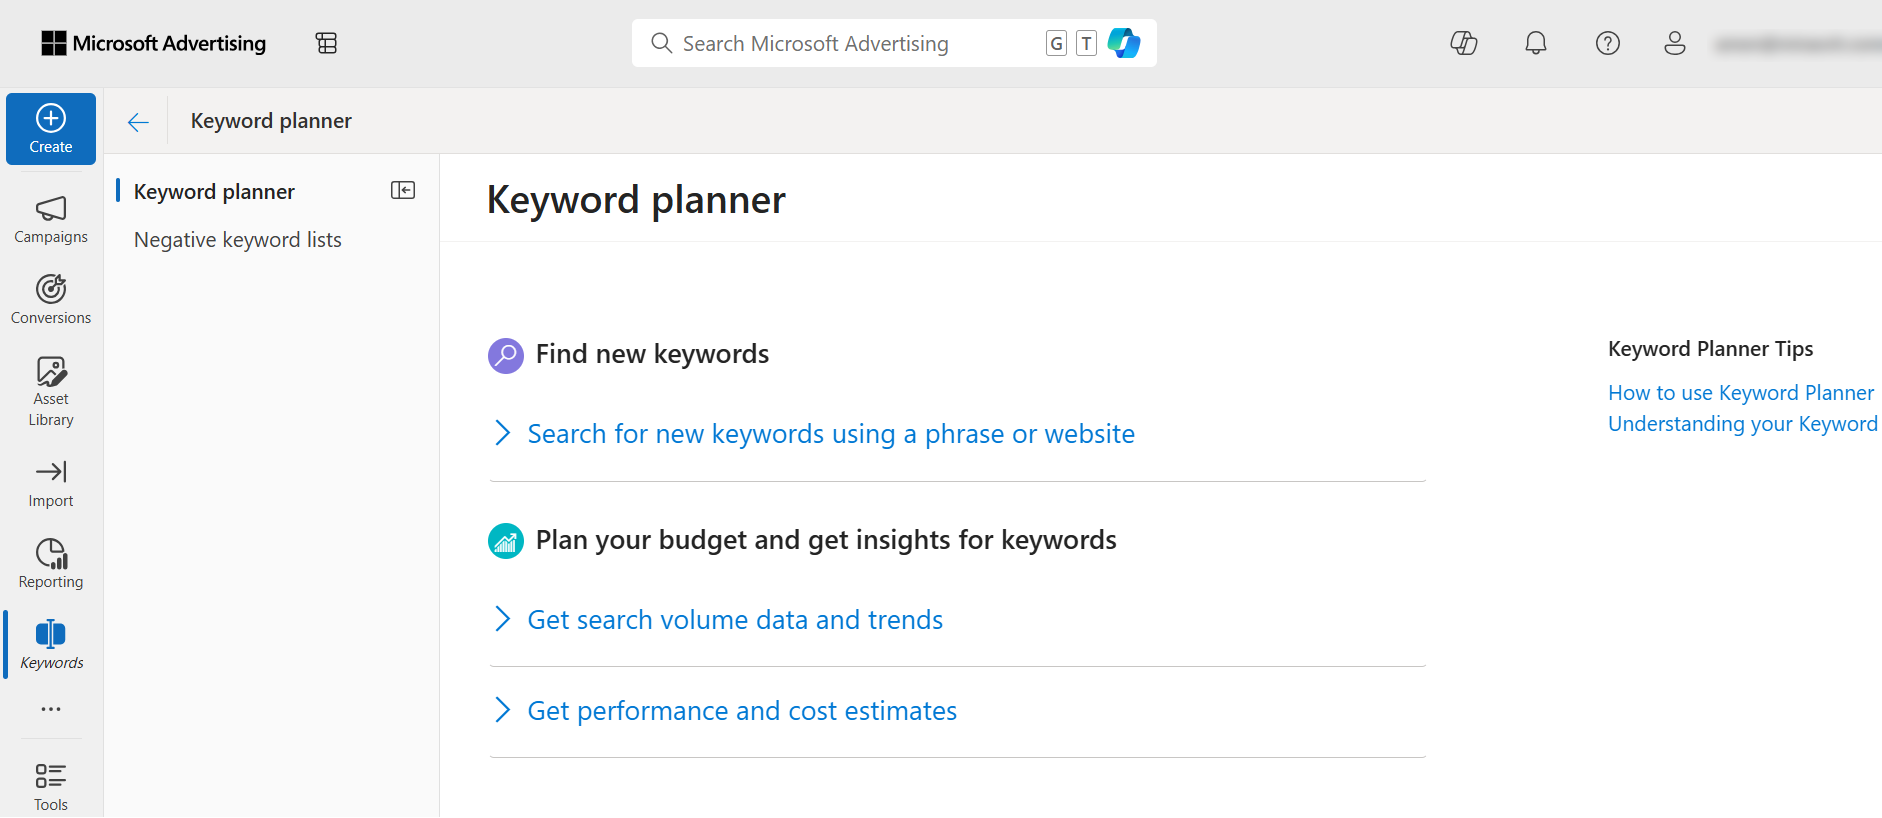
- Use keyword research tools. They can tell you how popular your keywords are, how tough the competition is, and what other similar phrases you can use. Try Keyword Planner in Microsoft Advertising and Keyword Research from Bing Webmaster Tools.
- Analyze your competitors and get inspired by their ideas. See what keywords they are using with tools like SpyFu and Ahrefs.
- Categorize your keywords. Create groups of keywords for specific audiences or topics. For example, you can use groups for ads promoting mid-season sales, new collections, and limited items.
- Use negative keywords. Sometimes you may find related words for which you don’t want to display ads. Write them down anyway! Give this list to Microsoft Advertising and it will do exactly what you want.
But remember: choosing keywords is not a one-time task. Trends change, and so will your keywords. It’s important to constantly monitor their performance and experiment with new ones. This and the right bidding strategy can help reduce your expenses and increase benefits.
Budget and Bid Strategies
Every cent will bring you profit if you know how to invest it right. It’s easier to choose your budget and bidding strategies when you learn about each available option. So, let’s look at the strategies Microsoft Advertising offers.
In Microsoft Advertising your campaign can have either a “Daily – Standard” or “Shared – Standard” budget type. Their main feature is the same: Microsoft will help you spend money in the way that your ads are shown evenly during the day. The key difference between these two types is how many campaigns use one budget. In the “Daily – Standard” type one campaign has a dedicated budget, while in the “Shared – Standard” type your budget is distributed between several campaigns based on their needs. We recommend starting with the “Daily – Standard” budget for your new campaigns so that you can control how much you spend on each one separately.
Now, let’s choose a bidding strategy. Microsoft Advertising uses cost-per-click (CPC), meaning you pay for every click on your ad. The more you pay, the higher Bing will show your ads. Microsoft Advertising can also help you manage your bids to meet a specific goal. Here are the bidding strategies suitable for Shopify stores:
- Enhanced CPC. Microsoft Advertising automatically changes the bids based on your previous performance. However, you can’t set a maximum CPC with this strategy.
- Maximize Clicks. Microsoft Advertising will set your bids to get as many clicks as possible. However, you can’t set a maximum CPC with this strategy.
- Maximize Conversions. Microsoft Advertising will change your bids to increase conversions. However, conversion tracking is required for this strategy.
- Maximize Conversions Value. Microsoft Advertising will help you increase the amount of conversions that lead to sales. However, conversion tracking is required for this strategy.
- Target CPA. You tell Microsoft Advertising what your target cost per acquisition (CPA) is, and Microsoft Advertising will automatically set your bids to achieve this value. However, conversion tracking is required for this strategy.
- Target ROAS. You set your target ROI and Microsoft Advertising will automatically change the bids to reach this value. However, conversion tracking is required for this strategy.
With this knowledge, you can now plan your expenses better. You can do it even more effectively with these handy tips:
Tips for Managing Budget and Bids
- Set a goal. You’ve already seen that Microsoft Advertising has different bidding strategies. Ask yourself what you want to get as a result, and pick the right strategy for it.
- Start small. Don’t throw in all your money at once. Start with a small budget that will be comfortable for you. You can always increase it once you see how your campaign performs.
- Use different targeting. If you notice a certain trend in how people interact with your ads, you can schedule bids to adjust to this time. For example, you can increase your bid on weekends or pay less when showing ads on tablets.
- Prioritize by the keywords. Remember your keyword groups? Some will perform better than others. Increase their profit even more with higher investments.
- Monitor your performance. The situation online can drastically change within a few hours. But don’t forget that you can change your budget at any time too. Check your performance daily to take action in time.
- Listen to recommendations. Microsoft Advertising can give helpful recommendations for your running campaigns. Don’t ignore your assistant. Instead, use this feedback to make your campaigns even better.
If you create a campaign with these tips in mind, you will turn each dollar spent on ads into millions in revenue.
Create and Set Up Microsoft Ads Campaign
Now that you’ve found your target audience, picked the right keywords, and chosen your budget, it’s time to create a Bing Ads campaign. We will walk you through all the configurations you must do in Microsoft Advertising to successfully launch a campaign.
Your whole journey will consist of four simple steps:
- Verify your Shopify store and connect it to Microsoft Advertising.
- Create a store in the Microsoft Merchant Center.
- Upload products to your Merchant Center with a Bing shopping feed.
- Create a campaign for your store.
Let’s cover each of them in more detail.
Create and Set Up UET Tags Using Shopify
A Universal Event Tracking (UET) tag lets you set up conversion tracking in Shopify. This tag allows Microsoft to collect data about what your visitors do on your website. You will also use it to show Microsoft that the store’s website belongs to you. Without a UET tag, you won’t be able to create a store in the Microsoft Merchant Center.
In this article, we will add a UET tag directly in Shopify. You can also set up Bing Ads conversion tracking with Google Tag Manager. Read the official Microsoft help to learn how to add a UET tag with Google Tag Manager.
Steps to Add Conversion Tracking to Your Shopify Store
- From the left navigation panel, choose Tools > Conversions > UET tag > Create.
- Give your tag a name and description. If you want to use Microsoft Clarity to collect and analyze user behavior, check the Enable Microsoft Clarity checkbox. When you’re done, click Save and next.
- Choose Add the tag through a website editing platform, then select Shopify.
- You need to add a block of code to every page of your website. To do that, follow the instructions Microsoft provides. When you finish, click Next.
- All done! Microsoft also congratulates you on creating a UET tag. Carefully read the information Microsoft provides and click Done to finish.

Great! Now Microsoft can track conversions on your website.
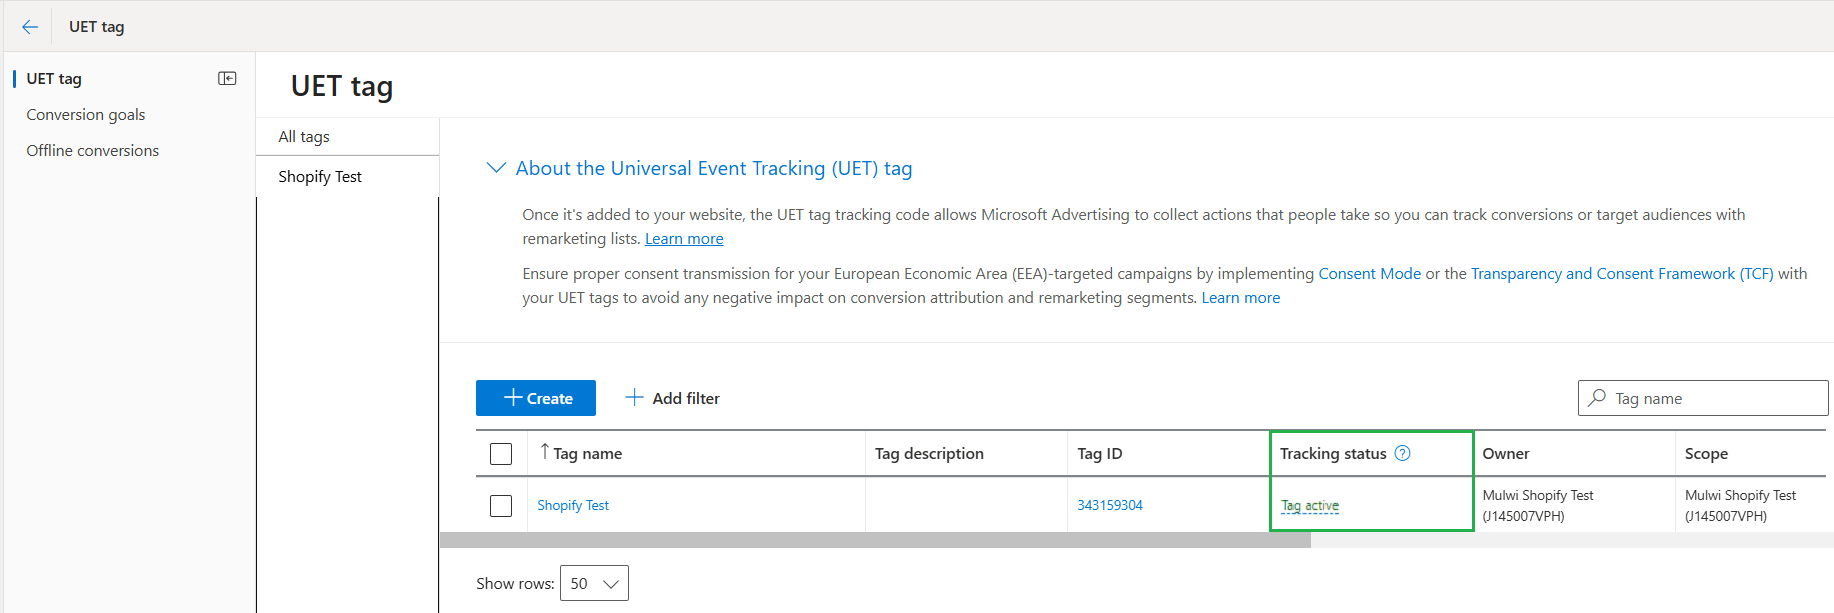
Pay attention! It may take up to 24 hours before Microsoft verifies your tag. Check your tag later and make sure that its tracking status is set to Tag active.
Connect Your Shopify Store with Microsoft Merchant Center
Now let’s create a store in the Microsoft Merchant Center. Microsoft will use products that you add to the Merchant Center in your campaigns. If you already sell on Google Shopping, you can import data from your Google Merchant Center. In this article, we will add a new store manually.
Pay attention! Your UET tag must have a Tag active status and register at least 50 actions on your website. Without these requirements, Microsoft will not show your website as an option.
Follow these steps to manually create a store in Microsoft Merchant Center:
- From the left navigation panel, choose Tools > Merchant Center > Create Store.
- Choose Create your store manually and click Next.
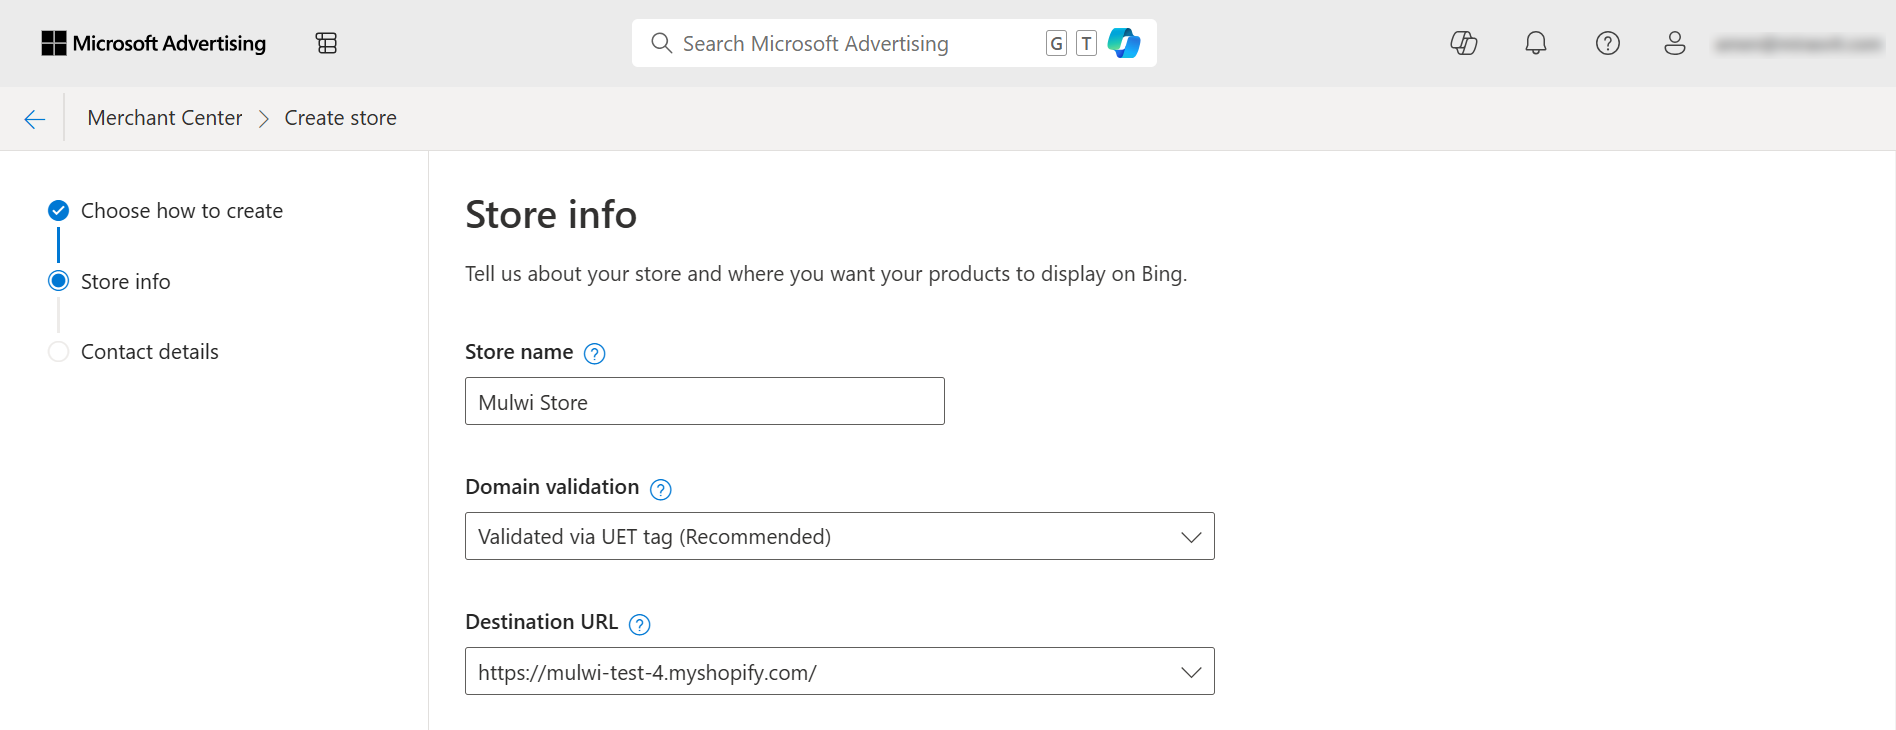
- Provide your store information:
- Enter your store name and description. Double-check the store’s name, as you won’t be able to change it later.
- For Domain validation, choose Validate via UET tag.
- In the Destination URL field, select your store website from the dropdown.
- Microsoft lets third-party sites called aggregators display your products on other shopping websites. Check the Block Aggregators checkbox if you don’t want to use them.
- Click Next.
- Pick your store’s language and provide your business email.
- Click Create Store to finish.
Great job! You’re halfway through! Next, let’s add products to your store.
How to Create and Use Bing Shopping Feed for the Shopify Store
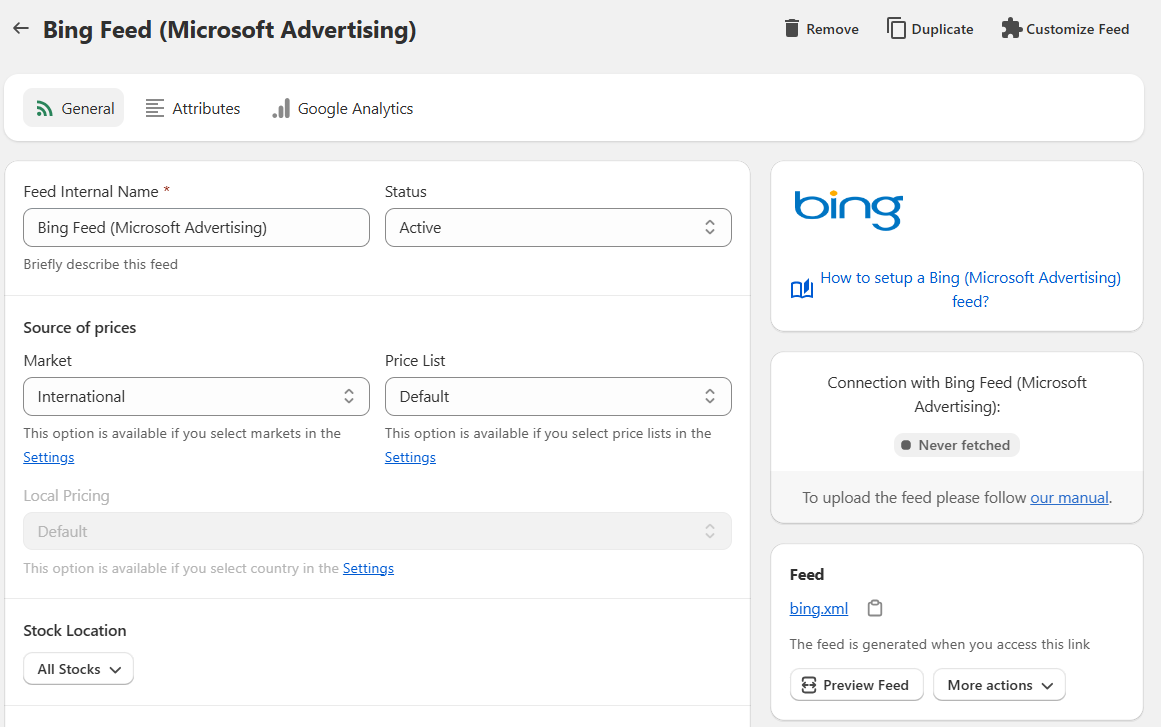
You have a Merchant Center now, so let’s fill it with your products. For that, you will need a Bing shopping feed. It’s the easiest and fastest way to upload all your products at once. Moreover, you can set up your feed to update regularly so that Microsoft always uses the latest information from your Shopify store.
It’s best to use one of the product feed solutions to create a feed. With Mulwi, you can create a Bing Feed for Shopify in just a few minutes thanks to our convenient, ready-to-use template. Read our guide to learn more about how you can quickly make a Bing shopping feed with Mulwi.
Steps to Upload Your Feed to the Merchant Center
- From the left navigation panel, choose Tools > Merchant Center > Feeds > Create feed.
- Fill in information about the feed:
- Feed name. Give it a meaningful name.
- Enable publishing. Leave checked to make the feed available for use during campaign creation.
- Feed type. Choose Online Products.
- Country of sale. Choose where you sell the products listed in your feed.
- Language. Select your feed’s language.
- Under Input Method pick how you want to upload your feed. If you need more detailed steps, consult our guide on how to upload your Mulwi feed to Microsoft Advertising. The Import method is used to add products from the Google Merchant Center, not from the feed file. Instead, choose one of these options:
- Manually Upload. Select a feed file from your device. Keep in mind that the changes in your store will not be shown in Microsoft Advertising with this method.
- Upload via FTP/SFTP. Configure an FTP/SFTP account in Microsoft Advertising and connect it with Mulwi. You set up the connection once and then Mulwi will regularly upload the file for you. Although the setup requires some technical knowledge, this method provides the highest security during feed upload.
- Automatically download file from URL. Provide your feed file URL and Mulwi will upload the feed itself. It’s the easiest and fastest option. However, it’s not the best choice if you need to update your products frequently during the day. In that case, consider uploading via FTP/SFTP.
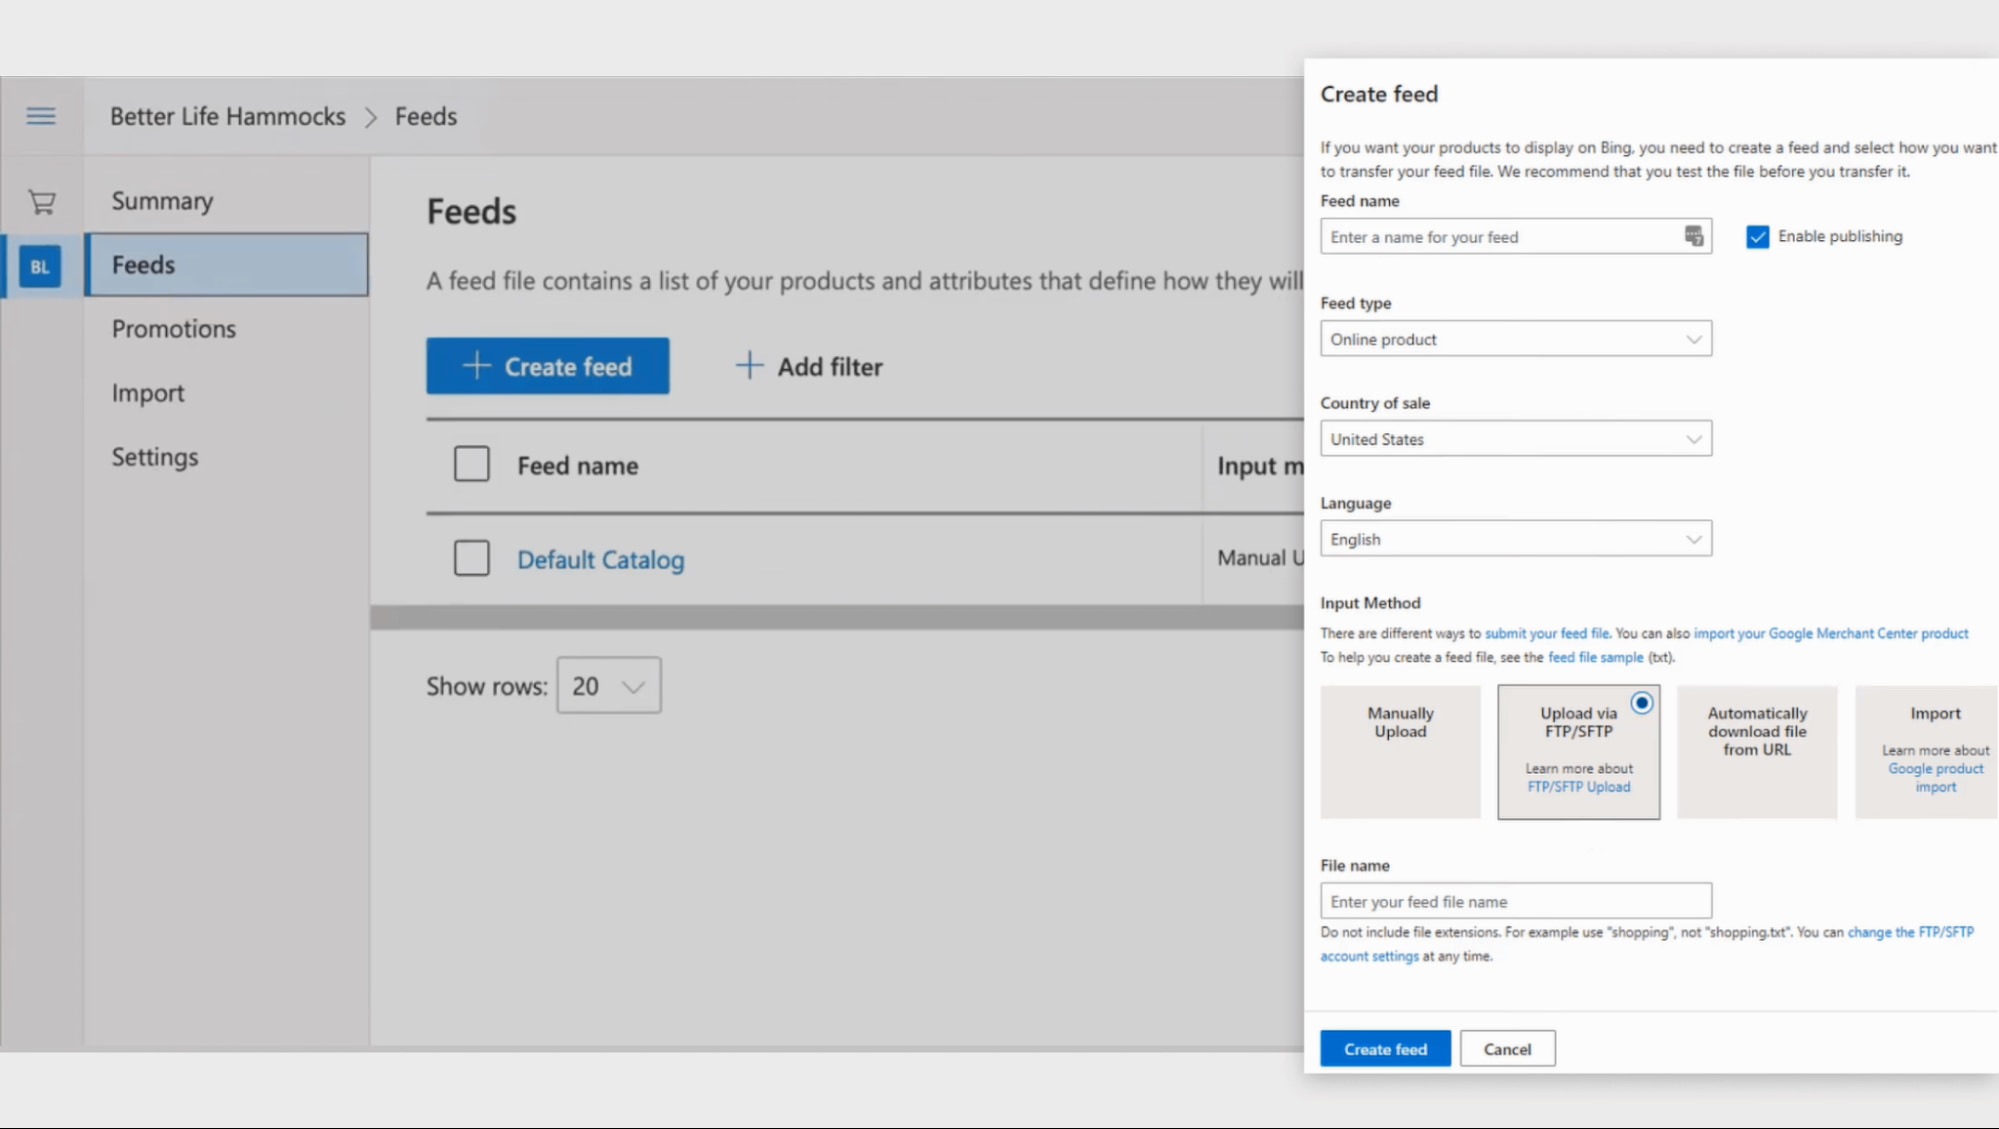
Click Create feed to finish and upload your feed.
You’re almost there! You’ve finished all the preparations, and now you can move on to the most exciting part: creating your first ad campaign.
Create Microsoft Ads Shopping Campaign
Finally, let’s see how to create Bing ads. Microsoft Advertising has three types of campaigns that are designed specifically for product selling:
- Performance Max. Microsoft AI helps you create and show ads. You provide basic settings for the campaign and add your assets, such as images and text. Microsoft AI will then create ads with those assets and use your settings to determine which ads to show to which people.
- Standard Shopping. You create your ads yourself and control every aspect of your campaign. This type gives you the most freedom in customization. Standard Shopping also has two ad types:
- Search ads. Your ads appear in search results on Bing, AOL, Yahoo, and other affiliate websites like DuckDuckGo.
- Audience ads. Your ads appear in Microsoft Network apps like Microsoft Edge, Outlook, and Office.
- Smart Shopping. It has the same features as Standard Shopping, but Microsoft Advertising handles bidding and targeting automatically.
In this article, we will create a Standard Shopping campaign with Search ads. Consult Microsoft’s official manual if you want to create a Performance Max campaign.
Follow this tutorial to create a Microsoft Ads campaign:
- On the left navigation panel, click the Create button.
- Pick Sell products as your campaign goal.
- Choose Standard Shopping > Search as a campaign type and click Continue.
- Enter basic information about your campaign:
- Name. Give it an informative name.
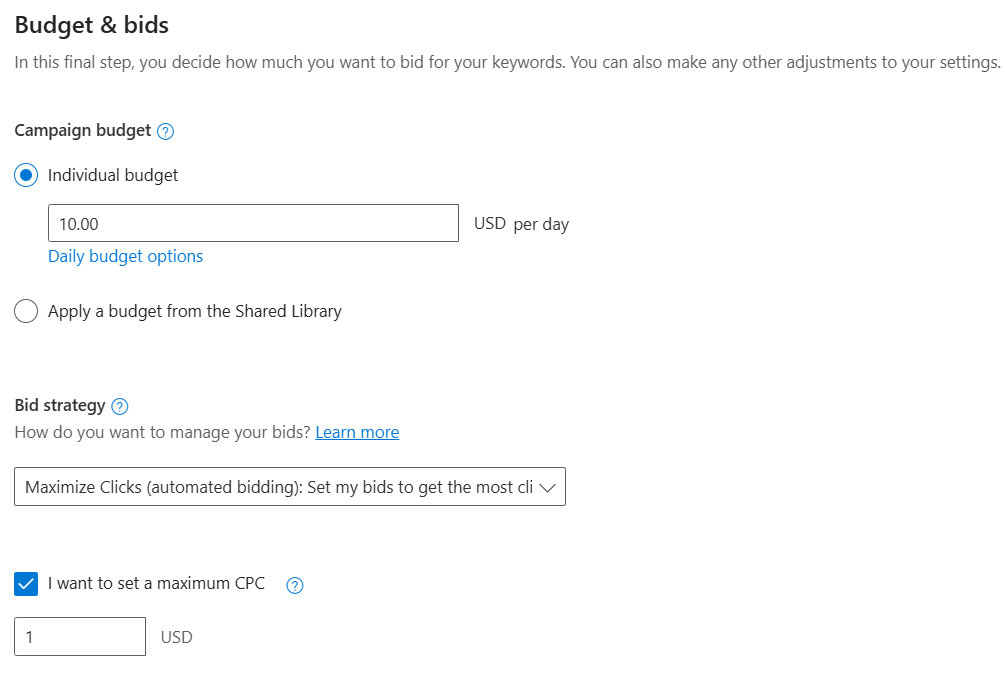
- Budget. Set your daily budget.
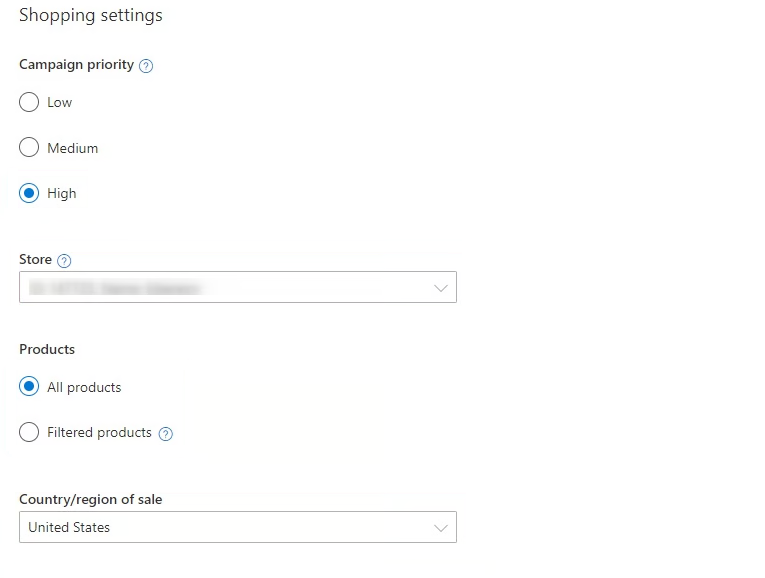
- Priority. If you plan to run multiple campaigns, tell Microsoft how often it should advertise products from this campaign.
- Store. Pick the store from which Microsoft will use the product information.
- Products. Filter which products to advertise.
- Country/Region of sale. Select in which country you sell the products. It should match the Country of sale you’ve set for your product feed.
- Location. Select the geographical locations where Microsoft will show your ads.
- Language. Choose the languages of websites on which your ads will appear.
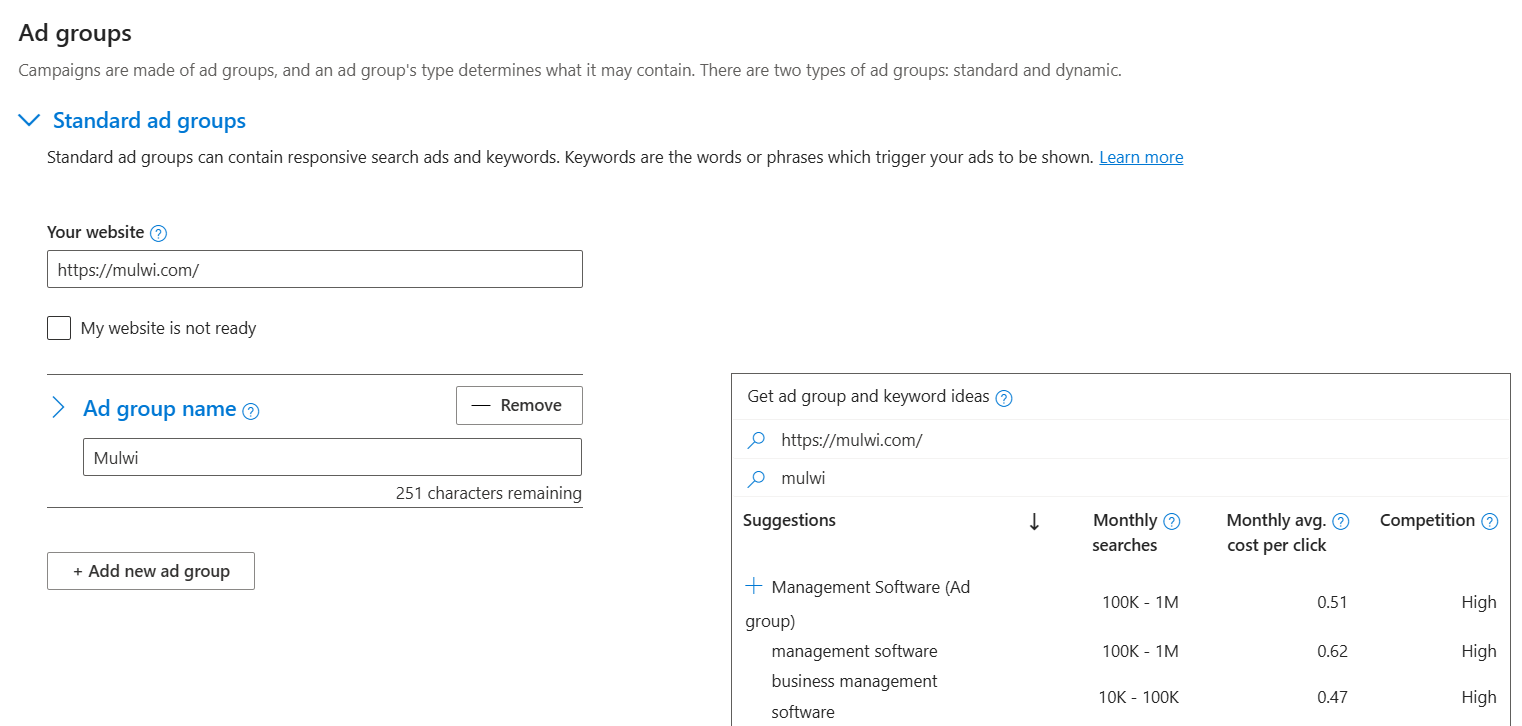
- Create ad groups. An ad group is a way to get relevant keywords together. You can provide your keywords in the Standard ad groups, or let Microsoft analyze your website and come up with keywords itself with the Dynamic ad groups. You can also use a widget on the right side to see what keywords Microsoft suggests for your website.
- Finally, check your budget and choose the bidding strategy. You can also add categories for which you want to adjust your bids, such as the age and gender of your audience or the devices they’re using. In the advanced settings, you can also schedule ads to appear at specific times.
- Carefully review your campaign and click Save to finish.
Congratulations! You’ve just finished setting up Bing ads! There’s one final check your campaign must pass before it goes live. This process usually takes up to one business day. After Microsoft reviews your campaign for policy compliance and approves it, your ads will start running. In the meantime, you can spend this waiting time optimizing your campaign.
Optimize Your Microsoft Advertising Campaigns
Wondering how to create successful Bing ads? The key to success is optimization. Your campaign will perform even better than you expect if you follow these best practices:
- Use good images. Your product should be the main focus of the image. Show its front view on a white background. Make sure the whitespace around your product takes up no more than 10% of the picture.
- Match your ads with the landing pages. Misleading ads often turn customers away because customers expect to find the same information in the ad and on the website. Check that your ads have the same content as their landing pages.
- Make a high-quality feed. Add as many attributes as you can to tell customers everything about your goods. Create informative product descriptions and include the product’s key aspects in its title. With Mulwi, you can also use our Quality Control feature to see how you can enhance your product feed.
- Experiment with ad extensions. Use them to connect deeper with your audience and motivate them to take action. For example, you can build trust by showing product reviews. You can also feature your special services with a callout extension and even add a call-to-action button so that customers can checkout directly from the ad.
- Bid differently for various devices. Personalize not only your ads but your bids as well. Tablet and mobile users are often overlooked. You can adjust your bids based on the user's device to effectively reach your audience through screens of all sizes.
- Schedule your ads. Be active when your audience is. It’s especially important if your audience is located in different time zones. You can set the days and times when your ads will show the most for multiple target locations.
But keep in mind that no matter how much you optimize and automate your campaign, you still need to regularly check its performance.
Track Your Results
Looking back at how well your campaigns performed is a reliable way to find opportunities for growth. Here are several tips to help you analyze your campaign’s results:
- Use metrics. A few numbers can say more than a thousand words. Microsoft Advertising shows different metrics for each campaign, such as clicks, average CPC, conversions, and click-through rates. Monitor these metrics regularly and take action to change the ones you focus on the most.
- Become friends with reports. In the Reporting menu, you can view and analyze performance data in the form of graphs and spreadsheets. Microsoft Ads offers over 40 different default reports, but you can also create a custom report to include only the information you need.
- Assess your keywords. Microsoft Advertising has a Quality Score feature that tells you how well your keywords work on a scale of 1 to 10. Look out for low scores: keywords with Quality Score values below 6 are underperforming and require your attention.
- Check out search terms. When analyzing keyword performance, you can also see what users are searching for when they encounter your ads and how relevant your keywords are to these searches. If some keywords aren’t working well, you can mark them as negative.
- Take Microsoft’s advice. Microsoft Advertising has a dedicated section named Recommendations in your campaign menu. Here, Microsoft advises you on how to optimize keywords, biddings, target audience, and more. Listen to your partner and try implementing these recommendations.
With these tips, you will be able to extract value from your data and use this information to enhance your campaigns.
5 Tips for Creating a Successful Microsoft Ad (Bing Ads) Campaign
So, in conclusion, let’s review the 5 key steps to a successful Microsoft Ads campaign:
- Create a good product feed. Include all necessary information in your Bing shopping feed. Connect it to your Microsoft Merchant Center via URL or SFTP so that your product information is regularly updated.
- Know your audience. Choose wisely where and to whom Microsoft will show your ads. Target those regions where you operate. For example, don’t show ads in Australia if you don’t ship your goods there. Also, choose your demographic carefully so that you don’t waste money on ads people won’t be interested in.
- Experiment with keywords. Start with exact and phrase match keywords to find the most profitable ones. Raise your bids for those that perform better. Use negative keywords to avoid irrelevant queries.
- Invest carefully. Start with a small budget. Regularly review your budgeting and bidding strategies. Set a goal and choose a bidding strategy for it. Choose the default “Enhanced CPC” strategy if you don’t know where to start.
- Look after your campaign. Check analytics regularly to pinpoint and eliminate the weak spots. Monitor key metrics like conversions and average CPC. Listen to Microsoft’s recommendations and try them out.
If you already use Google Ads, Meta Ads, or Pinterest Ads, here’s a bonus tip. You can import successful campaigns from there and test if they perform well on Microsoft network. See more on how to import the campaigns in Microsoft's official help.
But don’t stop on Microsoft Advertising! With Mulwi and our shopping Feeds for Shopify, you can conquer new sales channels just as easily. Especially since the whole setup process has the same key steps: set up a merchant account, create a product feed, upload it to the merchant account, and create an ad campaign. Try Mulwi today and boost your sales even higher!


