Awin
On this page, you will find out how to:
- connect your Shopify store to Awin;
- prepare an Awin product feed using Mulwi;
- upload your Mulwi feed to Awin;
- solve common errors regarding Awin product feeds;
- invite Mulwi's support expert to your Awin account.
1. Connect your store to Awin
You connect your store to Awin through a respective account on its platform.
Register an account
In order to create an Awin account, you must send a connection request to Awin's support team:
Steps for registering on Awin
- Go to the Awin sign up page.
- Click the Advertiser Sign Up button.
- Fill out the contact form.
NOTE
The contact form is different for each supported territory.
Before filling out the form, check that Awin's website shows you a correctly localized version of the webpage.
- Click Submit to send the connection request.
Afterwards, wait for Awin's reply to schedule a call. Awin usually responds in 1 business day.
Once you meet with Awin and agree on your cooperation, Awin will create a new advertiser account and give you the credentials for it.
Build your advertiser profile
You log in to your advertiser account through the Awin user interface.
Next, you must complete your profile and affiliate program details.
Without a complete profile, publishers won't be able to find and work with you.
To finish setting up your Awin account, follow these steps:
Steps for setting up your Awin account
- Navigate to Account > Profile > Overview.
- Add basic business information:
- Click the pencil icon near the Profile Picture and upload your company logo.
- Write a short description of your company in the Summary section.
- Provide your store's website and other social links in the Links section.
- Add your contact information in the Contact section.
- On the Overview tab, specify more details about your affiliate program and business.
- On the Documents tab, upload any materials about your business, such as brand presentations, if necessary.
- Fill out all sections of the Program terms tab:
- General. Add your program's policy.
- PPC. Specify how you work with publishers using a PPC (pay-per-click) model.
- Transactions. Explain how you calculate commissions.
- Branding. Add guidelines on how to use your branding.
- Notice Periods. Tell how many days in advance you will notify publishers about any changes to your program or website.
- Publishers. Choose which types of publishers you want to work with.
- De-Duplication. Specify whether you work with other advertising channels and, if you do, how you determine which one gets paid if multiple channels contribute to the same sale.
- On the Commission Groups tab, add more information on how your commissions work.
- Navigate to Account > Promotional > Sector Categorization and choose your business sector.
- Navigate to Toolbox > Links & Tools > My Creative and upload your promotional materials.
Add tracking to your website
Tracking lets Awin record which publishers have brought you sales. Follow these steps to add Awin tracking to your online store:
Steps for adding Awin tracking to a Shopify store
- Log in to your Awin advertiser account.
- Go to Support > Integration > Tracking Installation Guide.
- Choose Shopify as your platform and click Next.
- Follow the instructions Awin provides to set up and test tracking in your store.
2. Create the product feed
To upload your products to Awin, you need to create and configure the product feed. To do this, log in to your Shopify store admin and follow these steps:
Steps for creating an Awin product feed in Mulwi
- Go to Apps > Mulwi Feeds > Feeds.
- Click Add Feed to generate the new feed.
- Choose the Awin feed template. The feed is created in CSV format.
- In the pop-up window, select which product data to use as feed content and click Create. You can change this later in the Feed content field of the feed's general settings if necessary.
- Set feed's status in the This feed is currently block to Active.
- Fill in the general feed information:
- Feed Internal Name. Give your feed a descriptive name.
- Filename. Give your feed file a unique name.
- Max Number of Items per File. Limit the amount of products in the feed.
- Compression. Compress the feed file if necessary.
- Protect feed with password. Password-protect your feed if necessary.
- In the Applied Filters section, you can use product filters to choose what products should be included in the feed.
- In the Template section, pick appropriate values for Awin's required Attributes:
- Delivery Costs. Specify the cost of shipping the product in the same currency as your product prices. Enter it as a numeric value using period as a decimal separator (for example, 4.99).
- Delivery Time. Specify the product's estimated shipping duration with the measuring unit. You can enter the value solely as a text string (for example, Next day) or as a combination of numbers and text (for example, 3 to 5 hours or 2-4 working days).
- Size. Select all the attributes that indicate the product's size.
- Color. Select all the attributes that indicate the product's color.
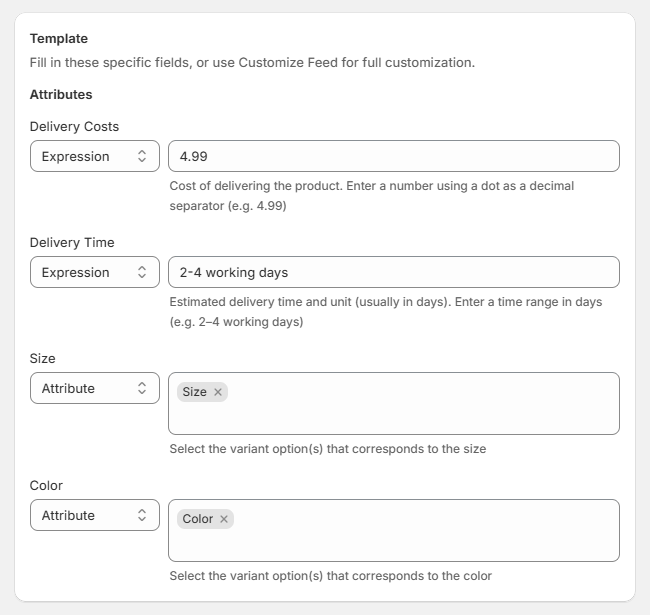
Filling out required attributes in an Awin feed template
- In the Source of prices section, you can set product prices from Markets or Price Lists.
- In the Stock Locations section, select from which locations you want to include stock levels and availability information.
- In the Translation section, you can select a language to translate your feed into.
- Configure the Google Analytics section if you have an analytics campaign.
- Click Save at the top of the page to finish and generate the feed.
NOTE
You won't be able to change the Filename after you save the feed.
After saving the new feed, you can customize it if necessary.
You will also be able to map your categories to the Awin Product Taxonomy. To do that, fill out the Awin Product Category field in the feed's Template section.
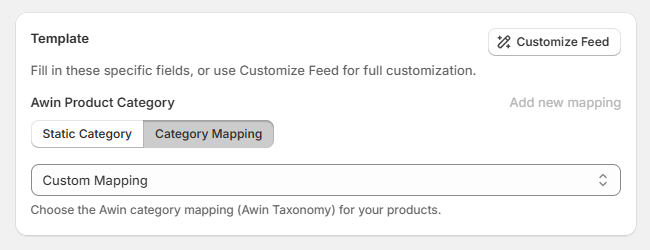
If your products have the same category, use Static Category. Start typing the category name or ID and choose the appropriate category from the dropdown menu. For multiple categories, use Category Mapping.
NOTE
If you need help setting up, optimizing, or troubleshooting your feed, don't hesitate to contact our support team. We will be happy to assist you.
3. Upload the feed to Awin
You can upload your feed to Awin via URL (HTTPS) or manually.
NOTE
We recommend using the HTTPS method due to automatic feed updates.
Upload Awin feed via URL (HTTPS)
First, you copy the feed's URL from Mulwi in such way:
- Navigate to the feed you want to upload.
- Find the Feed block.
- If you have a single file, simply click the Copy feed URL button.
- If you've split your feed into multiple files, first click View all feed files, and then click Copy feed URL next to the file you need.
As a result, the feed URL will be copied to your clipboard.
After that, you simply log in to your Awin advertiser account and upload the feed in such way:
Steps for uploading a product feed to Awin via URL (HTTPS)
- Navigate to Toolbox > Links & Tools > My Product Feeds.
- Click Add a New Feed.
- Enter a descriptive Feed Name.
- Select the Feed Language.
- Choose HTTPS as the Transfer Method.
- Paste the feed URL you've copied from Mulwi in the File Location input field.
- Add authentication information in the Username and Password fields if your feed is password-protected.
- Uncheck the XSLT pre-processing and Enable custom commands options.
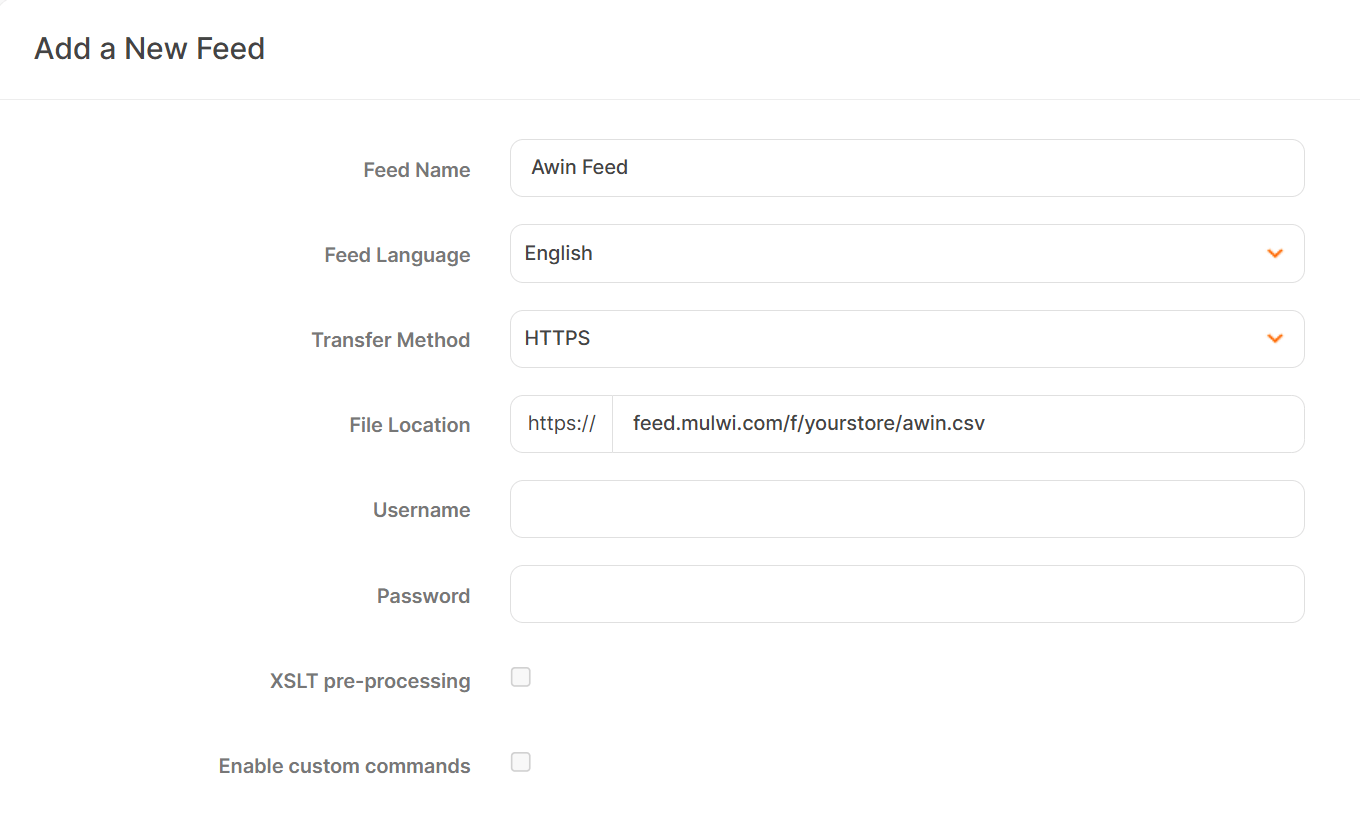
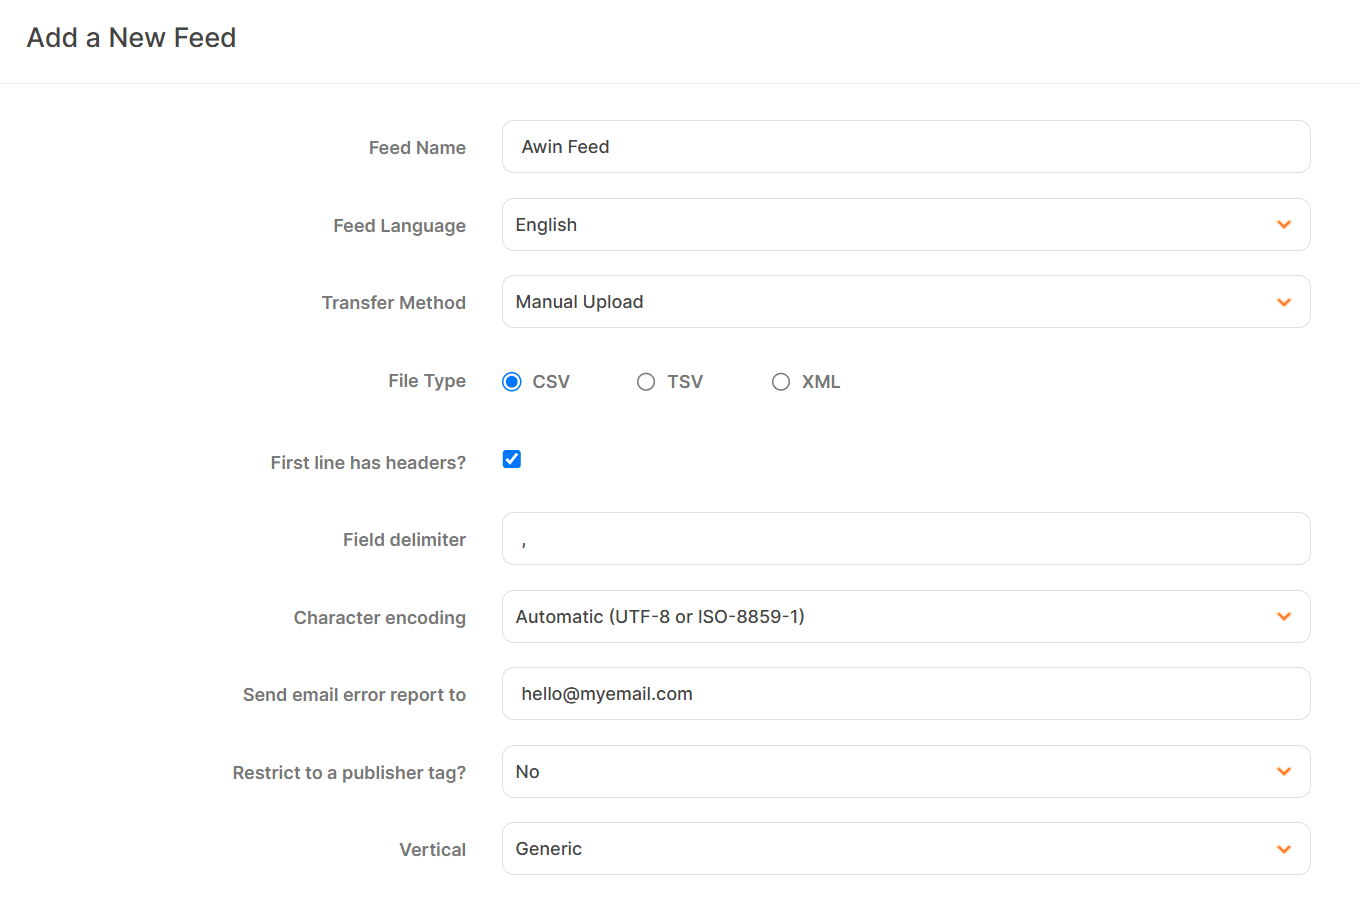
Feed's main settings configuration in Awin
- Configure the feed file settings:
- File Type. Set to CSV.
- First like has headers? Tick the checkbox.
- Field delimiter. Set to comma mark
,. - Character encoding. Set to Automatic (UTF-8 or ISO-8859-1).
- Send email error report to. Specify the email where Awin will notify you of errors.
- Restrict to a publisher tag? Set to No.
- Vertical. Choose the vertical of your products. A vertical determines what additional attributes your feed can include. If you're uncertain, set this value to Generic.
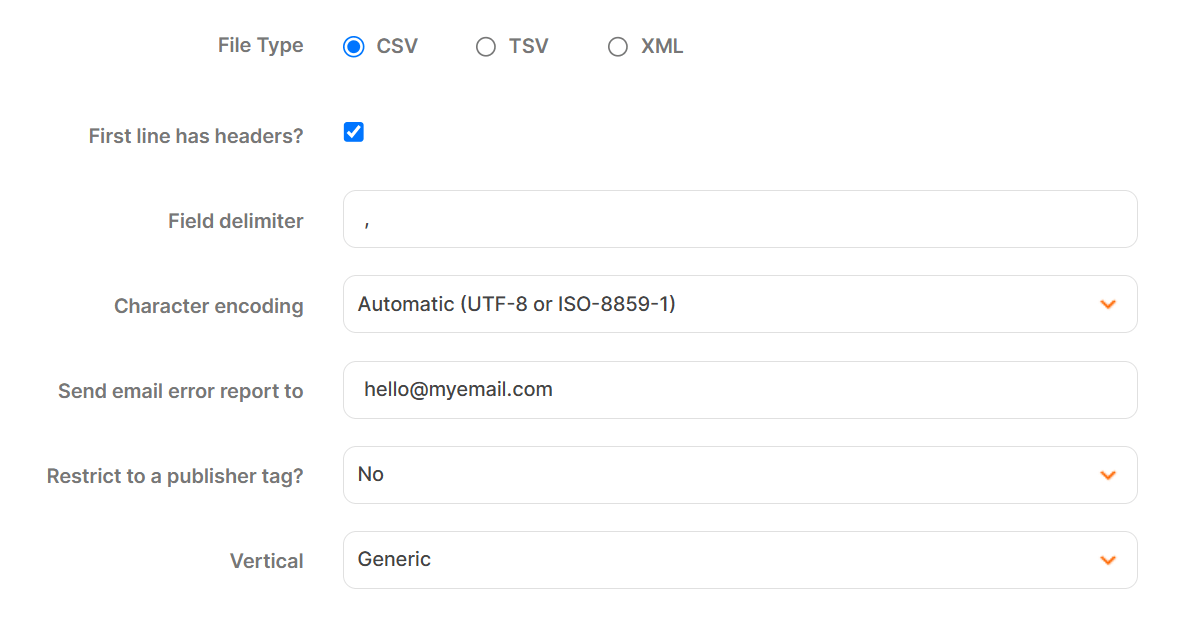
Feed's file format configuration in Awin
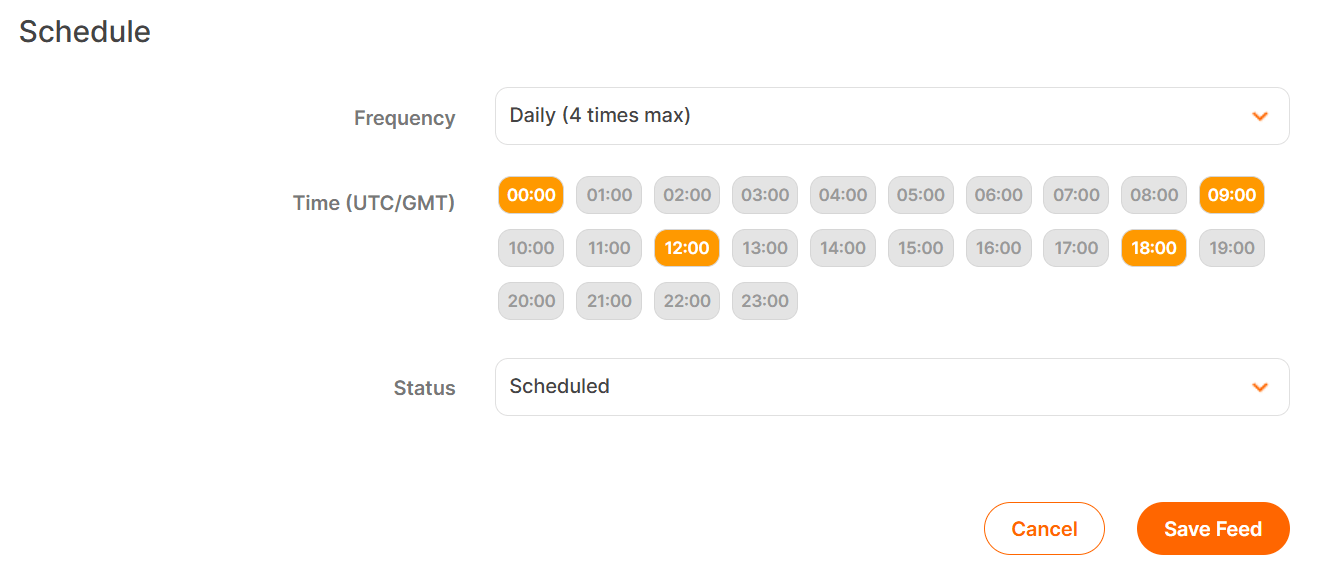
- Change the fetch frequency in the Schedule section:
- Status. Set to Scheduled.
- Frequency. Change how often Awin should fetch the feed.
- Time (UTC/GMT). Select the time when Awin should fetch a new feed. If you've set Frequency to Daily, you can select up to 4 time slots.
WARNING
If you set Schedule Status to Disabled, Awin will not fetch the feed at all.
As a result, Awin will keep showing that there are no products in the feed.

Feed's fetch schedule configuration in Awin
- Click the Add Feed button to upload the feed.
- Awin will attempt to automatically map the columns in your feed (Your Columns) to its column structure (Product Feed Columns). Check this mapping and change it if necessary.
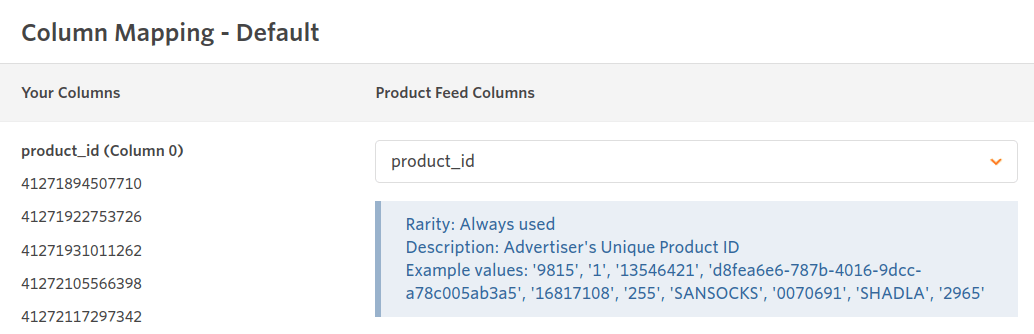
Feed's column mapping in Awin
- Click Save Mapping to finish and save the new feed.
NOTE
You may have to wait for Awin to validate the feed you've uploaded.
After Awin finishes processing it, check the Feed health status to see if there are any problems you should resolve.
Upload Awin feed manually
First, you download the feed file from Mulwi in such way:
- Navigate to the feed you want to download.
- Find the Feed block.
- If you have a single file, simply click the Download button.
- If you've split your feed into multiple files, first click View all feed files, and then click Download next to the file you need.
As a result, the feed file will be downloaded to your device.
After that, you simply log in to your Awin advertiser account and upload the feed in such way:
Steps for uploading a product feed to Awin manually
- Navigate to Toolbox > Links & Tools > My Product Feeds.
- Click Add a New Feed.
- Enter a descriptive Feed Name.
- Select the Feed Language.
- Choose Manual Upload as the Transfer Method.
- Configure the feed file settings:
- File Type. Set to CSV.
- First like has headers? Tick the checkbox.
- Field delimiter. Set to comma mark
,. - Character encoding. Set to Automatic (UTF-8 or ISO-8859-1).
- Send email error report to. Specify the email where Awin will notify you of errors.
- Restrict to a publisher tag? Set to No.
- Vertical. Choose the vertical of your products. A vertical determines what additional attributes your feed can include. If you're uncertain, set this value to Generic.
Feed's main settings configuration in Awin
- Under Pick a product feed file to upload, click Browse to open the file explorer.
- Find the feed file on your device.
- Select the file and click Open.

Feed's file select configuration in Awin
- Click the Add Feed button to upload the feed.
- Awin will attempt to automatically map the columns in your feed (Your Columns) to its column structure (Product Feed Columns). Check this mapping and change it if necessary.
Feed's column mapping in Awin
- Click Save Mapping to finish and save the new feed.
NOTE
You may have to wait for Awin to validate the feed you've uploaded.
After Awin finishes processing it, check the Feed health status to see if there are any problems you should resolve.
Common Awin Errors
The feed has no products
If you see this when you upload the feed for the first time, don't worry yet.
Awin can show this message while it is processing the feed.
If you still see this message after Awin finished processing the feed, it means that Awin didn't fetch the feed.
Check that you have correctly configured the fetch schedule for the feed:
- Navigate to Toolbox > Links & Tools > My Product Feeds.
- Click on the pencil icon near the feed you need.
- Check that the Schedule section is set up correctly:
- The Status is set to Scheduled.
- An optimal fetch Frequency is chosen.
- At least one time slot is selected in the Time block.
- If you've made any changes, click Save Feed to save them.
Feed's fetch schedule configuration in Awin
NOTE
If you need help, you can reach out to our support team at [email protected]
You can also invite our support expert to your Awin account.
There are XX products with no category mapping
You need to map the categories in your feed to Awin's taxonomy.
We recommend using Category Mapping and including the mapped categories directly in your feed.
You can also map categories in your Awin account:
- Navigate to Toolbox > Links & Tools > My Product Feeds.
- Under Category Mapping, click Map Categories.
- Click Map it next to the unmapped category.
- Select the most appropriate category from the taxonomy.
- Click Save to save the mapping.
- Repeat steps 3-5 for all unmapped categories.
NOTE
If you need help, you can reach out to our support team at [email protected]
You can also invite our support expert to your Awin account.
There are XX products without name/description/price
You need to check if the product has values in the Name, Description and Price attributes.
Go to the product's page in your Shopify store and fill in the missing fields.
NOTE
If you need help, you can reach out to our support team at [email protected]
You can also invite our support expert to your Awin account.
How to invite support expert in Awin
Our support team can assist you in configuring the feed.
To get help, you need to invite our expert to your Awin account.
How to invite Mulwi's expert to an Awin account
- Log in to your Awin advertiser account.
- Navigate to Account > Users > Invite Users.
- Fill out the form:
- Email. Enter the
[email protected]email. - Permission Group. Set to Basic access.
- Language. Set to English.
- Email. Enter the
- Click the Invite button.