On this page, you will find out how to:
- connect your Shopify store to Pinterest;
- prepare a Pinterest product feed using Mulwi;
- upload your Mulwi feed to Pinterest.
1. Connect your store to Pinterest
You connect your store to Pinterest through a respective business account on its platform.
NOTE
You can upload products on Pinterest with a feed only if you are in a supported region.
Register an account
You can get a new business account by registering on Pinterest.
Alternatively, if you already have a personal Pinterest account, you can convert it to a business one in the account settings.
How to register a new Pinterest business account
- Go to the Pinterest business account registration page.
- Fill out the registration form.
- Click Create account.
- Choose Online merchant or marketplace as your Business description and click Next.
- Provide your Business name, the Region where you operate, and your store's Website address. When you're finished, click Next.
- Select up to three Business goals, your brand's Focus, and whether you plan to run ads on Pinterest.
- Click Done to finish setting up the account.
How to convert an existing personal Pinterest account to a business one
- Log in to your personal Pinterest account.
- Click the arrow near your profile's icon and choose Settings.
- Under the Account management section, find the Convert to a business account option and click the Convert account button next to it.
- Choose Online merchant or marketplace as your Business description and click Next.
- Provide your Business name, the Region where you operate, and your store's Website address. When you're finished, click Next.
- Select up to three Business goals, your brand's Focus, and whether you plan to run ads on Pinterest.
- Click Done to finish setting up the account.
Build your profile
Next, you should complete your profile. A profile with detailed information increases the credibility of your store.
On your profile's main page, you can set a cover image by clicking the pencil icon near the profile name.
To add more information to your profile, such as business phone and address, click the arrow near your profile's icon and choose Settings. You can edit the information in the Edit profile section.
Claim your website
You can upload products to Pinterest only after you prove ownership of your store's website.
To claim your website and connect it to Pinterest, follow these steps:
Steps for connecting a Shopify store to Pinterest
- Log in to your Pinterest business account.
- Click the arrow near your profile's icon and choose Settings.
- Under the Claimed accounts section, find the Websites option and click the Claim button next to it.
- Click on the code fragment under Add HTML tag to copy it.
- In a separate browser window, log in to your Shopify admin and go to Online Store > Themes.
- Click on the three dots icon next to the Customize button and choose Edit code.
- Open the
theme.liquidfile located in the Layout folder. - Paste the code you've copied right before the
</head>line and click Save. - Return to Pinterest and click Continue.
- Enter your website's address in the input field.
- Click Verify to claim your website.
NOTE
After Pinterest successfully verifies your site, you can remove the HTML tag if you want.
2. Create the product feed
To upload your products to Pinterest, you need to create and configure the product feed. To do this, log in to your Shopify store admin and follow these steps:
Steps for creating a Pinterest product feed in Mulwi
- Go to Apps > Mulwi Feeds > Feeds.
- Click Add Feed to generate the new feed.
- Choose the Pinterest feed template. The feed is created in XML format.
- In the pop-up window, select which product data to use as feed content and click Create. You can change this later in the Feed content field of the feed's general settings if necessary.
- Set feed's status in the This feed is currently block to Active.
- Fill in the general feed information:
- Feed Internal Name. Give your feed a descriptive name.
- Filename. Give your feed file a unique name.
- Max Number of Items per File. Limit the amount of products in the feed.
- Compression. Compress the feed file if necessary.
- Protect feed with password. Password-protect your feed if necessary.
- In the Applied Filters section, you can use product filters to choose what products should be included in the feed.
- Fill in the Template section:
- Shipping details. Fill in this section if you want to include shipping information in the feed.
- Specific fields. Pick appropriate values for Pinterest's required attributes:
- Gender. Specify the gender that the product is intended for: male, female, or unisex.
- Age Group. Specify the age group that the product is intended for: newborn (0-3 months old), infant (3-12 months old), toddler (1-5 years old), kids (5-13 years old), or adult (13 years old or more).
- Product type. Specify the category assigned to the product within your store. Usually, this seller-defined category is stored in the Product Type or First Collection Title attribute.
- Size. Select all the attributes that indicate the product's size.
- Color. Select all the attributes that indicate the product's color.
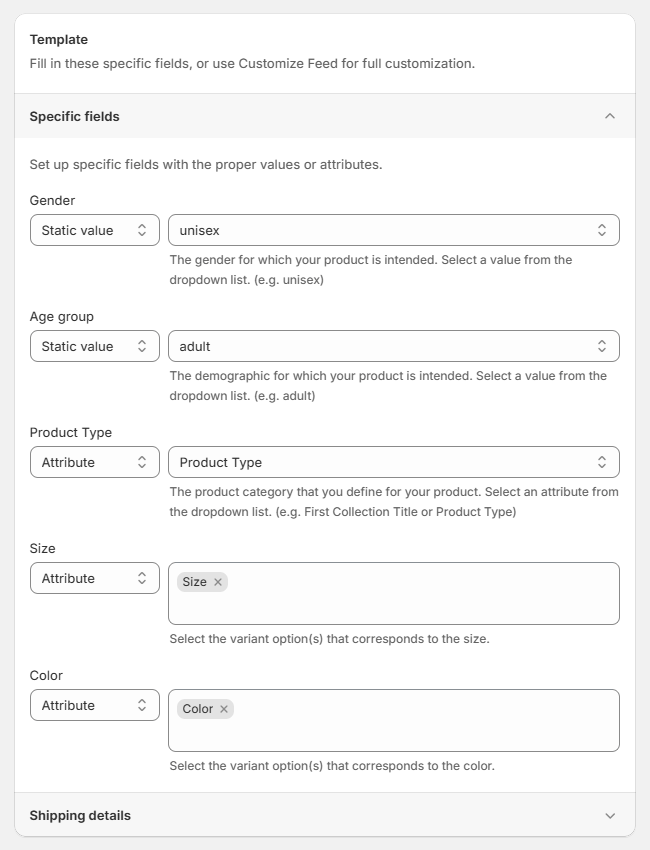
Filling out required attributes in a Pinterest feed template
- In the Source of prices section, you can set product prices from Markets or Price Lists.
- In the Stock Locations section, select from which locations you want to include stock levels and availability information.
- In the Translation section, you can select a language to translate your feed into.
- Configure the Google Analytics section if you have an analytics campaign.
- Click Save at the top of the page to finish and generate the feed.
NOTE
You won't be able to change the Filename after you save the feed.
After saving the new feed, you can customize it if necessary.
You will also be able to map your categories to the Google Product Taxonomy that Pinterest uses. To do that, fill out the Google Product Category field in the feed's Template section.
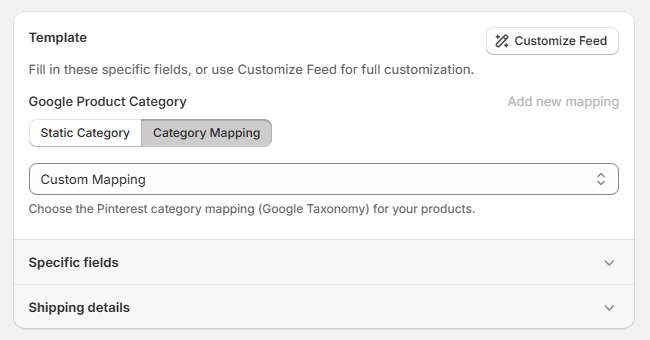
If your products have the same category, use Static Category. Start typing the category name or ID and choose the appropriate category from the dropdown menu. For multiple categories, use Category Mapping.
NOTE
If you need help setting up, optimizing, or troubleshooting your feed, don't hesitate to contact our support team. We will be happy to assist you.
3. Upload the feed to Pinterest
You can upload your feed to Pinterest via URL or manually.
NOTE
We recommend using the URL method due to automatic feed updates.
Upload Pinterest feed via URL
NOTE
Pinterest only supports feeds with less than 20 million products. If your feed exceeds this limit, break the feed down into multiple files.
First, you copy the feed's URL from Mulwi in such way:
- Navigate to the feed you want to upload.
- Find the Feed block.
- If you have a single file, simply click the Copy feed URL button.
- If you've split your feed into multiple files, first click View all feed files, and then click Copy feed URL next to the file you need.
As a result, the feed URL will be copied to your clipboard.
After that, you simply log in to your Pinterest business account and upload the feed in such way:
Steps for uploading a product feed to Pinterest via URL
- Click on the three horizontal bars next to the Pinterest logo at the top of the page.
- Under Manage Business, click Catalogs and product groups.
- Select Data sources and click the Add data source button.
- Choose Provide a URL link as the upload method.
- Configure the feed's settings:
- Name. Give your feed a descriptive name.
- Feed URL. Paste the feed URL you've copied from Mulwi.
- File format. Set to XML.
- Country/region. Select the region where you sell.
- Language. Select the language of your feed.
- Feed login details. Add authentication information in the Username and Password fields if your feed is password-protected.
- Default currency. Select the currency used in the feed.
- Default availability. If a product doesn't have availability information in the feed, Pinterest will use the value you specify here.
- Data source ingestion frequency. Change how often Pinterest should fetch the feed.
- Start time and Timezone. Select the time when Pinterest should fetch a new feed.
- Click Create Pins to finish and upload the feed.
NOTE
You may have to wait for Pinterest to validate the feed you've uploaded.
After Pinterest finishes processing it, you will receive an email with the results.
Upload Pinterest feed manually
NOTE
Pinterest only supports feeds with less than 20 million products. If your feed exceeds this limit, break the feed down into multiple files.
First, you download the feed file from Mulwi in such way:
- Navigate to the feed you want to download.
- Find the Feed block.
- If you have a single file, simply click the Download button.
- If you've split your feed into multiple files, first click View all feed files, and then click Download next to the file you need.
As a result, the feed file will be downloaded to your device.
After that, you simply log in to your Pinterest business account and upload the feed in such way:
Steps for uploading a product feed to Pinterest manually
- Click on the three horizontal bars next to the Pinterest logo at the top of the page.
- Under Manage Business, click Catalogs and product groups.
- Select Data sources and click the Add data source button.
- Choose Upload manually as the upload method.
- Configure the feed's settings:
- Name. Give your feed a descriptive name.
- Country/region. Select the region where you sell.
- Language. Select the language of your feed.
- Default currency. Select the currency used in the feed.
- Click Choose a file to open the file explorer.
- Find the feed file on your device.
- Select the file and click Open.
- Click Upload data source to finish and upload the feed.
NOTE
You may have to wait for Pinterest to validate the feed you've uploaded.
After Pinterest finishes processing it, you will receive an email with the results.
WARNING
Your feed will expire after 7 days.
After it expires, Pinterest will stop showing your products.
To continue displaying products, reupload a fresh feed file regularly.