On this page, you will find out how to:
- connect your Shopify store to Facebook;
- prepare a Facebook product feed using Mulwi;
- upload your Mulwi feed to Facebook.
1. Connect your store to Facebook
You connect your store to Facebook through a respective account in Meta Business Suite.
NOTE
In order to create a Meta Business Suite account, you first must get a personal Facebook account.
To register on Meta Business Suite and connect your online store to Facebook, follow these steps:
Steps for registering on Meta Business Suite and connecting a Shopify store to Facebook
- Log in to your personal Facebook account.
- Open the Meta Business Suite page in your web browser.
- Click Log in with Facebook to create a Meta Business Account using your personal Facebook account.
- Fill out the form with your contact details and click Submit to complete the initial setup.
NOTE
Your business account name should start with a capital letter, otherwise Meta will display an error.
- Create a Facebook Page for business by following the instructions in this Facebook Page creation tutorial.
- Add your Facebook Page to the Business Suite by following the instructions in this Facebook Page connection tutorial.
- Verify your website ownership by following the instructions in this Facebook website verification tutorial.
2. Create the product feed
To upload your products to Facebook, you need to create and configure the product feed. To do this, log in to your Shopify store admin and follow these steps:
Steps for creating a Facebook product feed in Mulwi
- Go to Apps > Mulwi Feeds > Feeds.
- Click Add Feed to generate the new feed.
- Choose the Facebook Dynamic Ad feed template. The feed is created in XML format.
- In the pop-up window, select which product data to use as feed content and click Create. You can change this later in the Feed content field of the feed's general settings if necessary.
- Set feed's status in the This feed is currently block to Active.
- Fill in the general feed information:
- Feed Internal Name. Give your feed a descriptive name.
- Filename. Give your feed file a unique name.
- Max Number of Items per File. Limit the amount of products in the feed.
- Compression. Compress the feed file if necessary.
- Protect feed with password. Password-protect your feed if necessary.
- In the Applied Filters section, you can use product filters to choose what products should be included in the feed.
- In the Template section, pick appropriate values for Facebook's required Attributes:
- Gender. Specify the gender that the product is intended for: male, female, or unisex.
- Age Group. Specify the age group that the product is intended for: newborn (0-3 months old), infant (3-12 months old), toddler (1-5 years old), kids (5-13 years old), adult (13 years old or more), or all ages.
- Product type. Specify the category assigned to the product within your store. Usually, this seller-defined category is stored in the Product Type or First Collection Title attribute.
- Size. Select all the attributes that indicate the product's size.
- Color. Select all the attributes that indicate the product's color.
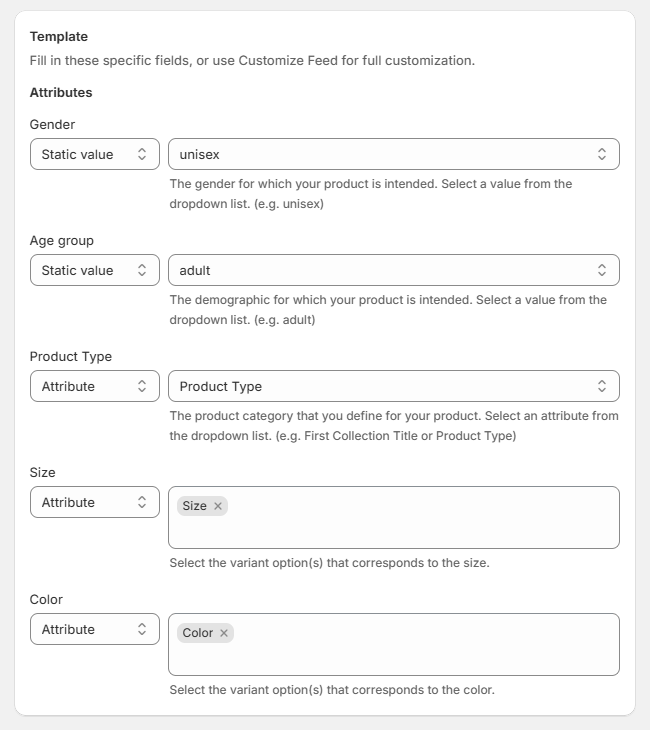
Filling out required attributes in a Facebook feed template
- In the Source of prices section, you can set product prices from Markets or Price Lists.
- In the Stock Locations section, select from which locations you want to include stock levels and availability information.
- In the Translation section, you can select a language to translate your feed into.
- Configure the Google Analytics section if you have an analytics campaign.
- Click Save at the top of the page to finish and generate the feed.
NOTE
You won't be able to change the Filename after you save the feed.
After saving the new feed, you can customize it if necessary.
You will also be able to map your categories to the Google Product Taxonomy that Facebook uses. To do that, fill out the Google Product Category field in the feed's Template section.
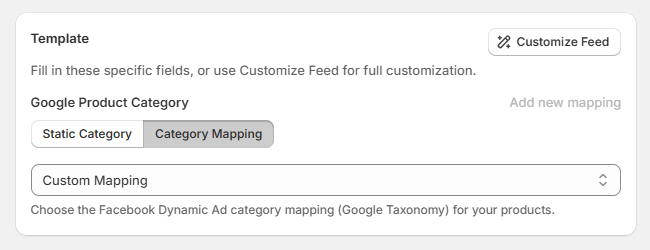
If your products have the same category, use Static Category. Start typing the category name or ID and choose the appropriate category from the dropdown menu. For multiple categories, use Category Mapping.
NOTE
If you need help setting up, optimizing, or troubleshooting your feed, don't hesitate to contact our support team. We will be happy to assist you.
3. Upload the feed to Facebook
You upload the feed to Meta (Facebook) via the Commerce Manager.
Meta (Facebook) stores products in catalogs.
You can create a new catalog and upload your feed to it during creation.
Alternatively, you can connect your feed to an existing catalog.
NOTE
Meta (Facebook) only supports feeds up to 8 GB in size. If your feed exceeds this limit, break the feed down into multiple files.
How to upload the feed while creating a new Facebook catalog
First, you copy the feed's URL from Mulwi in such way:
- Navigate to the feed you want to upload.
- Find the Feed block.
- If you have a single file, simply click the Copy feed URL button.
- If you've split your feed into multiple files, first click View all feed files, and then click Copy feed URL next to the file you need.
As a result, the feed URL will be copied to your clipboard.
After that, you simply log in to your Commerce Manager account and upload the feed in such way:
- Under the Catalogs section, select Add catalog.
- Add basic information about the catalog:
- Select Online products in the Product category.
- Disable Connect to a partner platform.
- Choose your Facebook Page for business under Business portfolio.
- Give your catalog a Name.
- Click Next.

Specify basic information about your new Facebook catalog
- If necessary, select a Meta Pixel or an app SDK that will track conversions on your website. Once you finish, click Next.
Add conversion tracking to your new Facebook catalog
- Choose people and partner businesses that can work on your catalog. Once you finish, click Next.
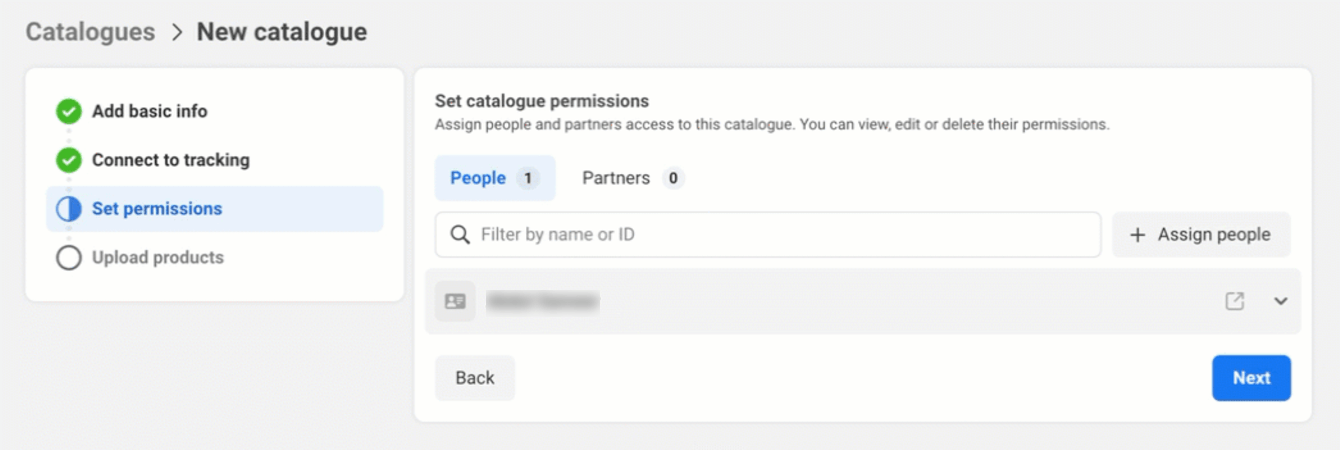
Configure partner access to your new Facebook catalog
- Select Connect to a Data Feed as an upload method and click the Connect data feed button.
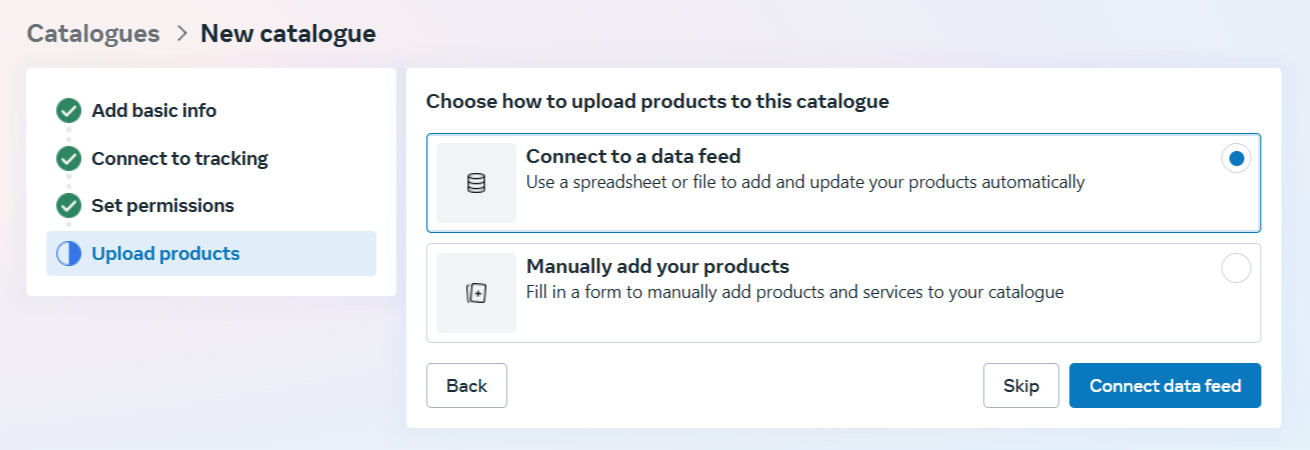
Upload products to your new Facebook catalog
- Check that the Commerce Manager is selected under Which platform is your data feed formatted for?
- Choose Use a URL or Google Sheets under Choose how to upload your file.
- Paste the feed URL you've copied from Mulwi in the input field.
- Add authentication information in the Username and Password fields if your feed is password-protected.
- Click Next.
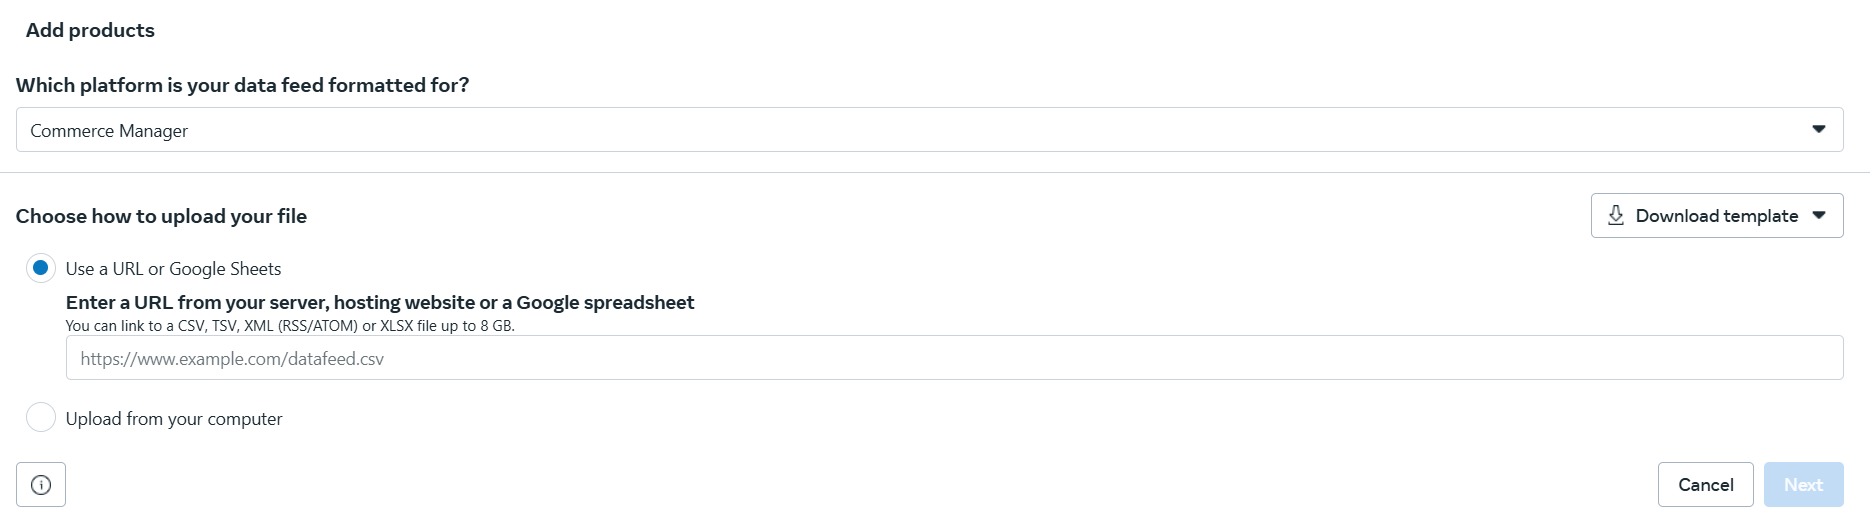
Feed's upload method configuration in Facebook's new catalog
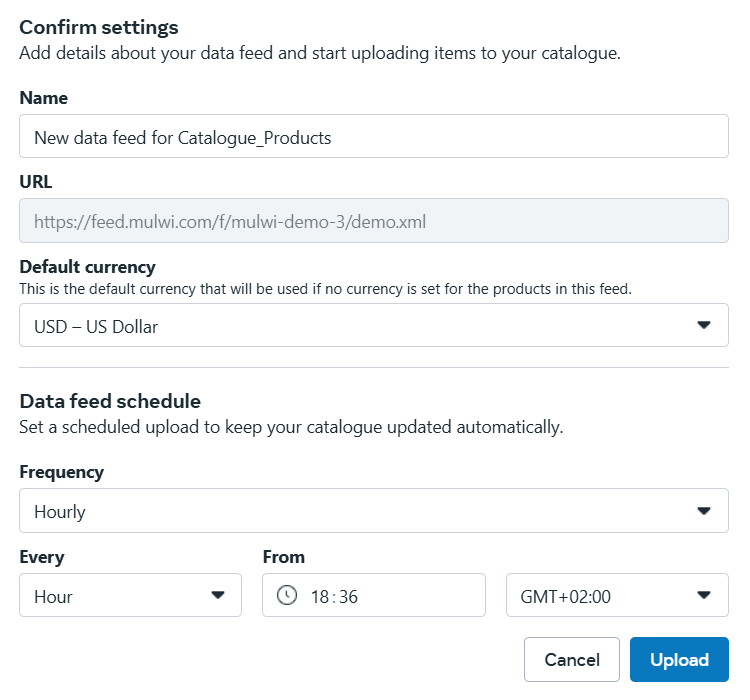
- Configure the feed's settings:
- Give your feed a Name.
- For the Default currency, select the currency used in the feed.
- Change the fetch frequency in the Data feed schedule section if necessary.
- Click Upload to finish and create a catalog.
Meta will immediately upload your feed to the new catalog.
Feed's main settings configuration in Facebook's new catalog
How to upload the feed to an existing Facebook catalog
First, you copy the feed's URL from Mulwi in such way:
- Navigate to the feed you want to upload.
- Find the Feed block.
- If you have a single file, simply click the Copy feed URL button.
- If you've split your feed into multiple files, first click View all feed files, and then click Copy feed URL next to the file you need.
As a result, the feed URL will be copied to your clipboard.
After that, you simply log in to your Commerce Manager account and upload the feed in such way:
- Select the catalog where you want to upload the feed.
- In the Catalog tab, select Data Sources.
- Click the Add items button and select the Data feed upload method.
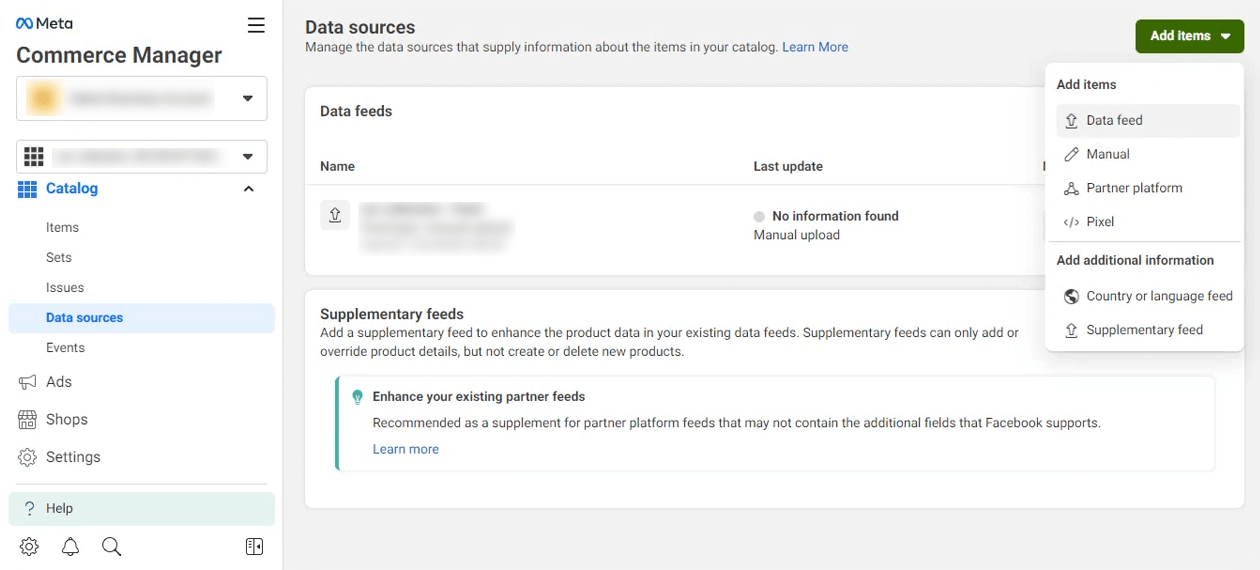
Connect feed to an existing Facebook catalog
- Check that the Commerce Manager is selected under Which platform is your data feed formatted for?
- Choose Use a URL or Google Sheets under Choose how to upload your file.
- Paste the feed URL you've copied from Mulwi in the input field.
- Add authentication information in the Username and Password fields if your feed is password-protected.
- Click Next.
Feed's upload method configuration in Facebook's existing catalog
- Configure the feed's settings:
- Give your feed a Name.
- For the Default currency, select the currency used in the feed.
- Change the fetch frequency in the Data feed schedule section if necessary.
- Click Upload to finish and upload the feed to your catalog.
Feed's main settings configuration in Facebook's existing catalog
NOTE
You may have to wait for Meta (Facebook) to validate the feed you've uploaded.
After Meta finishes processing it, you will receive a report with the results.