Selling guide for online shopping channels
On this page, you will find out how to:
- prepare a product feed using the Mulwi Shopping Feeds app;
- connect your Shopify store to a new sales channel;
- upload your Mulwi feed to the desired sales channel.
1. Prepare the product feed
Sales channels often require a product feed early during registration, so it's best to prepare one beforehand. You'll learn more about how to create a feed with Mulwi on the Create a new product feed page.
NOTE
If you need help setting up, optimizing, or troubleshooting your feed, don't hesitate to contact our support team. We will be happy to assist you.
2. Connect your Shopify store to the sales channel
Sales channels have separate platforms for merchants, and you need to create an account there. Usually, you can sign up on such platforms youself. Some channels, however, only add new merchants manually, so in those cases, you're instead required to send a connection request to the platform's technical team.
Once you get a merchant account, you have to log in to it and finish setting it up. This typically includes providing your business details, verifying your store's website, and, of course, uploading your listings using a product feed.
Since each sales channel has its own unique registration process, we recommend you to check out your target channel's business website and get in touch with its support team for more specific instructions.
3. Upload your feed to the sales channel
Most commonly, sales channels use one or more of these feed upload methods:
- A manual file upload;
- An automated fetch via the feed's URL;
- An automated fetch through an FTP/SFTP connection.
Mulwi supports all of these connection methods. Thus, if your sales channel also supports several upload methods, feel free to use the one you like best.
Upload a product feed manually
First, you download the feed file from Mulwi in such way:
- Navigate to the feed you want to download.
- Find the Feed block.
- If you have a single file, simply click the Download button.
- If you've split your feed into multiple files, first click View all feed files, and then click Download next to the file you need.
As a result, the feed file will be downloaded to your device.
After that, you simply go to your merchant account's feed settings and upload this file there.
WARNING
Upload a product feed via URL
First, you copy the feed's URL from Mulwi in such way:
- Navigate to the feed you want to upload.
- Find the Feed block.
- If you have a single file, simply click the Copy feed URL button.
- If you've split your feed into multiple files, first click View all feed files, and then click Copy feed URL next to the file you need.
As a result, the feed's URL will be copied to your clipboard.
After that, you simply need to add this URL in the feed settings of your merchant account:
- If you manage the account yourself, paste this URL in the account's product feed connection settings.
- If your account is instead managed by the sales channel's team, give them this URL and ask to connect the feed for you.
And that's it! Mulwi will automatically provide an updated feed whenever the sales channel requests it. The upload frequency varies between each channel, so check your channel's resources for merchants to see how often a new feed is fetched.
Upload a product feed via FTP/SFTP
First, you need to find out your sales channel's connection credentials.
After that, set up the connection in Mulwi by following these steps:
- Navigate to the feed you want to upload.
- In the Feed block, choose the FTP/SFTP Upload option and click Manage FTP/SFTP.
- Fill out the FTP/SFTP Upload section:
- Auto Upload. Set the frequency of automatic feed uploads.
- Protocol. Select the necessary connection protocol.
- Host. Provide the sales channel's host address.
- Port. Provide the sales channel's connection port.
- Fill in the Login details:
- Authorization type (only for SFTP protocol). Select whether you want to authorise using a Password or a Private key.
- Private key (only for SFTP protocol). If you're authorizing using a Private key, click Add file and select the private key file from your device.
- User. Provide your authorization username.
- Password. Provide your authorization password.
- In the Extra settings, specify the Upload Directory if necessary.
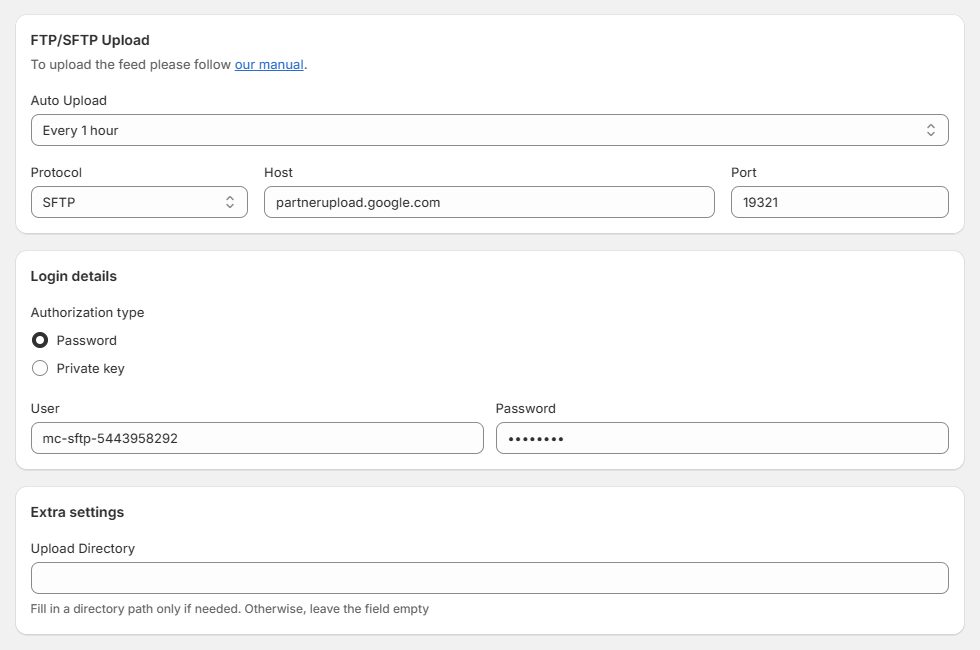
- Click Save to apply changes.
- Click Check connection to test whether the connection with the sales channel is valid.
And that's it! Mulwi will automatically upload an updated feed to the sales channel according to the Auto Upload frequency you've specified. But you can also trigger an immediate upload by clicking the Upload Now button.
WARNING
If you've set the Auto Upload frequency to Disabled, Mulwi won't upload new feeds.
In this case, you must trigger uploads manually by clicking the Upload Now button, or your sales channel must trigger fetches of new feeds itself.
What's next?
Congratulations on successfully joining a new sales channel — now it's time to boost your sales!
Depending on your chosen channel, you may need to take some additional steps to fully start selling. For example, this can be launching an advertising campaign or recruiting affiliates. We recommend exploring your channel's resources for merchants to learn more about what to do next. Happy selling!
We understand well that joining a new sales channel may seem quite complex. If you ever need help setting up, optimizing, or troubleshooting your feeds, don't hesitate to contact our support team. We will be happy to assist you and support your growth.