Webgains
On this page, you will find out how to:
- connect your Shopify store to Webgains;
- prepare a Webgains product feed using Mulwi;
- upload your Mulwi feed to Webgains.
1. Connect your store to Webgains
You connect your store to Webgains through a respective account on its platform.
Register an account
In order to create a Webgains advertiser account, you must send a connection request to Webgains' support team by filling out this contact form.
Afterwards, wait for Webgains' reply to schedule a call.
Once you meet with Webgains' team and agree on your cooperation, they will create a new advertiser account and give you the credentials for it.
Build your advertiser profile
You log in to your advertiser account through the Webgains platform.
Next, you must complete your profile and affiliate program details.
Without a complete profile, publishers won't be able to find and work with you.
To finish setting up your Webgains account, you must complete all of the following steps (you can do them in any order):
- Add tracking to your online store so Webgains can record which publishers bring you sales.
- Provide a description of your program to tell publishers about your terms and conditions.
- Determine your program's commission rates that you will pay publishers for driving sales.
- Upload creative assets that publishers will use to create ads and promote you.
2. Create the product feed
To upload your products to Webgains, you need to create and configure a product feed. To do this, log in to your Shopify store admin and follow these steps:
Steps for creating a Webgains product feed in Mulwi
- Go to Apps > Mulwi Feeds > Feeds.
- Click Add Feed to generate the new feed.
- Choose the Webgains feed template. The feed is created in CSV format.
- In the pop-up window, select which product data to use as feed content and click Create. You can change this later in the Feed content field of the feed's general settings if necessary.
- Set feed's status in the This feed is currently block to Active.
- Fill in the general feed information:
- Feed Internal Name. Give your feed a descriptive name.
- Filename. Give your feed file a unique name.
- Max Number of Items per File. Limit the amount of products in the feed.
- Compression. Set to None.
- Protect feed with password. Password-protect your feed if necessary.
- In the Applied Filters section, you can use product filters to choose what products should be included in the feed.
- Fill in the Template section:
- Webgains Categorization. Here, you map your categories to the Google Product Taxonomy that Webgains uses. If your products have the same category, use Static Category. Start typing the category name or ID and choose the appropriate category from the dropdown menu. For multiple categories, use Category Mapping.
- Attributes. Pick appropriate values for Webgains' required attributes.
- In the Source of prices section, you can set product prices from Markets and Price Lists.
- In the Stock Locations section, select from which locations you want to include stock levels and availability information.
- In the Translation section, you can select a language to translate your feed into.
- Configure the Google Analytics section if you have an analytics campaign.
- Click Save at the top of the page to finish and generate the feed.
NOTE
You won't be able to change the Filename after you save the feed.
After saving the new feed, you can customize it if necessary.
3. Upload the feed to Webgains
You can upload your feed to Webgains via URL (HTTPS).
During the upload process, you will need the feed URL from the Mulwi Shopping Feeds app.
To get this URL, navigate to the feed you want to upload, find the Feed block and click the Copy feed URL button in it.
The feed URL will be copied to your clipboard.
To upload the feed, log in to your Webgains advertiser account and follow these steps:
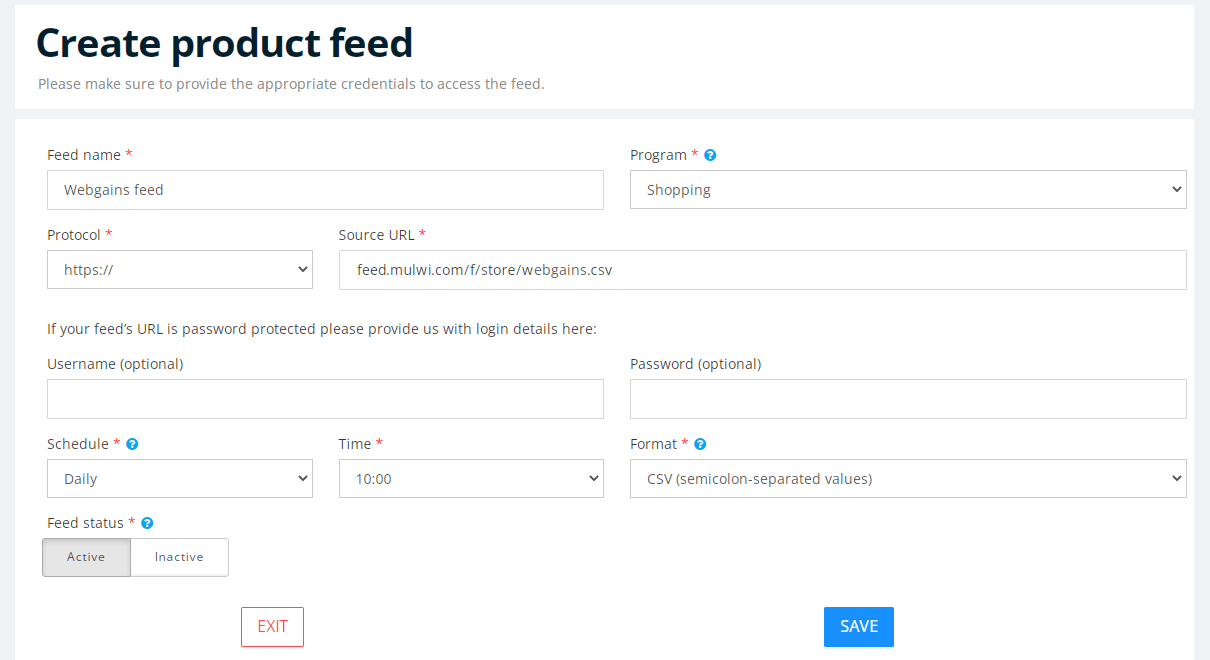
Steps for uploading a product feed to Webgains via URL (HTTPS)
- Go to the Product Feed section.
- Click Create Feed.
- Configure the feed settings:
- Feed Name. Give your feed a descriptive name.
- Program. Select the affiliate program the feed belongs to.
- Protocol. Set to https://.
- Source URL. Paste the feed URL you've copied from Mulwi without the https:// section. For example, a feed URL https://feed.mulwi.com/f/store/webgains.csv should be pasted as feed.mulwi.com/f/store/webgains.csv.
- Username and Password. Add authentication information in these fields if your feed is password-protected.
- Schedule. Change how often Webgains should fetch the feed.
- Time. Select the time when Webgains should fetch a new feed.
- Format. Set to CSV.
- Feed status. Set to Active.

Connect a new feed to Webgains
- Click the Save button to finish and upload the feed.
NOTE
You may have to wait for Webgains to validate the feed you've uploaded.
After Webgains finishes processing it, check the Process results status to see if there are any problems you should resolve.