ChatGPT
On this page, you will find out how to:
- connect your Shopify store to ChatGPT Ads Manager;
- prepare a ChatGPT product feed using Mulwi;
- upload your Mulwi feed to ChatGPT Ads Manager.
NOTE
This guide covers ChatGPT Ads Manager, OpenAI's beta advertising platform. Products from your feed are only eligible for use in paid ads. They don't appear in organic ChatGPT conversations, though OpenAI may add that capability in the future.
1. Connect your store to ChatGPT Ads Manager
You connect your store to ChatGPT Ads Manager through an advertiser account on OpenAI's platform.
Register an account
To register on ChatGPT Ads Manager, follow these steps:
Steps for registering on ChatGPT Ads Manager
- Go to the ChatGPT Ads Manager website.
- Sign in with your existing OpenAI account, or create a new one.
- Complete the onboarding process, including identity verification.
- Fill in your advertiser details: Account name, Website, Business country/region, Currency, Time zone, and Logo.
- Set up your billing profile (business name, invoice email, billing address) and add a payment method.
- Optionally, invite your team members to the account.
NOTE
ChatGPT Ads Manager is currently in beta and is being rolled out gradually by country. If it isn't available in your region yet, you can still create an account, and OpenAI will notify you once access opens up. See OpenAI's Ads Manager beta account setup guide for the latest details.
2. Create the product feed
ChatGPT (OpenAI) doesn't have a ready-to-use feed template in Mulwi yet, so instead of building the feed yourself, you request one from our team. To do this, log in to your Shopify store admin and follow these steps:
Steps for requesting a ChatGPT (OpenAI) product feed in Mulwi
- Go to Apps > Mulwi Feeds > Feeds.
- Click Add Feed.
- Click the search icon in the Most popular feeds block and enter ChatGPT.
- Click the Request feed button next to the ChatGPT (OpenAI) template.
- Fill out the contact form with your request details.
- Click Submit.
Our support team will get back to you as quickly as possible and set up a custom ChatGPT (OpenAI) feed for your store free of charge.
Once your feed is ready, you can further customize it if necessary, for example by adjusting product filters or the feed's translation.
NOTE
If you need help setting up, optimizing, or troubleshooting your feed, don't hesitate to contact our support team. We will be happy to assist you.
3. Upload the feed to ChatGPT Ads Manager
ChatGPT Ads Manager only accepts product feeds through an SFTP connection.
NOTE
During the current beta, each ad account is limited to one feed connection, and a feed can contain up to 2 million products.
Set up a feed connection in ChatGPT Ads Manager
First, you create the feed connection and generate SFTP credentials on OpenAI's side:
Steps for creating a feed connection in ChatGPT Ads Manager
- In Ads Manager, navigate to the Tools tab.
- Select Feeds.
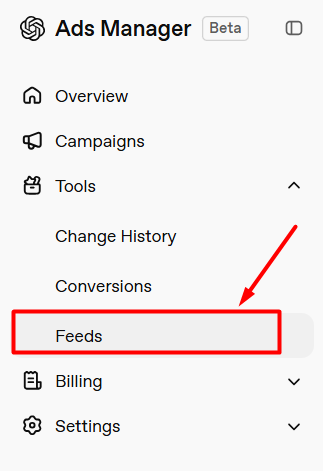
Opening the Feeds tab in ChatGPT Ads Manager
- Click Create Feed.
- Follow the prompts to set up a new feed connection.
NOTE
This step in Ads Manager only creates the connection and generates the SFTP credentials. You don't need to build the feed file manually here. You'll generate and upload the feed itself through Mulwi in the next step.
Next, get your connection details:
Steps for getting your SFTP connection details
- From the feed row, open the three-dot menu.
- Select Edit SFTP Connection.
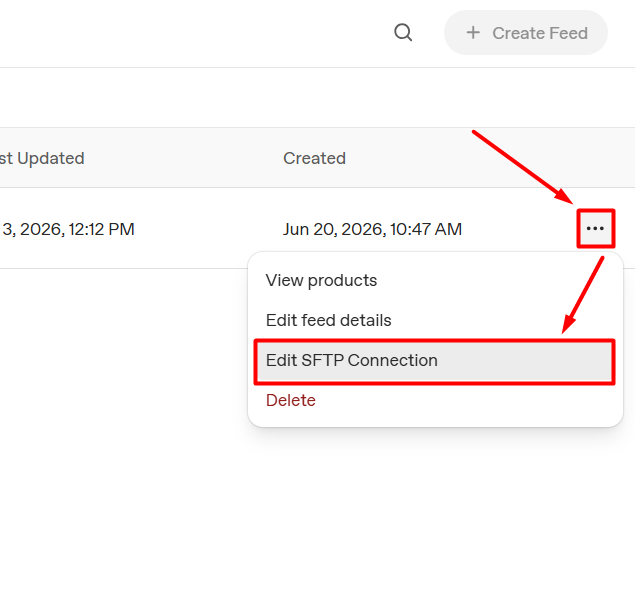
Opening the SFTP connection details from the Feeds list
- Choose Password as your authentication method.
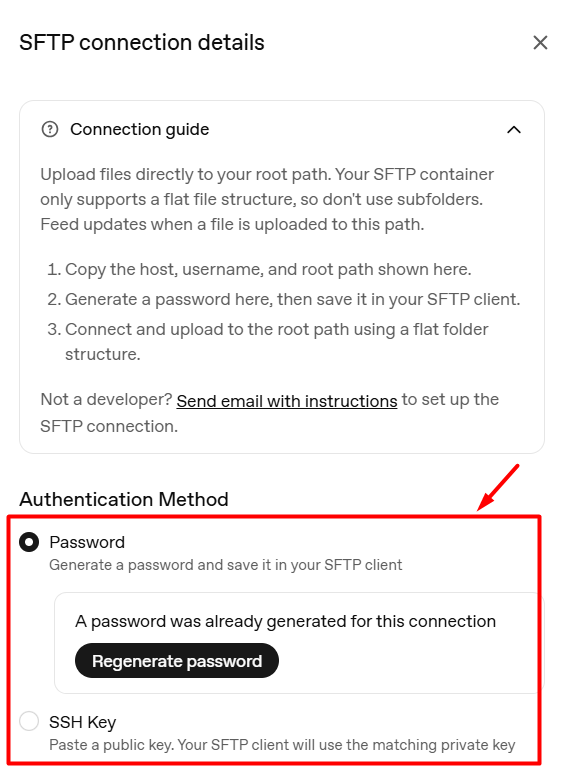
Selecting the Password authentication method
- Follow the connection guide in Ads Manager to connect to the SFTP server.
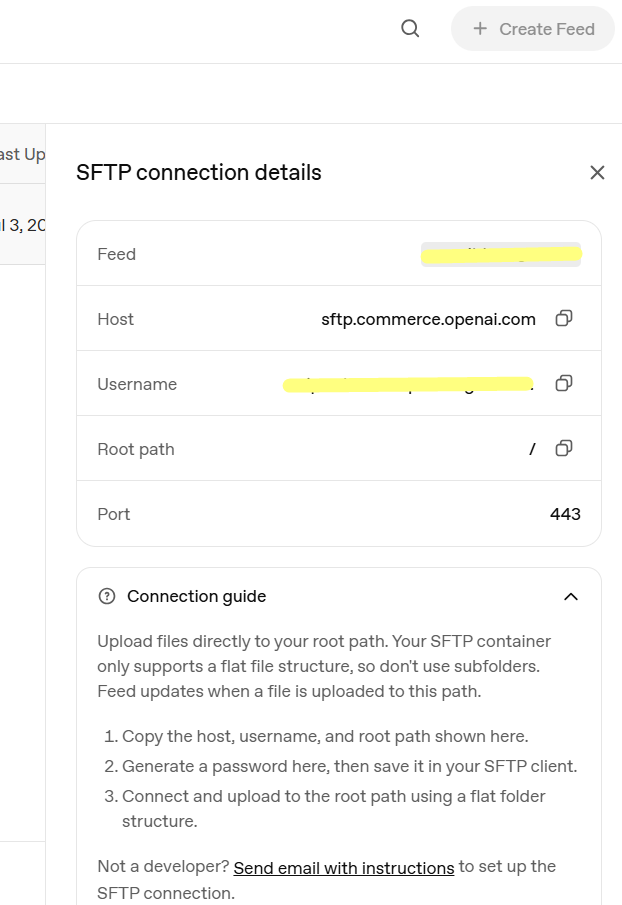
SFTP connection details provided by ChatGPT Ads Manager
Keep the host, port, user, and password from this step handy. You'll need to enter them into Mulwi next.
Connect Mulwi via SFTP
Steps for uploading a product feed to ChatGPT Ads Manager via SFTP
- Navigate to the feed you want to upload for the ChatGPT (OpenAI) channel.
- In the Feed block, choose the FTP/SFTP Upload option and click Manage FTP/SFTP.
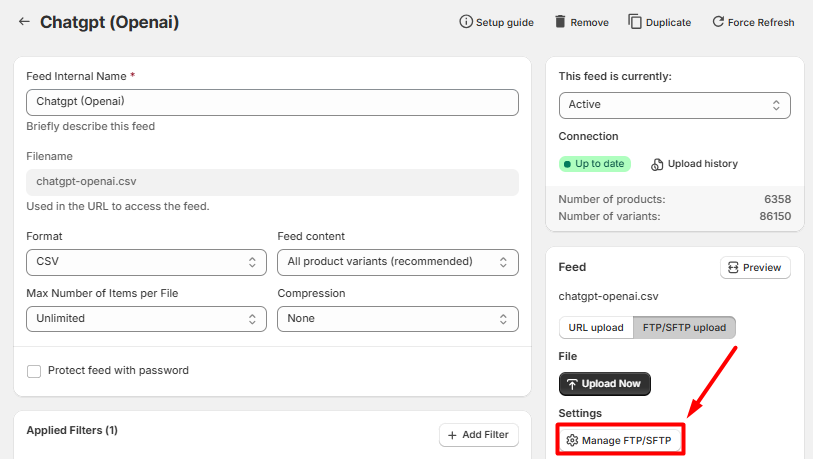
Opening the FTP/SFTP settings of a ChatGPT (OpenAI) feed in Mulwi
- Fill out the FTP/SFTP Upload section using the connection details from Ads Manager:
- Auto Upload. Set the upload frequency (for example, every 12 hours), or choose Disabled for manual uploads.
- Protocol. Select SFTP (SSH).
- Host. Enter the host address provided by Ads Manager.
- Port. Enter the port provided by Ads Manager.
- In the Login details, set the Authorization type to Password, then enter the User and Password provided by Ads Manager.
- In the Extra settings, specify the Upload Directory only if required. Otherwise, leave it empty.
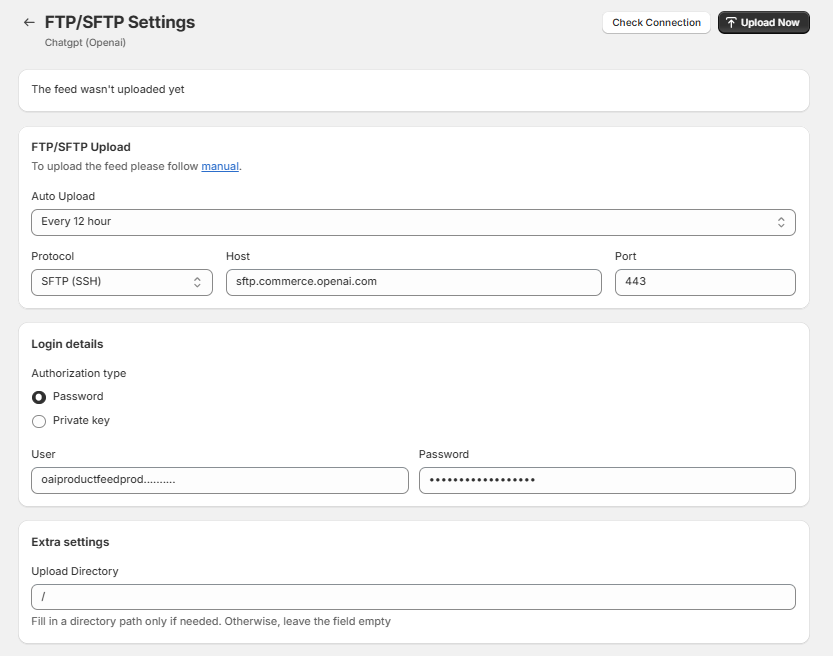
Filling out the FTP/SFTP Upload section for a ChatGPT (OpenAI) feed
- Click Save, then click Check connection to confirm it's valid.
NOTE
The connection details screen in Ads Manager showed sftp.commerce.openai.com as the host and 443 as the port. These looked like fixed values, but double-check them against your own SFTP connection details panel, since Ads Manager is still in beta and may differ per account.
And that's it! Mulwi will now upload your feed automatically according to the Auto Upload frequency you've set. You can also click Upload Now for an immediate upload.

WARNING
If Auto Upload is set to Disabled, Mulwi won't upload new feeds automatically. In this case, you must trigger uploads manually by clicking Upload Now.
NOTE
Ads created from your feed use the same format as ChatGPT's regular ad units, and the ad title and description are pulled directly from your product feed. This format may evolve as Ads Manager comes out of beta.